Ebon Hold Quest Guide (WoW)
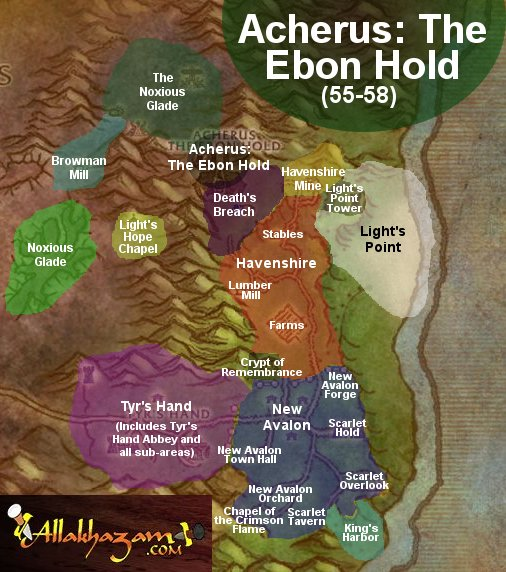
Acherus, The Ebon Hold (called Plaguelands: The Scarlet Lands in-game) is the Death Knight starting zone. The zone is unique because you must complete the quests in it to leave, and as you travel to and from the beginning section of the zone, the appearance of the rest of the zone changes with each return trip. This zone quest guide will have a unique feel to it, as all the quests are extremely sequential.
| Contents [hide] |
Inside Acherus
Your new Death Knight starts off in front of the very Lich King himself. Your first quest, In Service of the Lich King (1) sends you to find Instructor Razuvious in the back of the area. Razuvious will instruct you to find a nearby worn down weapon and runeforge it for The Emblazoned Runeblade (2) and then Runeforging: Preparation for Battle (3). At this point, you will finally get to do battle with one of the Unworthy Initiates in the ring around you for The Endless Hunger (4). This is your first chance to do battle and understand the way runes behave. Simply mash buttons and you'll survive just fine.
The follow-up quest is downright weird. After The Eye of Acherus (5) sends you back to the Lich King, his task, Death Comes From on High (6) is easily one of the most frustrating quests in the zone. Upon clicking on the controlling orb nearby, you will take control of an "Eye of Acherus" that travels to the nearby town of New Avalon. Notice that you have a new set of hotkeys, and that when the Eye is finally officially under your control that you are able to fly with it. The goal is actually very simple -- get near each of the four buildings in the quest objectives and use the analyze ability on your first hotkey. The other two abilities the eye has are rather inconsequential. When you have completed the quest, the adjusted interface will have a dismount button (the green half-circle arrow) to return to your character.
After this, The Lich King impends you to visit Highlord Darion Mograine for The Might of the Scourge (7) through the glowing teleporter nearby, and Mograine will then make you Report to Scourge Commander Thalanor (8). If you visit one of the trainers on the three side wings of this level of Acherus, they will tell you about The Power of Blood, Frost and Unholy (9), which is only nominally a quest.
From next to Thalanor, hop onto a skeletal gryphon and fly down to Death's Breach.
Death's Breach, part 1
When you report to Prince Valanar for The Scarlet Harvest (10), he will give you a new quest, and it will open up three others in the area:
- If Chaos Drives, Let Suffering Hold the Reins (11) - kill stuff nearby in Havenshire.
- Grand Theft Palomino (12) - approach a horse in the stables, mount it, and bring it back to Death's Breach.
- Death's Challenge (13) - duel 5 players or Death Knight Initiates.
- Tonight We Dine in Havenshire (14) - collect fallen arrows in the farms area.
If you are being efficiency-minded, and there's really no reason to be, focus on collecting the horse last. Go to the farm and get your arrows and your kill count first. (You can do Death's Challenge whenever.) After you return the horse by dismounting it next to Salanar the Horseman, he will give you the follow-up quest Into the Realm of Shadows (15), which is your first real taste into the instancing of the zone. Run down into where the Havenshire stables were and try to engage a Dark Rider of Acherus. Defeat him and mount his horse to take it back to Death's Breach. Salanar will join you in the shadow realm, congratule you, and tell you to speak to him outside it.[1]
When you finish all of the quests up to 15, you will be asked to talk to Gothik the Harvester (16), who wants you to reward the Havenshire miners with The Gift That Keeps on Giving (17). Go into the mine and throw his device at various miners. They will either become a ghoul or a ghost. You want ghouls, but if you get a ghost, put it to rest. Once you have 5 ghouls following you, return to Gothik. He will send you back to Valanar for An Attack of Opportunity (18).
Massacre at Light's Point (19) is quite possibly the most entertaining quest in the game. There is a mining cart outside of the mine that you can hop into it, and a peasant will cart you all the way down to the Scarlet ships at Light's Point. From here, get ready to pewpew. (Sorry, no spoilers here.) Just like quest #6, you'll have a new interface, but this one will be more interesting and enjoyable. If you get knocked out of your seat, quickly get into another one nearby.
Valanar will ask you to send the report of your Victory at Death's Breach! (20) back to Mograine in Acherus. You'll need to board one of the nearby gryphons to fly back up.
Death's Breach, part 2
After a quick run-around quest, The Will of the Lich King (21), you will be instructed to report back below. Take a moment to train if you have hit 56 by now. Also, note that each quest you complete has been awarding you talent points. You have enough now that it's worth looking at the talent trees] now.
When you return to Death's Breach, the game will attribute you to the second instancing of the rest of the zone. Things will not be as you remember them. Ride onward to The Crypt of Remembrance (22) in the rear of Havenshire. This leads to the following quests:
- The Plaguebringer's Request (23) from Noth the Plaguebringer out in the fields. For this, grab a chain from the smithy and a cauldron from tbe basement of the inn. And collect ALL the skulls you pick-up for a repeatable reward quest afterwards.
- Nowhere to Run and Nowhere to Hide (24) asks you to kill the mayor in the town hall and bring back the book next to where he stands.
- Lambs to the Slaughter (25) forces you to kill a ton of townsfolk and other scarlets in town, which you were going to do anyway.
Head into New Avalon, check the forge which is in and to the left, the inn in the center of town, and the town hall. You can enter the other buildings as well, but they're for later. Returning #25 gets you How to Win Friends and Influence Enemies (26) where you will equip special swords and beat on scarlets until one cracks and talks to you. By this point you should have a ton of scarlet skulls. Take them to Noth's cauldron for more Noth's Special Brew (27).
Within New Avalon
Behind Scarlet Lines (28) will send you to the back of the town. Another building in the back, the Scarlet Tavern, will be your new base of operations. You will get The Path of the Righteous Crusader (29) and Brothers in Death (30), both of which send you to the town barracks, Scarlet Hold. Go up to the main room on the second floor for the patrol schedule, and then down to the basement to find Koltira Deathweaver. You will need to defend Koltira for a bit until High Inquisitor Valroth emerges and you can complete the Bloody Breakout (31).
Return to the tavern and Thassarian will send you to the chapel nearby with A Cry for Vengeance! (32) where you will receive A Special Surprise (33). A Special Surprise is a rather touching quest and definitely a harbinger of things to come. Feeling probably less sure about yourself, you will have A Sort of Homecoming (34) to return to the tavern.
Report to the Scarlet Overlook in the east and use your cover. (It's an item in your bags.) When the courier emerges, jump him for Ambush at the Overlook (35). Do not go down the path with the elites. Yet. Go to the tavern first, and then ride down there for A Meeting With Fate (36), and return to Orbaz to report how The Scarlet Onslaught Emerges (37). He will open a portal and send you back to Acherus for the last time.
The Beginning of the End
Scarlet Armies Approach... (38) signals your final campaign against the scarlets. Initiate The Scarlet Apocalypse (39) for An End to All Things... (40) Namely, the end of the crusade armies as you call a wyrm and ride back into New Avalon to blast the soldiers and ballistae with your worm's breath. You shouldn't need to dive down to each a scarlet more than maybe once. Just get used to handling the yellow targeting arrow. Ballistas take more than 1 hit, and are easy to find on top of the towers by the overlook.
When you return, you will receive The Lich King's Command (41) to finish the job at Light's Hope Chapel. Ride through the cave in the northeast and look for Highlord Darion Mograine outside of Browman Mill. (You can also safely ride through Tyr's Hand.) If he is not at Browman Mill, wait for him. The events that the final showdown go through take some time, and are repeated maybe every 10-15 minutes. You need to talk to Mograine to receive your last quest, The Light of Dawn (42). Follow Mograine to the chapel and decimate the crowd. You are more or less invincible, and so are any other players there helping you. Eventually the action will stop as Mograine realizes that Ashbringer will not obey him, and the Lich King will reveal his true intentions. After a script full of twists, Mograine will grant you the ability to return to Acherus whenever needed for training or runeforging and order you to return to help Taking Back Acherus (43).
Archerus is now a war zone, with several Death Knight and Scourge littering the floor. Mograin will tell you that they managed to secure the current floor, but that second floor is still filled with abominations and that the Lich King left a little something behind - Patchwerk. He gives you the The Battle for the Ebon Hold (44) quest, which requires that you kill 10 abomination as well as Patchwerk. You will be given the same buff as earlier, making you nigh invulnerable and dealing much more damage, you'll be able to make short work of the abominations... Patchwerk however, will requires a group of Death Knight. If you are alone, you can always pull him to the guards for a very (long and boring but) easy kill.
Out of the Darkness and into the World
Patchwerk and his abominations defeated, you will have the entire world before you, including all flight points. You are effectively placed into Eastern Plaguelands at the end of the starting zone. However, Mograine has one last task before you leave. He wants you to take a portal to Stormwind/Ogrimmar and deliver a letter to the King/Warchief, to act as an ambassador between Ebon Hold and the Alliance/Horde. This is the Where Kings Walk/Warchief's Blessing (45) quest, which is really a walk of shame, you must make your way through the city without being able to mount and suffering the insult and abuse of the people. Luckily, you are accepted in, which also grants you Honored reputation with the city.
And from this point on, you are you own Death Knight, free to explore the world.
|
