Interface (WoW)
See also: Mods
One of the first thing any player must do is become acquainted with the way the game behaves overall. Please note that most of the information listed here can be found in your instruction manual.
Note that all commentary here is for the Default UI. It is possible to customize the appearance of your user interface through the use of Mods.
| Contents [hide] |
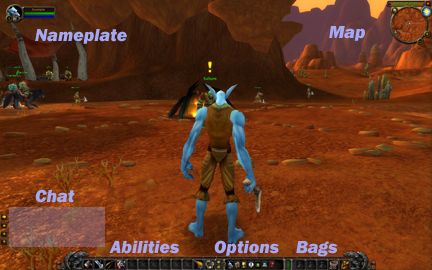
Screen Overview
| A more extensive interface | |
Nameplate
To the left is a portrait of your character, with it's name displayed above two bars. The bars show your current Health (green bar) and Mana (blue bar) as two graphs. Note that rogues, warriors, and death knights use other resources besides mana. When these bars are full, you are at 100% full health or mana, half a bar is 50% full, and so on. If your character portrait is flashing yellow, this means your character is resting.
| Nameplate | |
| Nameplate with combat symbol. | |
The small circle at the bottom of your portrait is your current level. When you are in combat, this circle will show two swords clashing, and you will be unable to do certain things like use food and water.
If you are in a group with other players, their nameplate will appear below your's, going down the left side of the screen. If you have an active pet or minion, it will have a small health and mana bar immediately underneath your's.
Chat Window
Action Bar (Abilities)
| Ability Bar | |
At the right end of this section is a pair of arrows and a number. You can have up to 6 of these bars, and the arrows select between them. Note that if you enable other Action Bars through the advanced options menu or use a UI Mod that adds more buttons to the screen, that these will use up one or more of your 6 bars. Also, you will get a Pet Action Bar that appears above this area when you have an active pet.
Menu Buttons (Options)
In the middle of the toolbar are the options buttons. These allow you to view other menus within the game. From left to right they are Character Info, Spellbook & Abilities, Quest Log, Social, Looking For Group, Options and Help Request. At level 10, another button will become available to take you to the Talents screen.
| Options and Bags. | |
Bags
The right end of your tools is your inventory. There are five slots where you can place bags. The sample image shows three slots with bags in them, an ammo pouch, and the basic backpack. Clicking on a bag displays its contents.
The right-most of these slots will always be your backpack.
Experience Meter
Above the length of the tool bar is a thinner bar with 20 blocks in it. This represents your progress toward the next level. You can also note from this meter if you have any rest experience, and mousing over it will tell you the exact numbers of experience you have and that you need for the next level. The experience meter will disappear at the level cap.
From the reputation window, you have the option of displaying your reputation with a particular group in a bar that will appear below the experience meter. This is helpful if your goal is to get to neutral with the Timbermaw Furbolgs, for example. This will not normally be displayed.
 Basic Map. |
 Map with Track Beasts active. |
Minimap
In the upper-right of the screen is the minimap. The name of the area you are in is displayed at the top. If you are not at a particular Point of Interest, it will display the zone name. The circle beneath that is an overhead map of the area around you. Note that the central arrow represents the direction you are facing.
Along the edges of the map are several smaller circles. The bottom-right + and - buttons zoom the map in and out. The image of a sun or a moon on it represents the time of day and will give you a clock if you mouseover it. The upper-left circle can be clicked on to see a map of the overall zone. The small icon beneath that in the second image is a Tracking icon.
Tracking represents the ability of certain classes and races to be aware of nearby objects, usually people and creatures. Certain tradeskills also allow for a tracking skill. Activating a tracking ability will show all the nearby objects of that type around you. In the image shown, the hunter is tracking beasts.
Some mods will also place a small circle around the edge of the minimap for their options panels.
Buffs and Debuffs

Buffs/Debuffs and Zone Objectives
Zone Objectives
In a few select zones, there are outdoor PvP objectives. For example, in Hellfire Peninsula, there are three towers that your faction is trying to take control of. If your faction controls all three, you receive a bonus effect that adds 5% to your damage while in the zone. If the opposing faction takes control of any tower, you lose this effect. The top-center of the screen reveals information about the status of these objectives.
Targeting
When you point to a person or monster, there will be a display in the corner indicating their name, level, creature type, and perhaps the reputation they are associated with. This window will appear with a background of green, yellow or red to indicate if the target is friendly, neutral, or hostile.
When you click on this creature, they become your Target, and appear at the top-center of the screen. There, you will get information about their health and mana. More importantly, this is who your next action(s) will be directed toward. So usually this will be an enemy, but you will want to target yourself or allies with healing spells!
Underneath a target, you might also see their buffs or debuffs. You will not see buffs for an unfriendly target.
 A yellow target. |  A red target. |
Menus
Character Window
The character window allows you to see vital information about your character. The main tab will show information about your character's stats, as well as your gear. If you have an active pet, it will have a similiar tab also. After this are tabs for your reputation, your skills, and your PvP accomplishments.
 Character Tab |  Reputation Tab |  Skills Tab |  PVP Tab |
Spellbook
(Default key: P) The spellbook gives you access to the entire list of abilities your character has. The primary purpose of the spellbook is to drag these skills to your Action Bar. The window will have four tabs down the side for "General" abilities and each of the three areas of focus for your class. Hunters will also find a pet tab at the bottom when they have an active pet.
| A quest in the quest log | |
Quest Log
(Default key: L) Your quest log will maintain up to 25 quests for your character, and monitor the progress you make in each. You have the ability to abandon, share, or see specific details about your current quests.
Talents
(Default key: N) The talent screen shows your three class talent trees, as well as where you have spent points in them and how many unspent talent points you have. If you want to spend additional talent points, you simply click on the talent you wish to spent points in. Even if you do not want to spend points, reviewing this window to learn about what options you have as a is often a good thing.
Socials
(Default key: O) The socials menu is where you receive information about other players. There are five tabs under socials. The first is your Friends List, where you can remember players that you had good experiences with or when you want to know at the push of a button if a particular person is online. The Ignore List is the exact opposite, forcefully shunning all communications from particular people that annoy you. Who, in addition to being a slash command, is the third tab where you can do a quick census of what players are in a given area or of a certain level or class. This portion of the window often appears when you use a normal /who command and the results are too large to comfortably display in the chat window. The guild tab will list all the people you have in your guild, and you can choose between ALL characters and currently-online characters. An officer in the guild has additional options from this menu. The final tab is for raids, and will show all the players in each group.
LFG
The Looking For Group tool enables you to find other interested people for a party. While many players do not regularly use the LFG tool, those that do and are familiar with the window will be able to efficiently find players that want to go. Granted, these will be random people and not your best friends, but sometimes a Pick-up Group is necessary.

The Options Menu.
Options Menu
(Default key: Esc) The Options Menu provides access to controls for the game related to Video, Sound and Voice, and the Interface. Each of these has a good many choices in it that some players consider rather essential. See the Options Menu article for more details.
Additionally from here, you can control your Key Bindings, create macros, or log out to the character select screen or quit entirely.
Other Windows and Pop-ups
NPC Interaction
Right-clicking on some friendly NPCs will enter a dialog with them. A merchant will try to sell you their wares. A questgiver will offer you their quest. A banker will let you see your stored items. Some NPCs will simply talk to you.
Auction House
One particular important dialog from right-clicking an NPC is the Auction House, which gives the player options to put items up for auction, or bid on other players' items. Even players not interested in playing the AH market for money will use the Auction House from time to time.

An open Backpack and Quiver.
Bags and Inventory
(Default key: Shift-B) If you click on any of the bags located on the right side of the ability bar, a pop-up of the contents of that bag will appear. Your backpack will also display the amount of money you have.
Zone Map
(Default key: M) The zone map shows the overall geography of the region you are in. Areas that have not yet been explored will appear as blank brown. The map is crucial for navigating at times.
Cast Bar
If you are in the process of completing some effect that takes time, a Cast Bar will appear on-screen to indicate the progress. There are some very similiar bars that will also appear. A channeling meter can occur during an on-going effect you need to concentrate on, such as applying a bandage. If you dive underwater, you will get a meter for your breath, and traveling into deep water may cause your fatigue meter to appear.
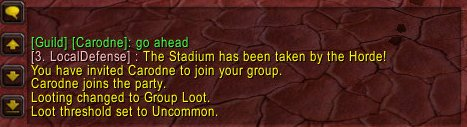
Decision Pop-up
Sometimes events will force you to make a decision that the game wants you to be aware of. For example, if someone invites you to a group, a box will appear in the middle of your screen saying that you are invited to a group, and offer the options to join or refuse. Most of these dialogs are initiated by another player's actions. Quest sharing, joining a battleground and starting an escort quest are some other times this can occur.
Using the Mouse
Being an effective WoW player will require the use of both the mouse and the keyboard. The left mouse button is generally used for targeting things, and the right mouse button is used for interacting with them. For example, if there is an enemy near you, left-clicking on it will make it your target, and right-clicking on it will cause your player to attack it. (Depending on the options you select in the Options Menu, your character may also run up to targets that it is not close enough to.)
Right-clicking can be used for many other things, such as talking to friendly NPCs, looting corpses, searching treasure chests, picking up ground spawns, opening doors, and can even be used to move to a particular location if Click to Move is enabled. In each of these cases, when your mouse is pointing at something you can interact with, your mouse cursor will change shapes into something more appropriate for the target.
When looking at your inventory, the left button will allow you to "pick up" an item so that you can drop it somewhere else in your bags (or in your character window to equip it.) In your spellbook, the left mouse button can be dragged to action bars to place abilities on them.
Also important to note, holding down the LMB will allow you to pivot the camera so you can see behind you quickly. The RMB will do the same thing, however it will also turn your character. While you can turn with the keyboard, the mouse is much faster, which is important in PvP. Holding both buttons together will make your character run forward.
Additional mouse buttons can be configured in the Key Bindings menu.
Using the Keyboard
There are a great many things that can be done with the keyboard -- many more than the scope of this article. The Default Keys article will list most of these controls. Some noteworthy other commands are:
- F1-F5: target self and party members
- Tab: target nearest enemy
- W,A,S,D: default keys for movement. The arrow keys also move.
- Space: jump
- Slash (/): initiate a slash command
- Num lock: auto-run
- Print screen: take a screenshot
- Ctl-Z: hide the user interface, handy for screenshots
- Shift: using in tandem with the mouse, shift will do several things...(example shift + right click to loot will automatically loot everything at once into your bags. This is a much faster way to loot items or dead creatures.)
- Split a stack
- Auto-loot a corpse
- Link an item into the message bar
Mods
A "mod", also sometimes called an add-on, is a modification to the user interface. World of Warcraft was designed with the idea in mind that some players may want their interface to look or work a slightly different way. A mod will allow a player to do just that.
Mods are independent files that are downloaded from various websites such as WoWInterface or Curse Gaming. They must be placed in a specific sub-folder in your World of Warcraft folder, and then must be activated for a character using the Add-ons button on the character select menu.
Most mods are cosmetic in nature. They change the way information is presented in the game, or show additional information that the Default UI does not display. There are some mods that allow the player to do things they would not otherwise be able to do. However, since all the tools and scripting options available to mods were put there by Blizzard, it falls on them to police what mods are capable of.
Note that a mod is not the same thing as a hack. Hacks are seperate programs or modifications to the main program itself to do things that are not meant to be possible at all, and almost all hacks are created with the explicit purpose of cheating.
See Mods.
Macros
Macros are pre-set routines for performing actions that can be executed by slash commands. An example of a time to use a macro might be a hunter that consistently starts a fight by sending his pet, casting Hunter's Mark, and attacking. After pushing three separate commands at the start of every battle, the hunter might decide to create a macro to perform all three of these actions with one keystroke.
Note that macros can not be used to perform a series of actions. Any ability that triggers the Global Cooldown can not be used in a macro with another ability that uses the GCD. However, simple things like assisting the MA can be made into an easy one-line macro. Some logic can even be applied to macros, allowing a player to use an ability only under certain circumstances. Again, however, the amount of options available is intentionally limited to prevent botting.
See Macro.