Azuarc's Leveling Guide part 21
Azuarc's leveling guide for Alliance, Act 21: Terokkar/Blade's Edge Mountains (66-67)
Return to Terokkar
Act 19 spent time in Terokkar Forest, and at the end of it, the zone was abandoned for greener grass in Nagrand. The grass isn't any greener in the Bone Wastes now, but the mob's level icons are, and that means it's time to bum rush the remaining quests here. Some of these quests are not very appetizing to attempt at 64, but are much more feasile at 66. Chances are, they'll all be finished before reaching 67.
Take the southeast exit out of Nagrand to enter Terokkar, aka The Low Road. After a short ride through some forested areas, you should be able to find Sha'tari Base Camp. There are a number of quests that are to be had here, including one that immediately starts an escort. Before starting the escort, here's what you should make it a point to have in your log:
- An Improper Burial
- Helping the Lost Find Their Way
- Taken in the Night
- Veil Shalas: Signal Fires
- The Dread Relic
It's possible you might have a couple other quests. There were a few from the refugee caravan that we left for dead. But we'll begin with Digging Through Bones.
Scene 1 - Sand Gnomes (level 66)
Quests completed: Digging Through Bones, Fumping
Talk to Dwarfowitz and he'll send you to guard an excavation team. If you casually walk behind the dwarves, there shouldn't be much of interest that happens other than getting attacked by maybe one scorpion. When the expedition lead bangs on the drum they encover, a bone worm will appear and you'll have to kill it. The quest may be marked group, but, well, it really isn't.
Return back to base camp and you'll be given a follow-up to use the drum yourself. Step away from the camp far enough for your map to say simply "The Bone Wastes," and start drumming. You'll have about a 50/50 shot of getting a bone worm or a sand gnome. If you get a bone worm, loot it. Kill 8 of those and go back to Dwarfowitz. There is a follow-up that *is* a group quest, and you'll have the option to do that in the next scene along with a couple other group activities, so feel free to start recruiting. If not, it's no travesty to skip.
Scene 2 - Burning Spirit Spiders's Relics for Signal Fires (level 66)
Quests completed: An Improper Burial, Helping the Lost Find Their Way, The Dread Relic, The Big Bone Worm (maybe), For the Fallen, Terokkarantula (maybe), Taken in the Night, Veil Shalas: Signal Fires, Return to Sha'tari Base Camp
This scene will be a hodgepodge of a few different objectives, and might be a two-parter for you.
Start off by traveling east, and staying along the southern edge of where the Auchenai warriors are fighting the Sha'tari vindicators. You want to torch the yellow-text corpses on the ground. (The mobs that die from fighting each other or you do not count for the quest.) You should be able to finish this quest without actually getting into battle much or maybe at all.
The next goal is Helping the Lost Find Their Way. Along the southern edge of the zone, and also further east up to the Derelict Caravan, are Broken Skeletons and Lost Spirits. As you travel east, lay to rest anything you encounter. If you do not finish this quest now -- and you do not need to -- there are Broken Skeletons all along the eastern side of Auchindoun, and Lost Spirits along the west. When you reach the Derelict Caravan, approach it with caution: There are both invisible opponents and there might very well be a giant circle of weenie zombies around the chest you need to access. If there wasn't one before you open the chest, there definitely will be afterwards. Shift-click the chest so you autoloot it, and immediately mount as soon as you grab the Dread Relic so you can ride out. Continue east.
The next area you will arrive in has clefthooves. If you are going to be attempting The Big Bone Worm, kill a clefthoof and use your Fumper at the corpse. You will want at least 3 people for this quest; the boss is not pretty. The other two group quests in this scene are actually soloable by some classes, but this one is not.
Even more eastward is Vindicator Haylen, who has a quest to kill the Dreadfang Widows in nearby Netherweb Ridge. Move slowly through the area, and also take note of any time you see a webbed creature. Attack these from ranged. There is a rather poor chance of actually freeing one of the Sha'tari from the web, and a much more likely chance that you will uncover one of several different random other enemies. You're going to have to open a lot of webs, and it's VERY frustrating if you actually do battle with the opposition you bring down on yourself. My advice is don't frustrate yourself finishing this quest immediately. Just get the 20 kills for the Vindicator's quest and return to him for the follow-up. As you head back in and back out, that is when you should focus on trying to finish Taken in the Night. However, that return trip might be more than you can handle by yourself, depending on your class and spec. The Terokkarantula is not really meant to be soloed, although I can say for certain that a level 66 Beast Mastery hunter can do it. If your character isn't a soloing powerhouse, you probably want some help with the giant spider, or you want to leave it alone. It dwells in the very far southeastern corner of the area.
Your final objective will include an escort. The quest suggests it's for at least two people, and Skywing is certainly easier to do with more people, but it can be handled alone if you're smart. Just make sure to pace yourself, since he does not wait for you to get health and mana back. Skywing is a bird flapping about near the entrance to Veil Shalas. Follow him through the Arakkoa nests, and be sure to touch the 3 signal fires his route passes you by. (If keeping up with him proves too much, leave them and come back. At least you'll know where they are.) At one point, Skywing does jump over the edge of a platform. Shortly after that, he'll cross a bridge to the boss. The first signal fire is at the top of the tree you climb inside, the second is right before the jump, and the third is where Luanga the Imprisoner meets you. Luanga will not be an easy fight, but the nail in the coffin will be if you end up with an add during the fight. Stay behind Skywing as he reaches the last platform and don't aggro anything he doesn't, even if it makes fearing much more difficult.
The final signal fire is in the northern end of Veil Shalas. There are actually two entrances to Veil Shalas, and the northern entrance splits the area into two. The much smaller northern area has but one ramp leading up into the trees, and the final signal fire is among those platforms. Return to the refugee caravan and then the base camp. Make sure you finish Helping the Lost Find Their Way along the way if you haven't already.
Scene 3 - Looking for a Hero (level 66)
Quests completed: A Hero is Needed, The Fallen Exarch
At the base camp, you'll be given an additional quest to attack the Auchenai that are battling the Sha'tari in the southwest corner of the wastes. Kill 12 initiates and 5 doomsayers by getting close to the outer ring of Auchindoun, but following outside it to the east. Once you've killed those, return for another follow-up. You may have noticed that the doomsayers free the spirits of the corpses you were burning in the last scene, and those spirits walk off toward some unknown goal. This time you want to follow them to a chest along the western side of the inner ring of Auchindoun. Clear the cultists around the large tomb there, and then attack the Reanimated Exarch. Return to base camp.
Scene 4 - Inner City Vigilante (level 66)
Quests completed: Return to Shattrath, The Skettis Offensive
Take your favorite mode of transportation back to Shattrath. You'll want to pay a visit to Rilak the Redeemed in the northern end of Lower City, and you may want to bring a friend with you. (It shouldn't be too hard to recruit *somebody* to help you in Shattrath.) Finish Skywing and Return to Shattrath, and Rilak's buddy will tell you that the Arakkoa are attacking. Thus begins The Skettis Offensive. This is a timed battle, so if you fight slowly, you will eventually get overrun. Initially you only need to fight 2 kaliris. However, another wave of 2 comes shortly afterwards, followed by a wave of 3 more. The fourth wave is one big elite bird that will finish you off very quickly if you haven't cleared out the smaller birds by now. It hits decently hard, so having a second person so you can have a cleaner fight is definitely recommended.
Scene 5 - The Blade's Edge (level 66)
Quests completed: No Time for Curiosity, Killing the Crawlers
It's time to move on to another zone. If you have anything left from your older material that you want to finish, go do it now. Otherwise, feel free to drop your entire log and fly out to Orebor Harborage to start on Blade's Edge Mountains. Tim the Specialist will have a delivery quest to take to Sylvanaar, the first town in the zone, and there will also be a quest along the path through the tunnel that takes you there.
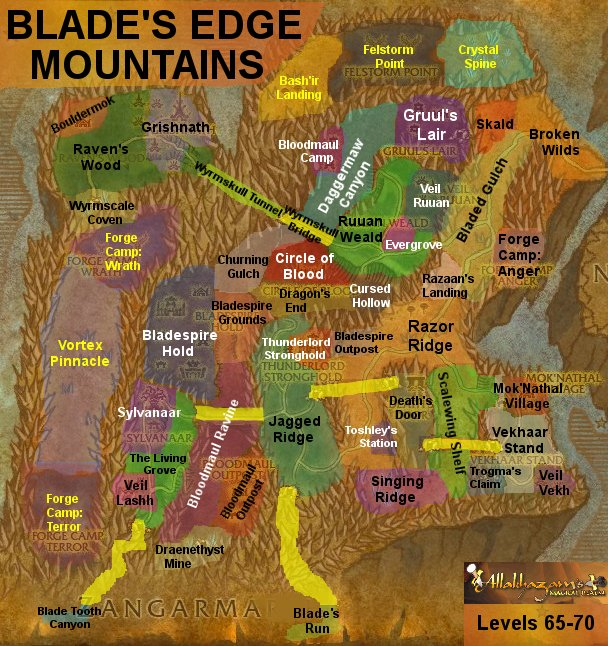
There are three towns in Blade's Edge Mountains, Sylvanaar, Toshley's Station, and Evergrove. Not counting the flight-only areas marked with yellow text on the map, Sylvanaar's quests focus on the southwestern portions of the map, only reaching outward as far as Bladespire Hold and Jagged Ridge. Toshley's Station quests share the rest of the southern half of the zone, focusing on the sections around Razor Ridge. All points north are out of Evergrove. Each town has a flight point, though some are lacking other basic amenities. (You'll be hard-pressed to find a Stable Master, for example.) Fortunately, the flights between the towns are short, and mostly unneeded.
This act will focus on Sylvanaar quests. The other two centers will be in the next section of the guide.
Regarding getting to Sylvanaar, just follow the road out of Orebor to the north past Blade Tooth Canyon and into The Living Grove. (The yellow part of the map is the tunnel you follow.) Go around Veil Lashh and on north to Sylvanaar. You should be able to pick up the following quests:
- Into the Draenethyst Mine
- Malaise
- Strange Brew
- The Bloodmaul Ogres
- The Den Mother
- The Encroaching Wilderness
Scene 6 - Lashhing Out (level 66/67)
Quests completed: The Encroaching Wilderness, Malaise, Scratches
Our main focus for the first trip out of town is to Veil Lashh in the south. So it may seem odd when you are told to leave town by the northeast exit, but this is what you will do. Hop your way from lynx to lynx to finish The Encroaching Wilderness before you reach Veil Lashh. There are barely enough cats to do this, and we don't want to deal with it on the return trip.
Upon entering Veil Lashh by any entrance of your choice, you'll need to start killing Arakkoa. After you've collected enough plucked feathers, a few spots will appear on your map where there is a Lashh'an Tome you can read. These are generally up in high places, so as you are killing, focus on finding your way into the treetops.
After you've consulted with the tome, look for one of the spell circles that you've no doubt had some of your opponents run toward already. Use the fistful of feathers there and get a bird spirit. Return to town without dying. If there's respawn behind you, it's usually bad news to try to ride through on your mount. Fight your way out.
Scene 7 - Wolves (level 66/67)
Quests completed: Marauding Wolves, The Den Mother, Test Flight: The Zephyrium Capacitorium
Leave town by the northeast exit, and this time actually go across the bridge into Jagged Ridge. Stay away from the Horde town in the northeast. The entire area consists of just wolves and chimeras. Kill four wolves and take their tails. Find your way to the other tunnel into the zone, all the way to the south, and kill Rema.
Once you've done that, go east up the hill by R-3D0 and up to Toshley's Station. Grab the quests if you like, but there's only one we care about because you'll have a cooldown before you can do the next link of the chain. Talk to Rally to go on a little trip...right back to where you fought Rema. Return to Sylvanaar.
Note about Toshley's Station: Periodically the station comes under attack by throngs of ravagers. Hide in a corner for a few minutes and the town guards will eventually fight them all off. There's little to no point in participating, however all the questgivers become too busy in the action to talk to you.
Scene 8 - Bloodmauls (level 66/67)
Quests completed: Protecting Our Own, A Dire Situation, Into the Draenethyst Mine, Strange Brew, The Bloodmaul Ogres
Go south into the grove and click on five of the little shrubs. Return to Sylvanaar immediately to finish Protecting Our Own.
Then head south again and take one of the two ridges that leads down into Bloodmaul Ravine. Around the southern edge of the ravine, you will find a number of ogres, wolves, kegs, and a mine. You have a quest involving each of these four things. Depending on competition, the hardest to get will be the booze. Focus on finding kegs and brewmasters as you wrack up a kill count, shrink some wolves, and eventually make a quick trip into the mine nearby. Complete all four quests, and return to Sylvanaar. Keep any extra beer you come by.
Scene 9 - Bladespires (level 67)
Quests completed: The Trappings of a Vindicator, Gorr'dim, Your Time Has Come..., The Bladespire Ogres, Getting the Bladespire Tanked, Planting the Banner (maybe)
Head down into the canyon, and go north this time until you reach Bladespire Hold. Stay along the road until you find Vindicator Vuuleen in her cage. Grab her quest, and then start exploring the large buildings for the two ogres she names, Droggam and Mugdorg.
You'll notice that there are 6 buildings shown on the map. Droggam is in the middle-left; Mugdorg is in the lower-right. Both are below the upper ridge where another large building houses Gorr'dim. The trick to luring out the named ogres is using your beer. If you put a beer down, one of the two non-elite guards will come. Pull one that way, and then the other, and then stand on the edge of the room and drop a beer to pull the named. He'll come without his sober guards, and you can ambush him there.
The vindicator will send you after one more named guy, Gorr'dim, who is in the upper-left building. Same routine as before. After that, talk to Vuuleen, and then go back up to Sylvanaar. (Well, once you have your 30 kills, anyway.) You're welcome to attempt Planting the Banner on the way back if you've got friends. Otherwise, just drop the quest.
Toshley's Station
This should wrap up all of the quests you've had out of Sylvanaar. One down, two to go. Pick up all the quests you can find in Toshley's Station, including:
- Test Flight: The Singing Ridge
- Building a Better Gryphon
- Crystal Clear
- Parts for the Rocket-Chief
- Picking Up Some Power Converters
- What Came First, the Drake or the Egg?
We'll start on those in Act 22.
|
