Azuarc's Leveling Guide part 20
Azuarc's leveling guide for Alliance, Act 20: Nagrand (64-66)
Green Acres, We Are Here!
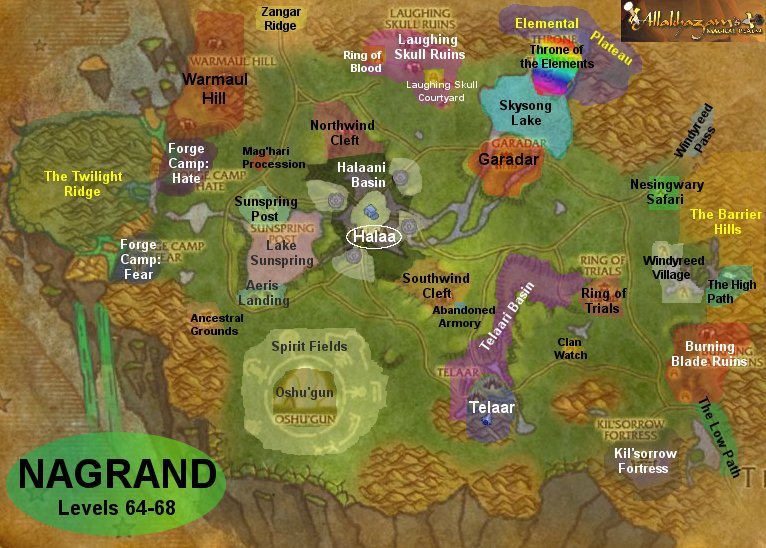
Welcome to Nagrand, home of slaughtering tons of creatures for no apparent reason. It's a pretty landscape, though. Better than the bleak environment of Terokkar Forest or the wastes of Hellfire Peninsula. Be prepared to do a few really long outings, or to break up these scenes as needed.
From Shattrath, travel north into Zangarmarsh, a little west, and then south again. There are four different routes into Nagrand, but this is where we will start. FYI, you may occasionally get Oshu'gun Crystal Sample from mobs in this zone. That's usable in the central PvP area, Halaa. Also, if you kill a Wild Elekk, hold onto the tusks, which another faction will want. Neither are super important, but you will want at least 3 tusks eventually.
Lots of your early time in Nagrand involves beating up on the wildlife because the very first person you will encounter when you enter Nagrand is Hemet Nesingwary of Stranglethorn fame. He's on safari hunting the windrocs, clefthooves, and talbuks, and he wants you to join him. Take his three quests, and we will begin!
Scene 1 - Endangering the Species (level 64/65)
Quests completed: The Underneath, Windroc Mastery 1, Talbuk Mastery 1, Clefthoof Mastery 1, The Tortured Earth, The Howling Wind
From Nesingwary's camp, head west, but stay north of the road. Garadar guards are not very friendly and will beat you to a pulp very quickly. Try to kill a single air elemental along the way so you can acquire Howling Wind. When you reach the edge of the lake, swim across it to the north, where you will find the Throne of the Elements. There are various questgivers here, including a quest called The Tortured Earth. Make sure you at least grab that one, and swim back across the lake.
At this point, just roam around looking for clefthooves, talbuks, windrocs, and earth elementals for your various quests. It'll be a bit of grinding to knock all these out, but they have follow-ups we want. Rocs are mostly north of the road, talbuks are largely south of Garadar. The clefthooves and also the elekks roam around. Kill those when you find them. Earth elementals are near crags and cliffs. You can range as far South as the Halaani Basin.
Head back to Nesingwary and Throne of the Elements to complete the quests you have for them. After that, get on one of the southern roads into Telaar. Grab quests, get the flight point, set your hearthstone, and all that fun business. And then take a break.
Checklist
Your quest list, not counting old Terokkar quests, should resemble the following at this point:
- Blessing of Incineratus
- Do My Eyes Deceive Me
- Muck Diving
- Talbuk Mastery 2
- The Throne of the Elements
- Wanted: Giselda the Crone
- Wanted: Zorbo the Advisor
- Clefthoof Mastery 2
- Fierce Enemies
- Murkblood Corruptors
- Shattering the Veil
- Solving the Problem
- Stopping the Spread
- Windroc Mastery 2
- The Ravaged Caravan (requires Kurenai friendly)
- He Called Himself Altruis... (requires 66)
Scene 2 - The Ogre Problem (level 65)
Quests completed: Do My Eyes Deceive Me, Not On My Watch!, Mo'mor the Breaker
This is a quicky. Just east of Telaar is a large rock mound. On the south side of the mound are several Boulderfist Hunters and a named ogre, Lump. Kill the hunters until you get Boulderfist Plans and take them back to Huntress Bintook. Return to the area and go "interrogate" Lump. On the way back, circle around the mountain and find the goblin Wazat by himself, and pick up his quest as well.
As you pass by Clefthoof Bulls, feel free to kill them to soften up the push you'll need to make later. Talbuks, too, but that's not as big a deal.
If you receive any Obsidian Warbeads, hold onto them if you care about reputation. Two different factions collect those, and unlike most quests, they go all the way to exalted.
Scene 3 - More Ogres (level 65)
Quests completed: The Ruins of Burning Blade, Fierce Enemies, HELP!, I Must Have Them!
travel south to the Burning Blade Ruins. The entrance to the ruins the southern end of the area. Just after you enter, you should find a caged Broken named Corki. Promise to help him, and then set out to kill 15 of each type of ogre here. Note that there are three general areas you can find the ogres in case there are level 70s farming for reputation: there is the initial area where you start, there is the area up in the hills to the north by Lantresor the Blade, and there is a cave in that upper area. Hunt through any or all of these to get the 30 kills you need, and then return to Corki and set him free on your way out.
As you leave, swing a little south of the road to Telaar and look for Dust Howlers. Kill 3 of them, and a few clefthoof bulls for good measure, as you return to town.
Scene 4 - Oh Halaa! Even More Ogres! (level 65)
Quests completed: Corki's Gone Missing Again!, The Twin Clefts of Nagrand
You can potentially go directly into the next scene after finishing this one. If you do, it will be a long trip out, but slightly more streamlined.
Leave Telaar northwest en route to the Southwind Cleft. As you step out of town, kill a few ravenous windrocs to lighten your load later. 5-10.
In the Southwind Cleft is...more ogres. Kill some. Get the quest at least half-complete as you fight your way through the cave. Then head north through the basin around Halaa, killing Muck Spawns to finish Muck Diving, and any Enraged Crushers you see, as you continue on to Northwind Cleft. Fight to the back of the cave and open Corki's cage, and then hang out until you finish your ogre-slaying.
Kill some more Enraged Crushers on your way out...to the North if you continue on to scene 5 immediately.
Scene 5 - Twisted Elements (level 65)
Quests complete: Muck Diving, A Rare Bean, Agitated Spirits of Skysong, Talbuk Mastery 2, The Throne of the Elements
From scene 4: Use the ramp on the western edge of the canyon to climb out, and circle around to the northeast. (If you see Murkblood Invaders, kill one and loot it.)
From Halaa: Travel between Halaa and Garadar to the west side of the lake bordering Garadar and the Throne of the Elements in the north.
Kill any Enraged Crushers or Clefthoof Bulls you encounter. Don't go all the way to the throne, though. Instead, stop just west of the lake, where you will find a lot of talbuks and some piles of dung all over the ground. Grab your dung while getting the rest of your talbuk kills for the second mastery quest. When you finish both quests, then finish the trek to Gordawg and the other elementalists.
Scene 6 - Reth Reth Reth (level 65)
Quests completed: Blessing of Incineratus, Diplomatic Measures, Armaments for Deception, Ruthless Cunning, Wanted: Giselda the Crone
Begin by traveling northeast to Windyreed Village. Clear into each of the buildings and use your Living Fire.
After you've burned each of the four huts in the village, return to the Burning Blade Ruins and head up the slopes toward Lantresor the Blade. Listen to his story, and then leave the area south toward Kil'sorrow Fortress. Kill stuff and plant flags in the bodies, and find Giselda the Crone in the main building and take her head. You should be looking for flat square boxes that contain Kil'sorrow Armaments as well, but once you get to Giselda's room, you can hang out in there and repeatedly pick up the four boxes that spawn there until you finish.
Take your dirty deeds back to Lantresor.
Scene 7 - Laughing at Ogre Skulls (level 65/66)
Quests completed: Wanted: Zorbo the Advisor, Windroc Mastery 2, Clefthoof Mastery 2, Eating DamnationBody of Evidence, Returning the Favor, Message to Telaar
The next goal is in the north central part of the zone, the Laughing Skull Ruins. We have three quests to do there, but equally important, we have kills to get along the way.
Leave Telaar northwest and kill your way through the birdies until you complete your quest. Go east around Southwind Cleft and all your windrocs should become replaced by clefthoof bulls if you still need any more. We're finishing the mastery quests now. Work all the way north, passing east of Halaa, (or through it if you want to and your faction controls it,) into the ruins. If you see the Murkblood Invaders along the road, feel free to attack them -- they drop a quest starter for scene 8, and you only have to actually kill one of them like the Winterfall Runners. You must finish your Enraged Crusher kills now, however.
In the ruins, there are three possible points of interest. From west to east:
- The Ring of Blood. This is a fun event, but takes a group. Save this for later.
- Zorbo's cave. Up a path in the center of the ruins, you will find Zorbo the Advisor. Kill him.
- The courtyard. Clear out the courtyard first, then walk up to the bonfire and use your blanket to call in the friendly ogres.
In addition to that, every time you kill an ogre here, plant a banner in their body. When you are finished, get the remainder of your clefthoof kills and head east to Throne of the Elements where some quests need to be turned in. Finally, swim across the lake to Nesingwary's Expedition and complete the masteries.
Visit Lantresor in the Burning Blade Ruins, and then return to Telaar. At last we are finished with killing ogres...I wish.
Status Check
You have slowly cleared out the eastern two-thirds of the zone. And as you have approached this point, you have probably noticed an alarming trend: your quest log is filling up with group quests.
Unfortunately, that's no coincedence. And you are going to have to make a conscious decision -- do you worry about those quests, or just leave them be? You won't need them to get to 70, but some of them (like the Ring of Blood) can potentially be some very fast experience.
As a result, I recommend that you read EACH of the scenes in the rest of the act (or at least the quests completed list) to clean up some of what was left behind. You can take these in any order, with the exception of going after Tusker. While I describe the two soloable sections first, you should definitely be thinking about looking for groups for the rest now, or accept that you will be putting them off while you leave the zone.
Altogether, your quest log should currently look like:
- Bring Me The Egg!
- Talbuk Mastery 3
- The Spirit Polluted
- Clefthoof Mastery 3
- Corki's Ransom
- Gurok the Usurper
- Ortor My Old Friend... (from Murkblood Invaders drop)
- Shattering the Veil
- Solving the Problem
- Stopping the Spread
- The Ravaged Caravan
- Wanted: Durn the Hungerer
- Windroc Mastery 3
- He Called Himself Altruis... (this is a prequest for "Buying Time")
Scene 8 - The Ethereal (level 65/66)
Quests completed: The Consortium Needs You!, A Head Full of Ivory, Stealing From Thieves, Gava'xi, Matters of Security, Shattering the Veil, Murkblood Invaders (maybe)
For once we have a scene that has absolutely nothing to do with ogres. Ride down the road to the west, toward Aeris Landing, where you will meet the Consortium. Pick up the quests you can, turn in all the Elekk Tusks you've gotten up until now, and head back down the road to the east.
At the far east end of the Spirit Fields, venture in. A few key landmarks to watch out for:
- Durn. Giant monstrous one-eyed fella'. You'll know him when you see him. Stay away.
- Banthar. The boss Clefthoof of the zone. Not quite as bad mojo, but still bad.
- Tusker. Giant Elekk that stands on top of the ridge in the northeast corner of the Spirit Fields.
You may very well kill all of those eventually, but for now you want to go south from Tusker's perch (which is visible on the map) to the next rock outcropping. Just west of it should be some ethereal mining a crystal fragment, and *somewhere* in the area will be Gava'xi. He takes a strange patrol, so sometimes he's hard to find, but hang out here and eventually he will find you. While you're at it, kill the ethereal and collect crystal fragments for Stealing From Thieves. Feel free to collect more if you want to since it's a repeatable quest for Consortium reputation. Meander southward, killing voidwalkers for Matters of Security, until you get to the edge of the world. Throw Gordawg's boulder at the Shattered Rumblers, and they will break into 2 or 3 little Minions of Gurok. Those guys die EXTREMELY easy, but you have to get 30 of them, which means using 13 or 14 of the big rock guys.
Once you have finished all four of those quests, ride back up to the road and into Aeris Landing. Scene 8 picks up immediately where this one ends.
Scene 9 - Sunspring Village (level 66)
Quests completed: The Spirit Polluted, Murkblood Corrupters, Ortor My Old Friend..., Solving the Problem, Stopping the Spread, He Called Himself Altruis..., Survey the Land
Go to Aeris Landing, and jump in the lake to the north. Kill 10 Lake Surgers and Watoosun at the bottom, and then swim toward the northern shores. Be careful as you approach, as there are mobs along the lake's edge.
You are going to need to do four things in Sunspring Village. One of them is actually easiest done while you are still in the lake. You should notice some submerged Sunspring Villager bodies. Use your torch on them to burn the bodies. You can get most of your 10 before ever going onto the shore. After that point, move through the village killing all the broken there. To go after Ortor, you will need to go into the main building, and the fight can be challenging. Other than that, this area isn't bad as long as you are careful not to get overwhelmed.
There is also an escort quest in one of the side huts. It is not recommended you worry about that quest. However, one thing we can easily do along the western part of the zone is visit Altruis the Sufferer. You will find a small stream that crosses the road due west of Sunspring Village. Altruis is along the northern bank of it. Watch out for Bach'lor.
Scene 10 - Warmaul Hill (group)
Quests completed: Talbuk Mastery 3, Windroc Mastery 3, Corki's Ransom, Cho'war the Pillager, Gurok the Usurper, The Ravaged Caravan
This is the first group section. If you have no interest in doing any grouping quests, just go to the next act now.
As you try to put together a group for Warmaul Hill, ask them if they will be willing to kill Bach'lor and Gutripper along the way. Bach'lor is just northwest of Sunspring Village. Gutripper is far to the northwest near Warmaul Hill. You'll want to try to get these done before scene 10, but you might convince your group for the next expedition to bump off these two.
Follow the road up into Warmaul Hill, and look for crates as you go. They will be all over, so just get them as you proceed. Where the path forks, stay to the left, and you will reach an area with a cave mouth on the east and a cave-thingy shaped like a dragon's mouth to the west. Go in the normal cave and fight to the back. You will need to defeat Warmaul Chef Bufferlo to reach Corki's cave and speak with him, only to find out that you need another key to free him.
Leave the cave and enter the dragon mouth. Fight through the entire twisting passage as it winds upwards, out and back in, and ultimately to Cho'war the Pillager. This is where you really need the group, as Cho'war is no pushover. Kill Cho'war and loot his body to get the key. Climb back down and head outside. Hack your way through the cave and free Corki, but don't leave yet!
Leave the cave and look around for a path leading up on top of where Corki's cave is. You should find a ring of stones in this area. By now you should have hopefully looted seven Warmaul Skulls. Use them here to summon Gurok and kill him. He's annoying, but not as hard as Cho'war.
Ask your group members if they need to do the Ring of Blood since that is where you will head next.
Scene 11 - The Ring of Blood (group)
Quests completed: The Ring of Blood: Brokentoe, The Ring of Blood: The Blue Brothers, The Ring of Blood: Rokdar the Sundered Lord, The Ring of Blood: Skra'gath, The Ring of Blood: The Warmaul Champion, The Ring of Blood: The Final Challenge
You want quick experience? You've come to the right place. Just make sure you have a good, balanced group. You'll need a solid tank and a dedicated healer. The Ring of Blood is a series of spawned fights, each of which has good exp and rewards, and the end result is a pretty nice weapon out of six choices. (There's a good option for every class except arguably hunters.)
Take your group to the Laughing Skull Ruins and speak with Gurgthock when your group is ready. In the ring nearby, Brokentoe will spawn for you to kill. Brokentoe is a big Clefthoof with nothing remarkable about him. When he is dead, return to Gurgthock and complete the quest. **Wait for the rest of your group to complete it as well before moving on!**
After Brokentoe, you will fight the Blue Brothers, a pair of Broken. You'll need an off-tank on this one to hold down the second guy so your healer doesn't get eaten. The third fight is Rokdar the Sundered Lord, a rock lord with a knockback. Fourth is Skra'gath, a voidwalker that sometimes shifts aggro. The fifth fight is the "Warmaul Champion," who can appear as one of a few people. The champion has Mortal Strike and can really hurt. He also sometimes charges the person farthest way before returning to the tank, so don't let that be your healer.
With the champ dead, the ogre shaman Mogor will challenge you. The Mogor fight will seem fairly easy at first, with him summoning a couple totems and using an AE frost shock. After you kill him, DON'T MOVE. He will reincarnate a few seconds later and start the fight all over. He's also angry and will attack more furiously, so be ready for this.
Once you kill Mogor, you can collect your final reward.
Scene 12 - The Spirit Fields (group)
Quests completed: Clefthoof Mastery 3, The Ultimate Bloodsport, Wanted: Durn the Hungerer
You should have four more quests to take care of at this point. One of them is your last mastery quest. If you have not killed Bach'lor and Gutripper, make this a separate effort to finish the three masteries. The mastery we are concerned with for certain, though, is Banthar, the king clefthoof. He wanders a bit, but generally stays in the northeast parts of the spirit fields. Kill him (and the other two) and return to Nesingwary to get your final challenge: Tusker.
Tusker is a jumbo elephant atop a ridge that shows on the map. He is challenging, but nothing a group of 3 or so can't handle. Unfortunately, a group of 3 will not be able to handle your other major challenge here: Durn.
Durn the Hungerer is the gronn that circles Oshu'gun. You don't really want to mess with this guy, but a full balanced group such as the one you hopefully had for the Ring of Blood should be able to take him down. And that is just what you shall do.
And Departing
If you've still got a few group members who need it, feel free to hit up Bring Me the Egg just outside of Telaar. The trick is figuring out the timing in clicking off the trampoline buff. When someone finally lands in the next and accesses the egg, the Windroc Matriarch will come down and proceed to kick your butts.
And with that said, it's time we return to Terokkar and roll over the quests we ignored earlier. They were moderately hard quests at 64. They should be more trivial at 66.
|
