Azuarc's Leveling Guide part 13
Azuarc's leveling guide for Alliance, Act 13: Un'goro (50-53)
Scene 1 - Blasted Lands (level 50)
Quests completed: Thadius Grimshade, Petty Squabbles, A Tale of Sorrows, The Decisive Striker, A Boar's Vitality, Snickerfang Jowls, The Basilisk's Bite, Vulture's Vigor,
Take the Ratchet boat over to Booty Bay and fly out to Nethergarde Keep. Complete the quest at the top of the mage tower, (you can abandon the follow-up unless you're still planning on going to Zul'Farrak,) and if you are level 50, there will be another quest available next to you. Grab it and head outside.
By the entrance to the zone is a small encampment with two blood elves in it that have a total of five quests that basically amount to: "Kill all the wild creatures in the zone, and commit mass genocide on the vultures and basilisks." More on this in a second, but while you're at the zone entrance, actually go out to Swamp of Sorrows, and in the corridor that leads to the zone will be the Fallen Hero of the Horde. Talk to him, listen to his story, then talk to him again. Drop the follow-up -- it's too high-level and we won't be back this way again.
Return to Blasted Lands and explore. Avoid any area where there are demons, ogres, cultists, or anything else that is not a basilisk, vulture, scorpid, hyena, boar or helboar. You will find mostly low-level scorpids and hyenas in the northwest part of the zone, but it is the basilisks and vultures you really need to work on the most since they are harder to find and you need over 10 drops from each. The best tactic for working on these quests is to kill some stuff that lets you complete one of the quests -- any one of them -- and hand it in to have a buff going while you work on the rest. Then ride down the road, looking for vultures. Past the sothern fork of the road, there is a small spot to the left (east) where two spawn and another one across the road from them. Further down, where the road bends to the west, there are another spawns to the right with a patrol that sometimes comes through that spot. Those vultures are basically your only spawns to work with. There are a few other loose ones, but these will be your bread and butter. After clearing them, or finding out that somebody else did, go closer to Nethergarde and work to the east of the road on boars and basilisks. If you need to start making a concentrated effort on basilisks, there are some tougher ones down closer to the dark portal. (southeastern part of the zone)
Note that you receive a buff when you finish each quest, plus an accompanying item to recreate the buff. These do not stack with each other (except the strength one for some reason,) so keep that in mind when turning in the quests. The only other thing worth commenting on while you work here is that every once in a great while you might find a Draenethyst Crystal, either Imperfect or Flawless. These can be handed in to Ku'misha the Collector repeatedly for rewards. Be sure not to leave without handing these in, since they initially give experience as part of a quest.
Scene 2 - Sorrow Hill (level 50/51)
Quests completed: Clear the Way, The Scourge Cauldrons
As fun as Blasted Lands was and all, we're going to travel up to the Plaguelands next for a real quick stint. Our current focus is really Un'goro Crater, but we'd like to be as close to level 52 as possible. Fly to Stormwind/Ironforge and check the auction house for a Mithril Casing if you're able to find out without spending more than a few gold for it. Then fly up to Southshore, set your hearthstone, and ride up the road north through Alterac Mountains to Chillwind Point.
We'll be doing plenty more quests from here and the rest of the Plaguelands later, but we're going to just get a very quick taste. Get the quest "Clear the Way," as well as your Argent Dawn Commission. (Hey, we've got a trinket!) Ride down the eastern road to Sorrow Hill and beat up on the skeletons and ghouls there. If you've got the place to yourself, hang out as long as you like. It's a great place to grind for experience. Unfortunately, that means you probably don't have the place to yourself.
Ride back to Chillwind Point.
Scene 3 - Felstone Field (level 51)
Quests completed: Target: Felstone Field, Return to Chillwind Camp, Better Late Than Never 1
This may prove challenging, but it's always good to be challenged once in a while.
Ride back to Sorrow Hill, and go north across the river. You do NOT want to cross the bridge into Andorhol, but don't swim too far out in the lake because the creatures further outward when you come onto land are nasty too. Just follow around the perimeter of the city until you get to the road, and follow that westward, past Dalson's Tears, to Felstone Field.
Felstone Field consists of a large field with a rocking, bubbling cauldron in the middle, a barn, a farmhouse, and some silos in the back. In front of the barn will be a few Scarlet Crusade folks, and everywhere else is undead stuff. Very carefully clear a small space for you to approach the cauldron from. In particular, look out for the level 54 Jabbering Ghoul. You'll find out more about him later, but for now he's just a nuisance. The cauldron itself is surrounded by mobs which you should *try* to get solo. The front of the cauldron may prove the worst, if the Cauldron Lord is up. You are ultimately trying to kill the Cauldron Lord, but this is much easier if you can clear where he hangs out first, since he just spawns after you kill enough other Scourge. Your mission is to kill the Cauldron Lord, loot him, and then access the cauldron itself. You do not have to fully clear the area, just enough to walk up to the cauldron. Good luck with that.
There's one other thing we'd like to do while we're here. This also takes a little careful patience. Get into the farmhouse. There are mobs inside, so you'll need to clear a path TO the farmhouse, and then deal with the 3 mobs on the first floor inside and one more upstairs, to reach Janice Felstone. Every one of the four cauldron locations has a secondary quest somewhere nearby. This is Felstone Field's. After talking to Janice, head back outside, and if you've been quick, it should be mostly clear to the barn. Sneak inside when the Scarlets are busy, and once you're literally inside the building, just poke your head around the corner enough to aggro the guy just inside the main part of the barn. Kill him, and then deal with the other two inside. Fighting all three at once is usually too much.
Once you clear the barn, check the package on the ground by the inner wall. Click on it a second time for a follow-up quest, and then you can get out of here. Ride or hearth your way back to Chillwind Point.
Traveling Again
You'll never guess where we're going! But before we do that, take a flight over to Aerie Peak, pick a violet tragan from the lake nearest to the Altar of Zul and Shadra'alor, and then continue on to Stormwind Harbour.
Take the boat to Auberdine, and make another stop at Darnassus. You will get a follow-up quest returning you to Gadgetzan. Get a mithril casing if you couldn't pick one up before. Last but not least, go to the Cenarion Enclave and talk to the big man there. He'll give you a quest to...bring him dirt. How heroic.
At this point, head down to Gadgetzan. Stop at Theramore to raise your First Aid training if you need to. (Runeweave Bandages might be available to you now, which is what the mobs in WPL were dropping.) In Gadgetzan, set your hearthstone, and get all the supplies you need. We're going to Un'goro Crater next, and while there is a town of sorts, you will not find any humanoids for bandages, you will probably want all the ammo you can carry, etc.
You should have three quests for Un'goro now -- Un'goro Soil, Bungle in the Jungle, and Super Sticky. There will be many more. Clear your log of any other quests that do not pertain to Western Plaguelands (like Better Late Than Never.)
Make sure your hearthstone is set for Gadgetzan, and that your bags are as empty as they can be. The only quest item you need -- and there is a bank in Gadgetzan -- is your mithril casing.
Scene 4 - Entering the Crater (level 51/52)
Quests completed: It's a Secret to Everybody 1-2, Williden's Journal Flight points: Marshal's Refuge
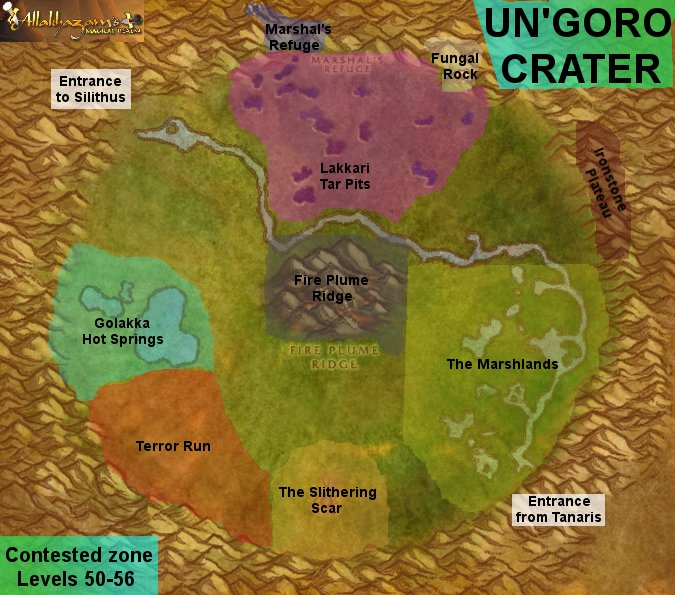
Head to southwest Tanaris. North of Thistleshrub Valley is a long ramp leading down into Un'goro Crater. A couple important things to note about Un'goro: First, you will get lots and lots and lots of quest items. Especially if you quest in the order we recommend, which will have you collecting a whole ton of things at the same time. Second, there are a lot of ground spawns -- pick up Un'goro Soil when you see it, power crystals as you are able to until you get to 7 of that color, and ignore Bloodpetal Sprouts. Third, as you can see from the map, it's a rather featureless zone. It's remarkable how many quests are in it, considering, but it may be difficult to understand exact locations of things without getting coordinates.
Just a little bit into the zone, you will see Torwa Pathfinder along the east wall. Get the two quests from him, and then it's time to head into the Marshlands to the west. If you look at your map, there is a lake toward the south that sticks out further west than the others. Go to that lake and locate the wrecked raft. Search it, then check the water in the pond nearby for a bag. Nab the bag and head northeast. You are looking for a threshadon carcass at (68, 56). This is the largest central clearing in the Marshlands.
After looting these, meander to the north. Un'goro Crater is a big ring, and you want to head to the zone wall at 12:00, past the Lakkari Tar Pits. Kill a few of the tar guys along the way if you want. Super Sticky is one of those "finish it along the way" sort of quests. You are looking for a dwarf named Karma Remtravel, and behind her a path into the mountains above. Welcome to Marshal's Refuge.
There are a lot of quests here. Grab them all. Get the flight point as well.
Scene 5 - Softening The Blow (level 51/52)
Quests completed: Chasing A-Me 01, The Apes of Un'goro, Crystals of Power
You suddenly have a LOT of quests, and some of them involve a whole heck of a lot of killing stuff. Let's discuss some of the quests, and what you need to be working on:
- Roll the Bones - kill diemetradons
- Shizzle's Flyer - kill diemetradons and pterrordaxes
- Beware of Pterrordax - kill pterrordaxes
- Muigin and Larion - kill plants
- Super Sticky - kill tar elementals
- The Apes of Un'goro - kill apes
- Crystals of Power - collect 7 of each color of crystal
- Expedition Salvation - grab an item from two spots in the zone
These are the other quests of immediate concern. You've got others, but we want to work on at least partially finishing all of these so that they will be finished after a couple more trips out of town.
Exit the refuge and go east. Kill Bloodpetal Threshers primarily, and also any Diemetradons you encounter. The Tar Lurkers wouldn't be bad to work on either, but take them as you come to them. Work from mob to mob, watching out for giant T-rexes that come out of nowhere, and hang out in the northeast parts of the zone for now. Be sure to be grabbing crystals that you need. Ultimately, your two objectives for right now are to make sure you have 7 of each crystal, and that you collect the expedition supplies at (68, 37).
With those two important objectives complete, head toward Fungal Rock, home of a ton of monkeys. Fight outside the cave for a bit to get pelts together, and then go inside. Be careful of Un'goro Gorillas (as opposed to stompers or thunderers) because they will call for help, and that call has a *LONG* range. As you enter the cave, follow the right wall to A-Me 01. If you give her your mithril casing, she will ask you to escort her back to Marshal's Refuge. Unless there is someone right behind you that might start the quest first, take a moment first and check the entrance behind you to see that it is somewhat clear. The easiest place to fail this quest is right at the mouth of the cave. Once you are free of the cave area, it should be easy enough to just jog with A-me back to town.
Make sure you complete the quest in the back of the crystal cave.
Scene 6 - Round and Round (level 52)
Quests completed: Roll the Bones, Shizzle's Flyer, Muigin and Larion, Expedition Salvation, The Fare of Lar'korwi, The Scent of Lar'korwi, Beware of Pterrordax (maybe), Bungle in the Jungle, The Northern Pylon, The Eastern Pylon, The Western Pylon, Making Sense of it All, Super Sticky
This trip is going to be a grandiose sweep circling the entire zone. Be sure you're ready for this. Also, if you don't finish any of the quests in the completed list because they involved collecting items you don't yet have, your follow-up to this scene is to wrap those up.
Head out of Marshal's Refuge through the tar pits to the east. Stay close to the northern wall and look for a giant crystal tower-thing called the Northern Pylon. Find a path up to it and inspect it. Then head southeast and do the same thing at the eastern pylon, which is roughly at the 3:00 position and should be visible from below. In each of these areas, feel free to beat up some Pterrordaxes since you need to kill 10 of them. Watch out, they fear.
Continue on down to the southeast corner where Torwa Pathfinder is waiting. You have two quests to complete with him, both of which lead to follow-ups. You're going to do one right now. Amidst the raptors to the west are occasionally some eggs on the ground. After fighting the raptors nearby, go stand on some eggs. A mob named Lar'korwi Mate will spawn. Kill and loot it. Do this twice, at two different nests, and then go back to Torwa. Save the follow-up for later.
Instead, travel west past all the raptors into The Slithering Scar. The gorishi silithids are not the most fun bugs to hang out with. Kill enough to get a scent gland, and keep going.
The area in the southwest is called Terror Run, with good reason. All the stuff here is higher level than you. Your goal isn't to do any fighting. In fact, you really want to avoid combat here. In the northeast section of Terror Run is the remnants of an expedition camp, and you will find the other supplies at (39, 66).
Go to the western wall next, and hunt around for the western pylon. Your map will probably say you are in Golakka Hot Springs by the time you find it, but you might have to climb up each of the mountain paths to find it. While you're up there, there are Frenzied Pterrordaxes up here that you can take a stab at. If they're too annoying to fight, you definitely won't want to finish up by fighting random guys down below where you might get feared into something nasty, but if you can handle them, start running up the kill count back here.
Your final task is to visit Krakle next to the large rock in the middle of the springs. Grab his quest, not that you'll be doing it any time soon, and make the gradual trip back to the refuge. There are several devilsaurs that path through this northwest corridor, so be careful if you stop to fight.
As mentioned at the beginning of the scene, your next scene (unlisted) is to finish all the stuff you didn't get done from this round.
Scene 7 - U'cha and Lar'korwi (level 53)
Quests completed: The Mighty U'cha, The Bait for Lar'korwi
Return to the ape cave, and this time stay to the left. The structure of the cave looks like a backward S. You'll need to follow all the way around the S to U'cha. U'cha's 55, but you should be able to take him solo.
Head back outside and travel southeast to the eastern pylon. (3:00, you remember the place.) Behind the pylon should be an empty canyon with a skeleton in the back and a small flat rock partway to the back. Open up the back Torwa gave you and take out the meat and then the gland. This will summon Lar'korwi, a level 56 raptor. Don't be scared about his level, he's actually a push-over. I lagged out two-thirds of the way through the fight and killed him on auto-attack. (He might be slightly less friendly to a caster, but he's still not that challenging.)
Run down to Torwa in the southeast to complete these quests, and then hearth to Gadgetzan.
Darnassus, part 4
There are a few quests you have left for Un'goro that we're going to save. Notably, Lost!, Volcanic Activity, Finding the Source, Alien Ecology, and Pawn Captures Queen. We'll have a chance to wrap those up later. You also have two quests now that leave the zone. We will do It's a Secret to Everybody. We will -not- do A Visit to Gregan, so you can drop this quest.
Take the boat in either Theramore or Ratchet, and hit up Stormwind and Ironforge real quick. Stormwind for Better Late Than Never, and Ironforge to grab a quest in the Explorer's Hall, A Little Slime Goes a Long Way.
When you get to Darnassus, complete Un'goro Soil with the gentleman behind the Cenarion Enclave, then talk to Staghelm again to get you started on collecting Morrowgrain. Once you talk with his right-hand bear, you'll get a packet of seeds and an item that lets you use those seeds and all that extra Un'goro Soil you've got laying around to try to create Morrowgrain. Use this every time the cooldown is up and you remember, until you run out of soil...or until you get 10 morrowgrain, at which point you can destroy them all. (There's a second place to turn in morrowgrain in Feathermoon Stronghold if you want to go for 20, but you might need extra seeds for that.)
Bank your unnecessary quest items, grab the two quests from Rut'theran Village and fly out to Astranaar to begin Act 14.
|
