Azuarc's Leveling Guide part 11
Azuarc's leveling guide for Alliance, Act 10: Tanaris/Feralas (levels 44-46)
| Contents [hide] |
Feralas
There are several quests you could have for Feralas. In actuality, there's only three you need to have until scene 7: The Missing Courier, The Ruins of Solarsal, and In Search of Knowledge. We could certainly perform some of the other quests, but we're level 44 in a zone that starts at 41, and Tanaris is as well. It's either do the low-end quests now, or write them off as being too low to not be worth the time. Thus, after just those few quests, we'll be spending time working out of Gadgetzan.
But for now, set your hearthstone in Feathermoon Stronghold.
Scene 1: The Ruins of Solarsal (level 44)
Quests completed: The Ruins of Solarsal, Return to Feathermoon Stronghold, Against the Hatecrest 1-2, Against Lord Shalzaru, Delivering the Relic, The Missing Courier 2, Boat Wreckage, The Knife Revealed, Psychometric Reading
You should find The Ruins of Solarsal all along the southern edge, and somewhere on the western third in a strange gazebo. Or at least the game says it's strange. Either way, go face the gazebo, and then return to Feathermoon.
For round 2, return to the Ruins and beat up on the naga. Some of them are a few levels under you. If you really want even-level targets, swim to the southern island, but it's easier just to run around the ruins here. Get 10 scales and return to Feathermoon a second time.
Finally head back and actually cross the channel to the southern island. The Isle of Dread is not a place you want to explore, but the northern shore is alright. Toward the west end, there will be a small valley in the wall that leads down toward a cave. Be prepared to move quickly once you enter the cave, because it's tightly packed and respawn is pretty quick.
As you enter, there will be two small nooks to either side. Just keep moving forward. The next area you enter will have a pool of water in the back with a small island where Lord Shalzaru and two of his lackeys will reside. Clear your way around there so that you can pull him safely. Considering he has help, it's not an easy fight, but it should be doable.
Fight your way back out -- don't get caught in respawn -- and go east once you reach topside. Head around the east edge of the island a little bit, and then swim due east. Look at your minimap for where the deep sections of water are and make sure you go as far out as you can before starting on your bar of Fatigue. You'll need about 3/4 of the bar at a minimum, so don't fool around.
The mobs on the shoreline are level 47-50, so you might be wondering why you're here. The answer is some Blizzard developer is evil. However, our direction of approach softens the blow considerably. Imagine traveling the full way down the shore past these same creatures. Your target is a small rowboat on the shoreline. Search it, and hearth out so you don't have to leave on foot.
Scene 2: All Creatures Great and Small (level 44)
Quests completed: Freedom For All Creatures, Doling Justice 1, The Woodpaw Gnolls, The Writhing Deep, Thalanaar Delivery
Get over to the mainland (swimming or by boat). Travel eastward on the road a considerable distance. If you analyze the Feralas map, it appears to be in three main chambers plus the waterfront. We're heading to the eastern-most compartment of the zone, and the first point of interest is just barely into it.
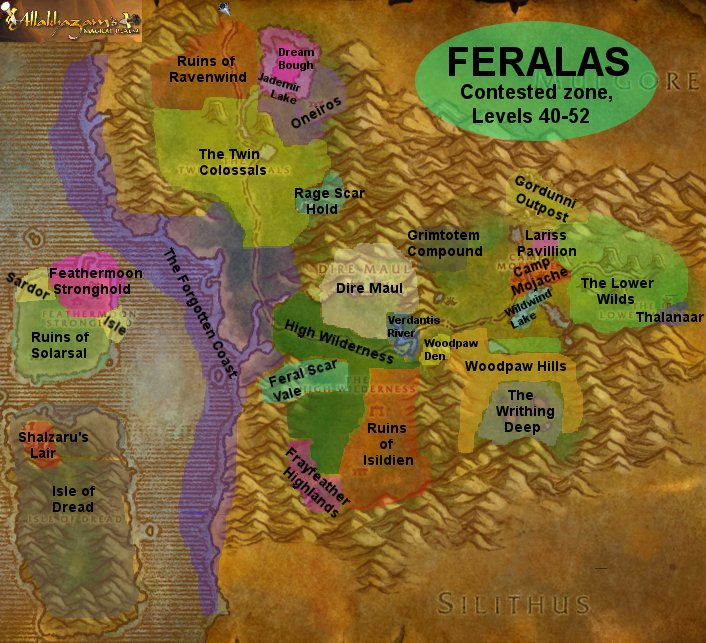
Although technically the map area for the Grimtotem Compound is fairly small, the grimtotems' camp extends all the way south to the road. Find the area where this starts, and *just* west of where the first mobs are is a large tree with a path behind it leading into the back wall. It's not easy to find, but it leads to a pair of questgivers. The first will want you to access the large bamboo cage in the center of the camp before you. Although the quest itself is not heard, you might consider clearing a portion of the area first since you are timed and one of the NPCs comes with you. Once you open the cage, all the sprite darters will attempt to escape, but they will also stop to fight Grimtotems. Follow the largest herd you can and attempt to escort them to safely by attacking anything that they get into a fight with. Just before your time limit runs out, you will probably finish the quest.
With such a large area full of lovely enemies to kill, you didn't think there would be no body count quest, did you? Return to the ledge where the Night Elves are and the follow-up will be to slay the Grimtotems. Focus on Naturalists, since they will take the longest to complete of the three types. Return to complete the quest, and oh look, we have to go to Darnassus.
Darnassus can wait for one little adventure, though. Further east, cross the road and explore the Woodpaw Hills for the bag of the missing courier. The easiest way to find it is by going to the southern tip of the lake in the area (not Wildwind Lake) and going due south. It will be tacked to a tree in one of the gnoll camps. Once you pick it up, there will be a follow-up quest *and* you will get the pack in your bags, which starts another quest.
Be glad you're probably level 45 by this point. To the south is The Writhing Deep, your first exposure to the insect race of silithids. Approach it from the west, and enter the first hole in the ground you can find. It should be a large downward spiral with a "door" halfway down and then one or two more at the bottom. Take the halfway-down door and turn right. Follow that passage to the end, and you will find your missing courier at the end. Open up the pod and he will escape on his own. Now you just need to do the same.
Once back outside, stay near the east wall and look for a path into the Lower Wilds a little before you reach Camp Mojache so you don't have to cross through the Horde camp. Hike over to Thalanaar and deliver the package. It is *strongly* recommended you follow directly from here into the next scene so you have your hearthstone available to return.
Scene 3: Darnassus (level 45)
Quests completed: Handle With Care, In Search of Knowledge, Feralas: A History, Doling Justice 2, Freed From the Hive, A Hero's Welcome, The Borrower
This is the first of several trips you will need to make to Darnassus between now and around level 53. Fly out to Rut'theran Village (or Auberdine if you're missing that flight point) and talk to the folks in the house. Handle With Care goes to the gentleman on the first floor, who also has a quest you might as well grab now. The second floor has the target for In Search of Knowledge. Talk to her, find the book in the back of the room, and then return. Finally, take the teleporter into Darnassus and go into the temple to talk to Tyrande. There is more to this questline, but it resumes back in Feralas.
Take care of any city stuff you need to, and also stop at the auction house for two elixirs of fortitude. You will need these for an upcoming quest. When you have your elixirs, hearth out. This concludes our business in Feralas for now, so complete Freed From the Hive and then fly to Gadgetzan to get started on Tanaris. (Yes, I know you just got another quest to go to Darnassus. You'll be back.)
Scene 4: A'wastin and A'wanderin (level 45)
Quests completed: Water Pouch Bounty, Wastewander Justice
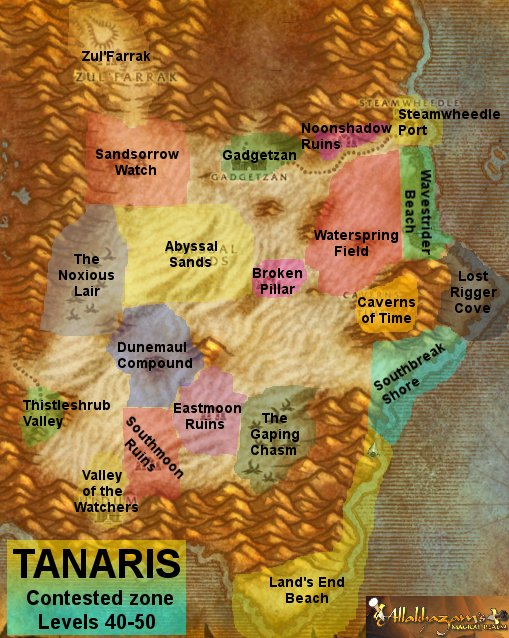
Travel east to the Noonshade Ruins and hunt down the Wastewander bandits in the area. Chances are there won't be enough spawns, but the Waterspring Fields to the south also host quite a few Bandits and Rogues if you're in the right section. (Assassins and Rogues are for the second part.) In one area or the other, or quite possibly both, get the kills you need and head back to Gadgetzan. If you don't get 5 pouches, no big deal.
Scene 5: Yarrrr (level 45)
Quests completed: More Wastewander Justice, Wanted: Caliph Scorpidsting, Wanted: Andre Firebeard, Stoley's Shipment, Southsea Shakedown, Pirate Hats Ahoy!
You will need to visit Steamwheedle Port to get all the quests you need for this run. Head back to the Waterspring Field and take on the tougher counterparts of the Wastewander syndicate. Chances are, you'll be stuck killing TONS of Shadow Mages since everybody else avoids them and kills the rest. Be careful entering a camp, though. Rogues can come out of nowhere, and adds have a habit of popping up out of nowhere. In particular, you should find *Caliph Scorpidsting* patrolling this area. He looks like he's alone, but he actually has two rogues with him. Don't enter this fight unprepared.
Once you are done there, continue southeast to Lost Rigger Cove. This pirate-infested area will require you to be careful since it is packed. You have four different quests to finish here, though:
- Southsea Shakedown - kill lots of pirates
- Pirate Hats Ahoy - kill even more pirates
- Wanted: Andre Firebeard - he's in the center of the outpost by the fire, along with friends
- Stoley's Shipment - enter the first building on the right, hack your way through, and grab the crates on the second floor
Focus on accomplishing the latter two tasks first if you can, but don't force the issue. You'll be here for a little while. Dock Workers and Swashbucklers are predominantly in the buildings and by the docks. Freebooters and Pirates are mostly in the other areas, such as outside the stockade.
Hike back to Steamwheedle Port when you're done, and then to Gadgetzan.
Scene 6: Dowser (level 46)
Quests completed: Gadgetzan Water Survey
This is a quicky. Go west past Sandsorrow Watch. On the outskirts of the area should be a small pool of water. Get ready to run away as you use your dowsing rod. Two big bugs will spawn that you don't want to fight. Hightail it out of there and back to Gadgetzan.
We're going back to Feralas next, but before you do, one quick trip out of town. Go to an area called Broken Pillar and grab the two quests from the goblin there. One goes to Ratchet, where we'll be fairly soon, and the other is a Tanaris quest we'll probably forget to take later if we don't get it now.
Head back to Feathermoon.
Scene 7: The High Wilderness (level 46)
Quests completed: Screecher Spirits, The High Wilderness, The Mark of Quality, Rescue OOX-22/FE (maybe)
Head into the High Wilderness, aka the central compartment of Feralas. In the northwest is Feral Scar Vale, where you can collect the hides you need for The Mark of Quality. If you happen to see a Vale Screecher, kill it and use Yeh'kimba's Bramble on the corpse. You'll want to get 3 of those before you finish, but they can be done later. (There are several Vale Screechers along the shore, between the dock and the northern ramp leading up to The Twin Colossus area.) Head into the cave if you like -- you'll probably need to. If you've gotten a distress beacon, the robo-chicken is in the early parts of the yeti caves. It is not recommended that you attempt to do this alone, but for some classes it is possible. Return to the cave to finish up afterwards if you do attempt it.
Then head southeast to the Ruins of Isildien. The ruins are in a few distinct areas, a northern area by the road, a bunch of camps north of the main ruins, and the large central building itself. You will only find shamans in the camps north of the main building, so begin your focus here. Kill everything -- chances are there won't be enough shamans and you'll need to wait for respawns. If you finish getting those 8, head to the camps near the road for the rest.
Your final task for this scene is simple. Get back on the road, ride east to the Night Elves you were working for to dispatch the grimtotems. They have another mission for you.
Return to Feathermoon.
To The Hinterlands!
We have some business in the Hinterlands, and one more quest to take with us on the way. Fly to Gadgetzan, complete Screecher Spirits, and go up to the racetrack with your two elixirs of fortitude in hand. Talk to Quentin and he will sent you on an urgent mission to Hinterlands.
Sp that's where we're going, but we have some stops to make along the way. Head to each of these places quickly on the way. You're being timed.
- Ratchet, to grab the Stone Circle outside of Ribbly's house and the quest from the girl outside
- Booty Bay, to turn in a couple quests
- Stormwind or Ironforge if you have some quick business to take care of
- Southshore to finish the trip to the Hinterlands
In the northeast part of Hillsbrad is the entrance to Hinterlands, and Aerie Peak is not far from the entrance. When you arrive, head inside the main building. You'll find Agnar Beasttamer in the basement and the innkeeper on the second floor in a very remote spot. (You can opt not to set your hearthstone, but it's a long zone to run back across.)
After grabbing all the quests in the zone, you should have the following to work on:
- Preying on the Predators
- Troll Neckalce Bounty
- Witherbark Cages
- A Gesture of Goodwill
- Featherbeard's Endorsement
- Skulk Rock Clean-up
- Favored of Elune?
- Super Snapper FX
- Whiskey Slim's Lost Grog
We'll use these to kick off Act 12.
|
