Azuarc's Leveling Guide part 07
Azuarc's leveling guide for Alliance, Act 7: Stranglethorn Vale, Part 1 (levels 33-36)
Welcome to the Jungle
Stranglethorn Vale is a massive, massive zone. There's only one other zone before Outland that compares, and that's in Horde territory. The jungles of STV are vast, and contain loads of quests. The good news is that you should now have your basic mount, which will speed things up considerably.
In addition to its size, there are three other items worth remarking on in the zone. The first is PvP. If you play on a PvP server, this zone is hell. See recommended alternatives if you get fed up. Those zones will still be bad, it just comes with the level range, but they won't be as bad.
Second, because this zone is so big, you need to ask yourself if you're actually done for the day, and if you are not, don't hearth back to Booty Bay. Your other two quest hubs are at the far north end of the zone, and there is at least a repair vendor up there, so if you come well-supplied, you should only need to return to town when the guide indicates that you need to. Unfortunately, unlike the Horde, your northern quest areas do not have an inn. Fortunately, a flight point was added, so it's not as bad as it once was.
The final item is that any time you kill a humanoid mob, you might get a page from the Green Hills of Stranglethorn. These are part of a massive quest to collect 15 pages that were blown out of a journal of an adventurer at the Nesingwary Expedition. Try to save these pages if you can. They might be worth your time, they might not. But there's a bank in Booty Bay, so every time you return, bank your pages until you're ready to make good on your collection.
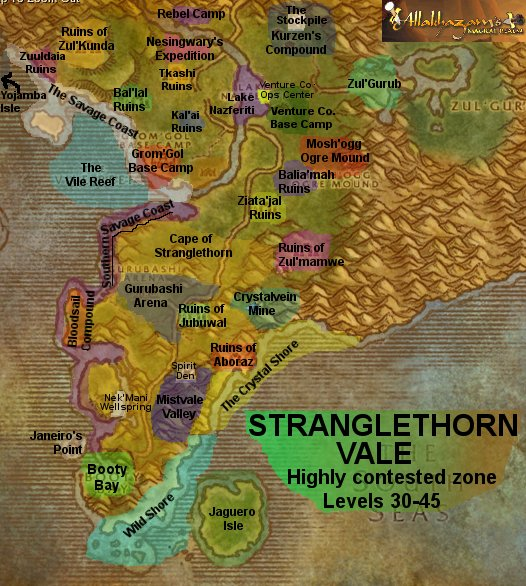
That's your map to an incredibly huge zone. Most of our time in this section of the guide will be spent in the northern areas where the low-level quests are. Creatures in this zone range from level 30 to 44, not counting Jaguero Isle or Zul'Gurub. The tougher guys are at the southern end.
Recommended Alternatives
So maybe you don't want to fight the masses. Quite understandable. There are some decent quests out of Southshore, most of which go into Alterac Mountains. If you decide to go this route, having saved the turtle meat from Thousand Needles will pay off since it's basically free experience. Try to take a Hillman's Cloak with you if you go that route. Next door to Hilsbrad is Arathi Highlands. The Refuge Point has several quests for the area, plus a few loose questgivers elsewhere. You could also head to Desolace, which used to be the next act in the guide.
Quest Collection
Grab all the quests in Booty Bay. Look around carefully. The easiest quest to miss is the one you will be doing first, in the Tan-Your-Hide Leatherworks shop, Supply and Demand. Then fly to the Rebel Camp in the north. If you don't have that flight point, (shame on you,) fly to Sentinel Hill or Darkshire and approach Stranglethorn from the other end.
There should be three quests in the Rebel Camp. Grab 'em. Then leave the camp to the south, cross the bridge over the river, and immediately turn right. Follow the southern river bank west to Nesingwary's Expedition.
The "hunter camp", as I will refer to it, has a ton of quests. At first, you'll need to grab the lone quest there to talk to the head of the camp. At that point, Hemet and his two lackeys will give you the beginnings of the "mastery" quests – each is a hunting quest to kill 10 of some type of creature. After that, you'll kill 10 of a bigger version of that type, an even stronger version, and finally a boss. The only other quest you'll find here is The Green Hills of Stranglethorn, which I am advising you don't even accept. It's just wasted space in your quest log. (You will take it some day, but don't now, because the main quest leads to four mini-quests.)
All of the scenes in the near future are going to start from the hunter camp, so remember how to get to it.
Quests you should have from Booty Bay:
- Supplies to Private Thorsen (top floor of inn)
- Supply and Demand (leather shop on third tier of town)
- Investigate the Camp (top floor of inn)
- Bloodscalp Ears (top floor of inn)
- Singing Blue Shards (first floor of inn)
- The Stone of the Tides (follow-up to The Haunted Isle, top floor of inn)
Quests you should have from the two camps:
- The Second Rebellion
- Bad Medicine
- Krazek's Cookery
- Tiger Mastery
- Panther Mastery
- Raptor Mastery
Scene 1 - The River (level 33/34)
Quests completed: Tiger Mastery 1, Supply and Demand
This will be surprisingly short compared to everything else you do in Stranglethorn. Along the river by the hunter camp, you will find River Crocolisks that have the skins you need for Supply and Demand. You will find some on the far bank, and way up in the hills are a couple basilisks. Kill basilisks you run into to make finishing Singing Crystal Shards easier in the future.
Away from the river, all around the hunter camp, are the Young Stranglethorn Tigers (or as I like to call them, baby tigers.) Get your 10 kills, get your 2 skins, and go back to the hunter camp. Use the vendor while there.
Scene 2 - Jungle Commandoes (level 34)
Quests completed: Panther Mastery 1, Tiger Mastery 2, The Second Rebellion, Bad Medicine
Go east to the road, cross the river north, and then go east again after you cross it. In the immediate area, you should find the baby panthers. If you work your way further (south)east. You'll see the normal Stranglethorn Tigers for the second mastery. Get your kills of each, and then head north from the tiger area.
The Kurzen Compound is filled with Jungle Fighters and Medicine Men. Be careful where you step in this place. If you end up fighting two Medicine Men at once, just run. However, you have two quests that require that you kill 15 fighters and collect 7 jungle remedies. Stay away from the stable area (with the cage next to it,) the fallen tower, and especially the cave in the back. Also, be very cautious around any of the other buildings or the central camp as you're likely to get a bunch of guys attacking you as soon as you pop your head around the corner. Take your time finding isolated guys. You will also need a fern extract that can be found in the boxes in front of the two-story building at some point.
One other thing you might consider doing while getting these kills (and waiting for respawn) is heading up the slopes to the east of the compound. There are several basilisks in this area that can be killed for Singing Blue Shards, however these are not the absolute easiest basilisks to fight. There are 7 or 8 spawns up above the compound, so you might consider making a pass at them initially, fighting some Kurzen guys in the compound, coming back later, and then making a third pass at the Kurzens. You do not –have– to do this now, but it will make life easier since the other easy spot to get basilisks is usually heavily farmed.
When you are finished all this, return to the rebel camp, and then the hunter camp.
Scene 3 - Beasts and Bloodscalps (level 34/35)
Quests completed: Panther Mastery 2, Raptor Mastery 1, Tiger Mastery 3, Singing Blue Shards, The Haunted Isle
Go west out of the hunter camp to the end of the river. You should notice a slope leading up onto the plateau above you. In that area, you will find some of the normal Panthers, as well as a few normal Tigers, and here and there you will also see some Bloodscalp trolls. You will also see a troll city at the Ruins of Zul'Kunda that you should probably avoid entering for now, but feel free to kill any trolls you encounter that you can handle. (Here or elsewhere. The drop rate on the ears is pretty low.)
Get your 10 panther kills as you make your way south. Stay on this ridge rather than hopping down. If you follow it south and then west, you should see the baby raptors. Out of the three masteries, the raptors are the toughest of the bunch, and the easy raptors are probably as hard as the second type of tiger or panther.
After getting the kills you need for the raptors from their nest, go east and drop down off the ridge. In this general area you will find Elder Stranglethorn Tigers. Kill 10 of them, and then go west past the Bal'lal Ruins to the coast. Kill whatever trolls you want along the way.
Follow the beach north and you should see mostly crocolisks, but at some point there will be one or two basilisks assuming they aren't dead. This is your hint that there is a cluster of basilisks on a ridge up above you. If you haven't gotten all of your Singing Blue Shards, now would be a good time to do that.
The last thing to do is look at your map and notice the large island off the coast. Swim to that. There will be level 37 water elementals all over the island. You do not need to kill any of them. Simply walk toward the center of the island until you get a message saying that you have explored the haunted isle. At that point, you can hearth back to Booty Bay.
Scene 4 - More Beasts and Bloodscalps (level 35)
Quests completed: Tiger Mastery 4, Raptor Mastery 2
After finishing your business in Booty Bay, take the long hike back to the hunter camp and turn in your quests there. At that point, go south and a little west. Hunt trolls as you go, but your primary target is on a mesa west of the Tkashi Ruins, and northeast of Bal'lal, surrounded by the elder tigers. On this small hill lies Sin'dall, the boss tiger. Unlike the other two bosses, she's really a pushover, perhaps as easy as the elder tigers.
After dispatching with Sin'dall, go south past Bal'lal to where the Lashtail Raptors roam. You need 10 of those. Feel free to kill some trolls along the way back to the hunter camp.
Scene 5 - Goblin-Infested Waters (level 34/35)
Quests completed: Some Assembly Required, Goblin Sponsorship (Thousand Needles), Hostile Takeover
Go east, following the river, to Lake Nazferiti. When you actually reach the lake, the river crocolisks will turn into snapjaw crocolisks, which are needed for Some Assembly Required. Loop the lake until you get those kills…or do it at the end of the scene if someone else is killing them.
On the east side of the lake is Venture Co. Base Camp. This area is dangerous. Take your time here. Your first objective is to climb the drilling rig in the lake. These goblins like to use ranged attacks, and they like to run, so fighting a single target is often extremely difficult. If you work your way up the platform to the second level, there will be a room at the top. Inside it is Foreman Cozzle, who has a key you need. So kill him.
Once you've finished your misadventures on the oil rig, get back to land and enter the small house next to the lumber mill. There should be nothing there but one locked chest, which you conveniently just picked up the key to. Crack it open, and then wander around the Venture Co. lands looking for geologists to kill. They blend in with the surroundings, so be cautious. The last thing you need is two or three geologists nuking you at once.
At this point, enough is enough. Hearth back to Booty Bay and take a break.
Scene 6 - Swamp Dust (level 35)
Quests completed: Dream Dust in the Swamp
Flight points acquired: Nethergarde Keep (Blasted Lands)
Fly to Darkshire. Your next trip for this act is not in Stranglethorn itself. From Darkshire, run east out of the zone. The road there goes into a nasty area called Deadwind Pass. Fortunately none of the nasty stuff is along the road, so just stay on the path and you will find yourself in the Swamp of Sorrows.
There isn't much to the Swamp of Sorrows for Alliance. The three or four quests are spread out and pretty meaningless, so we aren't here to do much. The only thing we do want to do is near the zone entrance. As you come into the zone, the road will bend north and then east as you approach Splinterspear Junction. We want to be in the area south of this (which would have been east over the cliff when you first entered.) This area, known as Itharius's Cave, is filled with green whelplings. They like to spit green gook at you rather than run at you, so treat them like you would any other spellcaster. Also, be wary of the paths these guys take, as none of them are stationary and they will often fly past each other. There are two Swamp Jaguars around this pond as well, and if you see one of those, pull it away and kill it first. You don't want to deal with one of those along with the whelps. (Or two whelps at once, for that matter.)
At this point, you *could* hearth back. However, while we've taken a trip to the middle of nowhere, let's visit the end of nowhere. Go back to the road and follow it east. Take the southern fork, and avoid the Horde guards. Before you reach the Horde town of Stonard, you should find a path leading south out of the zone into Blasted Lands. We have no business whatsoever being in Blasted Lands at this level, but go left (east) as soon as you enter the zone and follow the zone wall to Nethergarde Keep. There are two barracks and a tower in Nethergarde. The flight master is on a platform behind the barracks on the right.
Now hearth or fly back to Booty Bay.
Scene 7 - Kurzen's Mystery (level 35/36)
Quests completed: Water Elementals, Excelsior, Kurzen's Mystery, Bloodscalp Ears
This is going to be a long and frustrating journey, and you are welcome to save this for your return to Stranglethorn, but you really want to be level 36 in order to move on.
Although we've had it for a bit, we've avoided doing Kurzen's Mystery until now because it's a hard quest. There are four tablets you need to acquire. Two of them are in the Ruins of Zul'Kunda, which you do NOT want to by yourself unless you really know what you are doing and where you are going. Get a partner or two if you can, and go to Zul'Kunda, or run this act in reverse and finish there instead while you look for help. Also, if you have access to water breathing of some kind, bring it with you (if it isn't a class ability already.)
The Ruins of Zul'Kunda has a central road that passes through the heart of it. There are small outcroppings of trolls to both sides of the road until it reaches a downward slope with walls on both sides. If you go off the road to the left just before reaching that slope, and stay next to the wall, you will find the first legend. (It's actually the third legend, but who's counting?)
You will find the Third Troll Legend in the corner of the very last one of the "rooms" in this area. It looks like a huge stone tablet on its side. Be very careful of patrols in general in Zul'Kunda, and pull the room very carefully, especially if you're alone. It is not uncommon to be fending off three or more trolls at once, and this area can get infuriating very quickly.
Return to the central road through the ruins, and go down the slope. Shortly after the bottom of the hill, the wall on your right should end, and there will be a path behind it. (The road continues forward.) Wait for the patrol in the area, and kill those two trolls before they decide to gangbang you later. Then move very slowly and carefully up the path. Also be very careful with the trolls that are up the ramp. At the top of the hill, turn left and in the distance you should see the Fourth Troll Legend. Pull just as you have already to get this far, and you should be able to reach it without any further difficulty.
To exit, return to the "main road" of Zul'Kunda and follow it the rest of the way through to the beach. From there, swim out to the haunted isle. Hunt down some water elementals to get the drops you need for the quest by the same name.
To those running in reverse: follow the path until there is a small path up and to the left. This is where the fourth troll legend can be found. Return to where this path branches off, follow the road, and immediately turn around the end of the right wall. Go all the way to the back for the third legend.
Your next task is to get another troll legend. This one is underwater, and can prove troublesome if you don't know where it is. Leave the island due south, and swim underwater a bit so you can see the sunken ruins. The Second Troll Legend is OUTSIDE the wall of these ruins, on the northern edge toward the east, which means you should see it off to the left in front of everything else. The ruins themselves are filled with murlocs. With the right approach, you don't actually have to fight any of them because the legend is outside, but you will want to because these are the ones you need for Encrusted Tail Fins from Thousand Needles. Do your best to pull the murlocs to the surface if you don't have any kind of water breathing. Your biggest enemy in this area is your breath capacity.
Swim back to shore and look for an Elder Saltwater Crocolisk. They are mixed in with the other crocolisks, and sometimes there aren't any out on the beaches at all, but either you'll find one eventually or you can clear out the normal crocs and wait for respawn. They used to be elite, but they're easy to kill now. You'll get the skin off the first kill.
Your final task is to get the First Troll Legend. (Wow, we're backwards.) It's in the back corner of the Ruins of Bal'lal, which should be fairly nearby the beaches you've been combing for crocolisks. This should be no worse than anything you've done in Zul'kunda, even if the trolls are packed together a bit. Take your time. This one is much more easily soloed. Stick around if you haven't finished collecting Bloodscalp Ears yet.
Return to the Rebel Camp when you finish.
Hightailing it
It only gets worse from here. Stranglethorn is a massive zone, and not meant to be done in one pass. Although we'll do it in two, the original guide did it in three. Pack up and get ready to go to Dustwallow.
You'll get a lot of different quests in Dustwallow, so while you have access to a bank, stow all your quest items (and Green Hills pages,) and DROP all quests from Stranglethorn that aren't in some way partially completed. When we return, they will be easy enough to grab again, since they're all from Booty Bay or the two camps. However, you will need the space in your log.
|
