Azuarc's Leveling Guide part 06
Azuarc's leveling guide for Alliance, Act 6: Duskwood/Thousand Needles (levels 31-33)
The Duskwood portions of this act were formerly at the end of Act 5. I've split it off into the previously very short act 6.
You should have just returned to Duskwood from Ashenvale, and initiated the Missing Diplomat series from Stormwind.
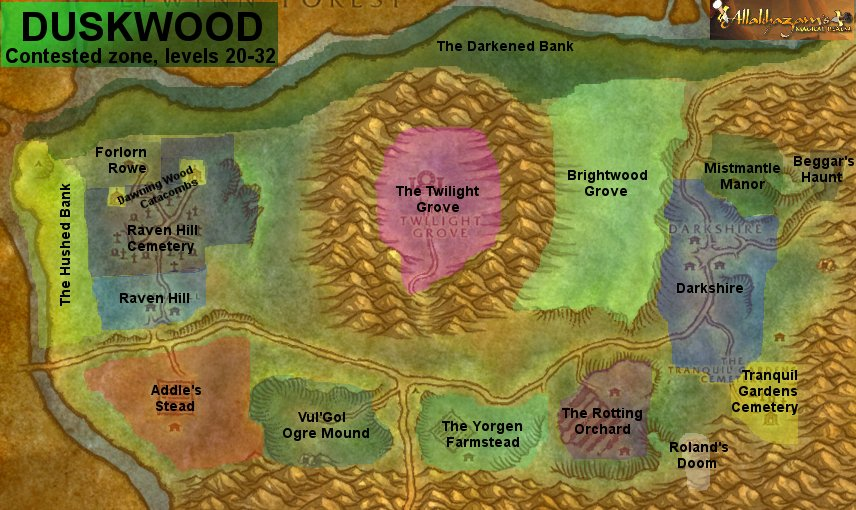
Scene 1 - Raven Hill, part 2 (level 30)
Quests completed: Finding the Shadowy Figure, Juice Delivery, Ghoulish Effigy, The Night Watch 3, The Totem of Affliction, Return to Sven, Proving Your Worth, The Weathered Grave, Morgan Ladimore
You should have talked to the townsfolk about who Sven's shadowy figure is, which sends you to three different people in Darkshire. Once you're finally ready to confront this individual, leave town to the southwest and go all the way to Raven Hill. Talk to Jitters, head up to Sven, and then over to the hermit. (Remember where they all are?)
Our focus is on killing ghouls. You have three quests for ghouls now. Ghoulish Effigy is the new one from the hermit, along with the Totem of Affliction and the third Night Watch quest. The last of those three is going to be the troublesome one. Ghoulish Effigy and Totem of Affliction allow you to kill any ghoul, but The Night Watch requires the nasty ones -- Plague Spreaders.
Fortunately we've saved this quest for where Plague Spreaders are actually quite manageable. In fact, I would advise more or less heading right for the hole in the ground where the Plague Spreaders hang out. You'll need to be cautious inside, especially since the respawn can be screwy at times, but you should be able to pick up your 20 Plague Spreader kills much more quickly down below than topside, even if there are a ton of Brain Eaters mixed in. Be sure to finish the other two quests as well before moving on.
Oh, but we're not done yet. Once you finish, and turn in to Abercrombie (the hermit,) head west outside the fence. You should see a lone grave that is offering you a quest, as odd as that may seem. Grab it and then loop around to the western part of Raven Hill and look for another crypt, guarded by Skeletal Raiders and Skeletal Healers. Again, move slowly, but move inside the crypt since it's the only place you can find the Skeletal Warders for Proving Your Worth. Focus on raiders; once you have your three warders, you might consider doing the rest of your work outdoors where there are more spawns. But be careful outside the crypt -- Mor'Ladim patrols through here and will be a sharp swift death to you if you're caught unaware.
Talk to Sven and then return to town.
Scene 2 - Ending the Legend (level 30)
Quests completed: The Missing Diplomat 4, The Legend of Stalvan 13
Leave the town to the north, and find Watcher Backus along the way. Continue north and take the turn off the road to the right into Manor Mistmantle. Stalvan is waiting for you inside his house. Kill him.
The end.
Scene 3 - The Ogres and The Docket (level 30/31)
Quests completed: Worgen in the Woods 1, Ogre Thieves and follow-ups, Look to the Stars 4, The Missing Diplomat 5, Mor'Ladim (maybe)
Go west to the Rotting Orchard -- it isn't far outside town to the southwest. Poke your head around for some Shadow Weavers amongst the worgen horde. Adds will be a-plenty around here, but at level 30+, you should be able to handle yourself. It won't take long to get 6 shadow weavers.
Continue west past the Stranglethorn road toward Raven Hill, but turn to the south of the road instead, to Addle's Stead. Follow the road down to the houses. There are two buildings here, but one of them houses several Defias. It also houses the chest containing the Defias Docket. Go in there and take its contents.
Head a little east from there, and hop on into the Vul'Gol Ogre Mound. You have two purposes here. Approach the "mound" where the ogres dwell, and notice the scattered crates in front of the cave mouth. One of those is Abercrombie's Crate, so snag it. The other reason for entering the cave is to chase after the ogre known as Zzarc'vul. He can be in a couple spots in the cave, but find him and dispatch him to get the monocle for the last Look to the Stars quest.
Since we're at the right end of the zone, (well, left end of the zone,) go drop off Abercrombie's crate. Then, if you're feeling daring or have some help, march into the cemetary and kill Mor'Ladim. Good luck. Some classes *can* solo him, but it's not a pretty fight.
When you return to town, make sure you seek out Watcher Backus up the road to advance The Missing Diplomat.
Scene 4 - Bark at the Moon (level 31)
Quests completed: Worgen in the Woods 2, 3, and 4, The Scythe of Elune
Go to the Rotting Orchard again, and hunt down Dark Runners. They're often in packs, but you should have no trouble finding them. Go to town when finished.
Then leave town due south, as though you were going to go to the Tranquil Gardens Cemetery. Just west of the TGC, in an area that goes off the path to the right, will be a mine named Roland's Doom, and it is filled with more worgen. These guys are the toughest of the bunch. You'll find Vile Fangs outside the mine and Tainted Ones inside it. There should be exactly enough spawns of Tainted Ones if you clear it fully, plus an additional wanderer named Gutspill that is for a warrior class quest. In the back of the mine, to the right, is a loose mound of dirt. Search it and you will find what happened to Velinde Starsong. If you've been following the storyline on Sven's quests, they should make much more sense now. Once more, return to town.
Scene 5 - Eliza (level 31)
Quests completed: Bride of the Embalmer, The Daughter Who Lived (maybe)
There's one last task remaining. You've just unwittingly released an abomination on the poor citizens of Darkshire. That type of deed does not go unpunished.
Eliza lives in the grave behind Abercrombie's shack. Right-click her grave and she will appear. In spite of being a brainless ghoul, she is a mage. This means she goes down rather easily. This quest used to be MUCH more difficult, but it's a pushover now.
If you killed Mor'Ladim in Scene 3, go to his grave now to finish the quest line.
Moving Forward
You should have just finished all the meaningful quests in Ashenvale and Duskwood. We're ready to move on with the world. Finishing this range of zones is a rite of passage, particularly the bulk of quests in Duskwood so you should be pleased with yourself so far.
You should be down to four quests in your log, and anything else you've got you can throw out. What you should still have are:
Our next major goal is to reach the racetrack in Thousand Needles, but we've got some sidequests to do along the way.
Scene 6a - Answered Questions (level 31)
Quests completed: Answered Questions
Note: We're going to start some traveling. The very first thing you should do is see if your class has a level 30 quest that is worth doing. Shamans, for instance, have an effortless quest for their air totem that essentially just forces them to report to Exodar. Mounts also become available at level 30 now, at a fairly low price compared to what they once were, so this is definitely an expense you will want to invest in. While we make the trips to Darnassus, Stormwind, Southshore, and then southern Kalimdor, you may want to figure out where your class quests are and when you will be closest to your racial capital.
Since the Auberdine boat connects to Stormwind now, rather than Menethil Harbor, you will want to make the trip to Darnassus now to finish Answered Questions, and hearth back.
Scene 6b - A Lesson in Diplomacy (level 31/32)
Quests completed: The Missing Diplomat 6-10
Return to Stormwind. Speak with Elling Trias once more, and he'll send you after a charming fellow in Old Town named Dashel Stonefist. Dashel is in the very center of Old Town. You need to use one of the alleys to reach him or you'll just circle without finding him. As soon as you discuss matters with him, he and his friends try to jump you. Focus on Dashel. Get him to a certain point in his health and he will call off his dogs and talk things over. Return to Trias.
Then you will be sent to Menethil Harbor to talk to Mikhail in the inn. As soon as you do, a gentleman that calms himself Slim will try to escape the inn. If you stop him, he will fight back along with his friend. This fight can often be very challenging for a single player, but often the other passersby will help.
After getting Slim to surrender, he will agree to talk to you once more in the inn. This will lead you into Theramore, but we have some other matters to tend to first. While you're going to be heading for Theramore anyway, talk to Vincent Hyal about his brother. Then you will need to make two side trips, in either order.
Scene 6c - Southshore (level 32)
Quests completed: Southshore
Flight Points acquired: Southshore (Hillsbrad Foothills)
We're going to Southshore, just because. You do have a quest that takes you there, and there are quests to do in Southshore. The guide doesn't focus on them, but if you so desire, you could spend time working on Southshore quests instead of finishing this act.
Fly to Refuge Pointe and go west along the road, past Stromgarde. The road will cross into Hillsbrad Foothills through Thoradin's Wall, and you can take it the rest of the way to Southshore. Again, watch out for that Forsaken Courier. Get the flight point on the outside of town, and return to Menethil.
Scene 6d - Theramore at Last! (level 32)
Quests completed: James Hyal, The Missing Diplomat 11
After all this run-around, you can finally take the cruise to Theramore. When you get there, grab whatever quests you can find. Hit the flight master and set your hearthstone, too, of course. The quests in Theramore have changed tremendously with the 2.3 patch. We may take a look at them later on, but they're all over our heads, and unfortunately the quest we used to do first out of town appears to no longer exist.
Scene 7 - Thalanaar Adventure (level 32)
Quests completed: Reclaiming the Charred Vale, Lonebrow's Journal, Suspicious Footprints, The Black Shield 1-3, The Missing Diplomat (up to the last segment), and a couple others
Flight points acquired: Thalanaar (Feralas), Gadgetzan (Tanaris)
Leave town by the road. Follow it to Sentry Point, the first tower. Rather than finding Hendel there for The Missing Diplomat, you will find Archmage Tervosh, who will tell you where to find him. You are welcome to TRY to kill Hendel when you reach Northpoint Tower, but chances are he will simply pound your face in right now. We'll be back, don't worry.
Stay on the road all the way to the Barrens. At the zone edge, where the golden savannah grass begins, you will find the ruins of the Shady Rest Inn. Talk to the inspector there, and then take a gander at the footprints, the shield hanging on the fireplace, and the badge lying on the fallen beam. Each of these start a quest, which you'll take to Theramore a little later. Continue along the road. When you reach the Gold Road, go south. (PvP server folks will probably want to avoid the road and just cut in front of Bael Modan.) The end of the zone is a Tauren elevator. Jumping = death unless you can levitate or slowfall, but the graveyard is at the bottom if you do jump, which might be a better bet if you're under pressure from Horde players and guards. At the bottom, to the right side of the road, is a dwarven skeleton with a journal. Take it for the quest it gives you.
More road following! It will fork shortly after the Great Lift. Take the right (west) fork all the way to the end of the zone. As you are entering Feralas, turn left and head toward the Elven encampment known as Thalanaar. There is a flight point here, plus you have two quests to finish. Don't bother with the Crone of the Kraul. Nobody in Alliance EVER goes to Razorfen Kraul, except maybe for the warrior quest. There was a quest for a nearby area called Highperch, and if you found that quest in Theramore, great go do it. Highperch is just to the southeast. However, I was not able to locate that quest (or even the questgiver) recently, so it might no longer exist.
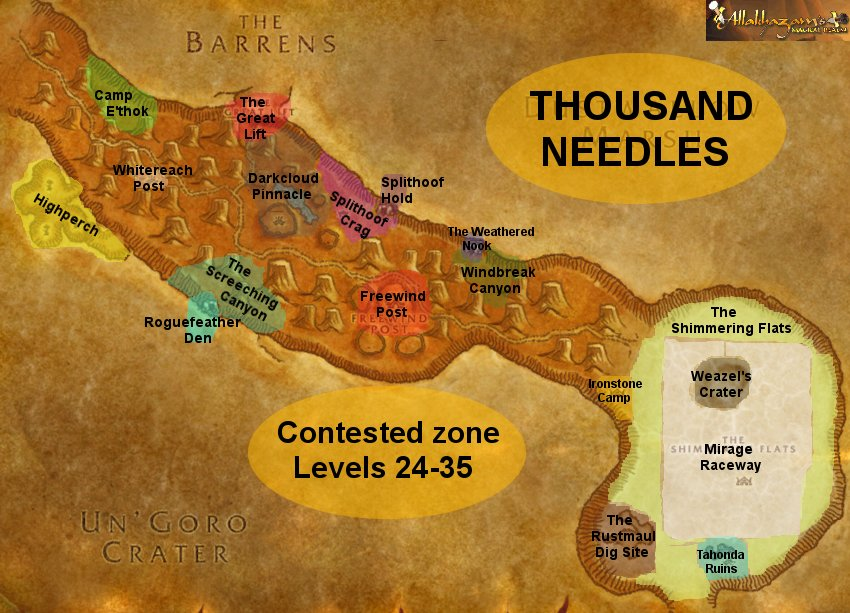
Turn around and head down the road to the east. Take it until it ends. Be careful around Freewind Post; the guards tend not to like Alliance very much. The end of the road is The Shimmering Flats, a large salt flats area that is littered with various wasteland creatures and rocket car parts. Wait, rocket car parts?
At the center of the flats, you will find a racetrack where gnomes and goblins feverishly try to invent the best rocket car they can. They even enlist your help. There are six quests in all to grab here -- four from the gnome area, one from the goblins, and one from the master of the races. These quests are grindfest city, but it doesn't seem so bad because you're doing quests at the same time.
Before we do any of those quests, though, let's finish one other important affair. Go south-southwest to the zone exit. Watch out for level 35 basilisks. The path through the edge of the flats leads to the goblin city of Gadgetzan. There's an inn here, a flight point, even a bank. There are none of those things at the race track, so if you need to stop for the night or get back here quickly, you have that option. The flight master is outside the town walls on the south side of town.
In fact, fly to Ratchet real quick to complete the quest you received to go take an item there, and then pop in at Theramore to finish some tasks you have there as well. Return to Gadgetzan when you're ready for the grindfest to begin...i.e., tomorrow.
Scene 8 - The Shimmering Flats (level 32)
Quests completed: A Bump in the Road, Hardened Shells, Load Lightening, Rocket Car Parts, Salt Flat Venom, Parts for Kravel, Delivery to the Gnomes
Back at the racetracks, let's take stock. We've got quests to (1) kill turtles, (2) kill scorpions, (3) kill basilisks, (4) kill buzzards, and (5) collect junk off the ground. The sixth one was a delivery quest you should have just done in the last scene. In fact, at any time of your choosing, if and when you need to come up for air, fly to Ratchet to finish Parts for Kravel. You'll end up making this additional trip anyway.
There is a lair for every one of the creatures we need to kill. The car parts just come along the way. Start off by heading due west where the scorpion lair is. Don't dwell on killing the tougher scorpions. Just pick off what you can, and continue north. The northwest area is the bread basket for getting started. There are car parts, plenty of turtles, which often have the worst droprate, and various other things in the way. Kill it all. Hang out in this quadrant for a while, until you start to complete some of the quests. Run back to the tracks and sell at the ice cream vendor if you need to.
East of where you've been grinding, at about 12:00 actually, is the turtle lair. The trouble with the turtle lair is that each spawn can be the low-level or high-level turtles, and because turtles are passive, everyone just kills the low-level ones until they respawn as high-level turtles, and then they leave them. These is a massive difference between the two in difficulty because mostly everyone here is in the 31-33 range. This is why it is strongly encouraged for you to hunt down the turtles in the northwest corner first.
You probably shouldn't need them, but the basic kind of basilisks are all clustered about the crater south of the turtles. If you rotate further around the flats, in the east is the vulture lair. Considering the scarcity of the buzzards overall, it is recommended that you hang out here, kill as much as you can, and come back later if everything is dead.
There is almost nothing in the southeast quadrant of the flats. At the south-center is a series of ruins with the two tougher types of basilisks. Be especially cautious around the gazers. They are level 35 and will be more difficult than the other mobs here. This particular quest is a kill count, so grab a partner if it helps you.
And then back to the scorpions in the west. In the southwest corner is a set of ruins infested by silithids. Leave them well enough alone.
Altogether, questing here should take about two hours unless you're on a PvP server and getting royally ganked, or if there's a lot of spawn competition. (Horde do these quests as well, and tend not to think much of you being here.) When you are finished, try to keep eight pieces of turtle meat away from the vendor. You may want them later for a Southshore quest.
The Run-around (level 33/34)
You probably gained a good level-and-a-half in the Shimmering Flats, but as you complete each quest, you'll note that basically every one of them has a follow-up. The reason we are here, now, is because several of the quest lines lead right into the very next zone we will adventure in, and we will go where the other two take place as well.
Go make those deliveries, fly to Ratchet for one of the quests, and then settle into Booty Bay to embark on your adventures in Stranglethorn Vale. There are a ton of quests in "STV" that will completely fill up your log, so if there's anything else you had any intentions of doing, such as running Gnomeregan, or finishing the Missing Diplomat...go do it now.
Your quest log should essentially be empty of all quests that didn't come from the racetrack when you move on.
|
