Azuarc's Leveling Guide part 05
Azuarc's leveling guide for Alliance, Act 5: Ashenvale (levels 27-30)
Back to Ashenvale
I would suggest to consider remaining in Wetlands, but honestly there is a level gap in the zone and virtually nothing to get you from killing Sarltooth to fighting through Dun Modr where the really hard stuff is. The Doomed Fleet and the second crocolisk quest are about it. So we'll turn back to Ashenvale since the only other option is (yech!) Redridge Mountains.
When we last left Ashenvale, we had basically cleared the western half of the zone and completely left the eastern half. There is quite a bit left in the zone, and it should prove significantly less challenging now. Your first order of business should be re-setting your hearthstone to Astranaar, picking up any stray quests you're missing. From earlier work, you ought to have The Tower of Althalaxx, Fallen Sky Lake, An Aggressive Defense, and Raene's Cleansing.
Scene 1 - Forest Song (level 26/27)
Quests completed: An Aggressive Defense, Raene's Cleansing 4, Kayneth Stillwind
Flight points acquired: Forest Song (Ashenvale), Talrendis Point (Azshara)
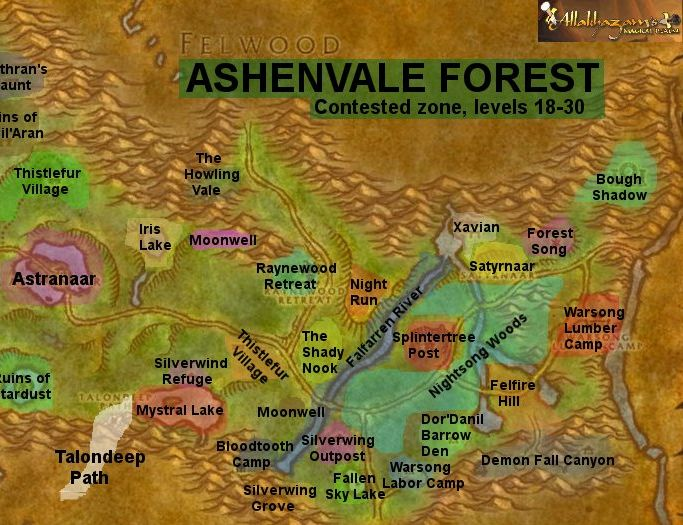
Here's the east end of the zone. (Our act 3 map cut off part of this.)
Leave Astranaar to the east, and go south off the road a bit before the road north to Felwood. The furbolgs in the village here are for An Aggressive Defense, a quest that has probably gone green to you by now. Green is ok, gray is not. So let's do it now.
Afterwards, get back to the highway and take the road north to Felwood. Head up this road until you start seeing treants. When you start slaying the crazed and withered ancients, you will eventually get a key to a chest. That chest is to the west of the road in a secluded grove most of the way to the north. (Not all the way, if you start seeing wolf-men, you're just a little bit too far north.) Open the chest and you will get the next piece of Raene's cleansing.
From there, cross the road and look for a path in the eastern mountains that heads up into them. You will have to range southward a bit for this, and it isn't *completely* obvious, so look carefully. Go up that ramp and turn south into Night Run, where you will find one of the two Highborne Souls amidst the satyrs. Continue east, cutting back south to the main road when you reach the second river. After you pass Satyrnaar, there will be an area to the north called Forest Song that is the other quest hub for the zone. Look around here for a flight point and the following quests: Agents of Destruction, Forsaken Diseases, Reclaiming Felfire Hill, The Howling Vale, The Lost Chalice, A Shameful Waste, Destroy the Legion. (Some of those may not be immediately available.)
One last thing while we're here...this isn't the only flight point in the area. Go back to the road and east out of the zone. Almost immedaitely after entering Azshara, there will be a small encampment to the right side of the road. Grab the flight point here as well before returning to Forest Song.
Scene 2 - Satyrnaar (level 27)
Quests completed: The Lost Chalice, The Tower of Althalaxx 6
Due west of Forest Song is a satyr camp called, of all things, Satyrnaar. You have three quests to work on in this small area. Be careful; there are stealth mobs. Keep your eyes open for small piles of wood on the ground as you go, but since you are approaching from the east, the first obvious thing you should see somewhere to your right is a big red gem like the one you saw back in Night Run. This is the other half of The Tower of Althalaxx. The gem is near a large red monument. Along the base of the monument, there should be a chalice sitting on the ledge. Take it. Return to Forest Song once you have the rest of your lumber, and then go to Astranaar and Maestra's Post to finish a few quests awaiting completion.
Scene 3 - Blood Fury (level 27)
Quests completed: Retrieval for Mauren, Reclaiming the Charred Vale
Flight Points acquired: Nijel's Point (Desolace)
I promised you that Stonetalon Peak flight point would be good for something some day. Today's that day.
Fly back to Stonetalon, run south to Mirkfallon Lake, and go west. You will be in a long canyon that eventually leads into the Charred Vale. Kill any basilisks you see for Mauren, and be aware that your ultimate goal is to finish Reclaiming the Charred Vale, which involves killing all kinds of annoying harpies. This is not a fun trip, but it is a somewhat necessary one. (Well, the end of it is. If you just want to run and grab the flight point at the end, that's good enough.)
The four kinds of harpies you need generally live in different sectors of the Vale. What makes this area frustrating is that (a) there are a lot of wandering creatures, (b) the harpies tend to live in packs, and (c) there are other types of harpies you don't need that become the bulk of what you will find as more people avoid them to kill the quest targets. (Horde have the same exact quest.) The "Harpy" and Ambusher mobs are mostly near the entrance and to the northern areas. You'll find the Slayers and Roguefeathers farther south. Note that there are also some basilisks in the Charred Vale if you can find them amidst all the other crap here.
When you finish collecting from both the harpies and the basilisks, you will want to leave the area to the south, which was our real reason in coming here. This will put you in the zone of Desolace, which is not a zone you want to be in yet, but also not a zone you want to make another trip to just to reach the flight point for later. A little after you enter the zone, turn east and follow the northern mountains. You will want to do your best to avoid the trash here since it's mostly level 30-32 and you are not. After running a bit over halfway to the end of your map, you will arrive in Nijel's Point. Nijel's Point is the Alliance town in the area, and the flight point is on the upper ridge.
You can drop the quest to report to Ziz Fizziks and return to Ashenvale now after hitting up Stonetalon Peak to finish Reclaiming the Charred Vale.
Scene 4 - Cleaning House (level 28)
Quests completed: Fallen Sky Lake, Raene's Cleansing 5, Forsaken Diseases, Agents of Destruction, A Shameful Waste, Destroy the Legion, Reclaiming Felfire Hill, Diabolical Plans (maybe)
Long journey this time. You may want to break this one up.
It's time for another trip to the moonwell. It's been a while since we've been there. Shael'dryn will send you to get the other half of the rod.
So go east to where the southern road heads toward the Barrens. Take the road about two-thirds of the way to the Barrens, and on the right (west) side of the road is Fallen Sky Lake. There should be an "oracle" on the island in the center of the lake. Kill him, loot, and move on.
Cross the road northeast and head for the Dor'Danil Barrow Den. All throughout this region are low level slimes. Contrary to what you might normally do to a mob 7 levels below you, kill them. Occasionally a chest will appear after you kill one. If you're lucky, when you loot this chest, you'll get the other piece of the rod. There is one other task in the area to the north of the actual barrow – you should find a small camp of Forsaken with a bunch of beakers and chemicals and such. Watch out for stealth mobs here, but fight your way to the table and grab a bottle of disease. Mmmmmm, sweet sweet bottles of disease...
Note: the next paragraph requires level 28 to get the quests for, and involves killing mostly level 30 targets. You're welcome to save it for later.
To the east, a small road will lead you across the river to Felfire Hill. In this area, you will want to kill 6 of each of the three demon types and plant 8 seeds at the loose clumps of dirt in the area. There seems to normally be a disproportionate number of Infernals in this area, so keep your eyes open for Felguards and Succubi, but you shouldn't have to go into the canyon to get those kills hopefully. There is the possibility you might also get a quest-starting item called Diabolical Plans while here, but don't fret if you don't have it.
The road through Felfire Hill goes across the eastern river into the Warsong Lumber Camp. Cross the river some place other than the bridge to avoid the pair of grunts guarding it. You have two quests for this area. One is to collect lumber, and the other is to wrack up a kill count on various enemies in the area. Grab lumber as you come across it, but focus on Agents of Destruction. The deforesters are not especially common, so your first priority is finding 5 of those. You will probably finish all the scouts and the shredders before that. Be careful around Peons. Overseer Gorthak is in the small building south of the fence that contains the stronghold.
Finish both quests and head back. Forest Song is just a little to the north from here. Turn in your quests, but don't hearth back to Astranaar yet unless you're done for the day.
Scene 5 - Satyr Slaying (level 29)
Quests completed: Vile Satyr! Dryads in Danger!, The Branch of Cenarius
From Forest Song head northwest, above Satyrnaar, into Xavian. The satyrs here perform a full heal when they get low on health, but it has about a six-second cast time, so it's easily prevented. What is not so easily prevented is the adds you often get here from respawns and from spellcasters that refuse to come to you. As you clear your way toward the river, you should find Anilla is in the center of the encampment. Her dying wish is for you to reclaim the Branch of Cenarius from Geltharis.
North of Anilla, you will find a small enclave that contains Geltharis and possibly a rare spawn, Prince Raze. Do your best to get Geltharis solo; he single-pulls easier than one might think. Loot and scoot back to Forest Song, and then hearth back to Astranaar.
Scene 6 - You Monsters! (level 29)
Quests completed: Raene's Cleansing 6, 7, and 8, The Howling Vale, Satyr Slaying
This trip is going to look a lot like Scene 1.
Go back to the moonwell one more time. Shael'dryn will take the Iron Pommel from you and put the rod back together, but you need to energize it. As you are running out of the moonwell area, (figuratively) put your hand on the left wall and follow it south, east, north, east, and then up a small path to the shrine above Raynewood Retreat where you need to recharge the rod. Retrace your steps back to the moonwell to show her.
Run east out to the northern road. Feel free to cut through Raynewood Retreat. Go ALL the way north to the border of Felwood, and then turn left off the road. There should be a ridge going up into the western hills to an area called The Howling Vale, filled with worgen. Clear your way past them into the main area. There are two clickable objects in the Vale, but the one we are interested in is the Tome of Melthandris on the left. If you move quickly, you can avoid most of the respawn on the way back out.
Run back down the road a little, and find your way into Night Run again. The entrance is off the east side of the road about a third of the way toward the main road. Make one full sweep through the satyrs, killing them all for their horns, and continue east out the other side. Xavian is at the mouth of the rivers, or if you prefer you can stay further south and go into Satyrnaar. But make your way to Forest Song, stopping to kill enough satyrs to get your 16 horns.
A Trip to Darnassus (level 30)
Make this trip either before or after scene 7, whenever you get to level 30.
After turning in The Howling Vale at Forest Song, you will want to fly to Darnassus to follow the trail of Velinde Starsong. Speak with Melyria Frostshadow in the warrior's terrace. She will give you a key to check out Velinde's possessions in the sentinel bunkhouse, which is on the south side of town. Look for signs on the second floor of buildings on the outer edge of the city. Thanks to the wonders of Night Elven architecture, that area can only be reached by taking the bridge over to it from the building across the street. Check the chest in the bunkhouse and head back to Melyria. She will have you head for Ratchet, which is what we will do when we are completely finished with Ashenvale.
While you're in that area, if you're a Night Elf or Draenei, you will want to do one other things before returning to Ashenvale, and that is pick up your mount. For Night Elves, it's in the Cenarion Enclave of Darnassus. Draenei will have to travel to the area outside of Exodar. Other races will be traveling to Eastern Kingdoms shortly, although you certainly *can* go there now if you like.
Scene 7 - Finishing With the Furbolgs (level 30)
Quests completed: Raene's Cleansing 9, 10, and 11, Insane Druids (maybe), Never Again! (maybe)
Head back to the moonwell and speak with Shael'dryn. Find your way back to the well and show Shael'dryn your energized rod.
Go to Astranaar and talk to Raene. She'll be interested in seeing your magic rod as well. Raene gives you instructions to use it to make contact with the last remaining uncorrupted furbolg. You will find him above the waterfall overlooking Mystral Lake. Go around the east side of the lake and you should find a path that leads up and above it to Krolg. Krolg will be hostile to you in your natural form, but if you use your rod, he will be more interested in your company.
Krolg will ask you to rub out Ran Bloodtooth and get his head. You can squirt over the wall to the east to reach the Bloodtooth Camp quickly. Ran is an archer, so you will not be able to get him to come to you. Instead, work around him first, and then you should be able to have a fairly enjoyable fight. Give the head to Krolg and he will ask you to share it with Raene. (Side note: Doing so will also deprive you of Dartol's Rod of Transformation. Many players choose not to progress any further on Raene's Cleansing so they can keep the rod as a fun toy.)
The rest of this trip is optional, and only for completionists.
East of the road is The Dor'danil Barrow Den. The quest Insane Druids takes place inside the den. Approach this area with caution, as there are a lot of stealth mobs. The quest has you killing three different druids, who are all passive and that you can clear around. The druid themselves are possibly easier than the trash mobs you clear to get to them. The den is just like any other barrow den – split up into three circular areas that are all linked together.
- The first has two bridges going across to small rooms, one of which contains Taneel Darkwood, and has a ramp down to a lower level that has connector paths out of it to either side.
- The area you reach from taking the left exit has a bridge leading to a central island with two more ramps off it. One goes to a room across the area that has a hall in the back leading up to Mavoris Cloudsbreak. The other ramp goes downward to a floor with a bunch of irrelevant rooms and the connector path to the third section.
- The final area has a large bridge heading into another small room, and a ramp down and to the left that leads into another room which hides Uthil Mooncall. The connector back to the first area is across from the bridge...or you can just hearth out.
While I doubt those directions helped much, the point is: kill the three druids and leave.
There is one final task you could do, and that is Never Again!, the follow-up to the dropped note in Felfire Hill. It involves fighting your way into Demon Fall Canyon and killing one named demon at the east end of the area, and going to the ridge at the west end, entering the barrow den there (which is just like the one you just came from) and finding the other named demon in there. You probably don't want to bother with this, although the rewards are slightly better than Insane Druids.
Returning to Duskwood (level 30)
We've got some perfectly good quests going to waste in Duskwood that we need to wrap up. Make your trip to Darnassus if you haven't by now, and then fly to Ratchet to chase after the Night Elven priestess. The wharfmaster will ask you to speak to the caravan master in Booty Bay, who will in turn send you to Clerk Daltry in Darkshire.
However, when you get to Booty Bay, fly to Stormwind instead and go to the Cathedral District. Speak with Thomas, the altar boy. He will send you on the beginning of another epic journey that will send you to the following people:
- Bishop DeLavey in Stormwind Keep
- Jorgen in the outer moat of the city
- Elling Trias in the first building on the way back into Stormwind
- Watcher Backus in Duskwood
So when you get to that last step, then fly to Darkshire. Set your hearthstone, talk to the clerk, all that jazz. We'll resume there in act 6.
P.S. Go get your mount if you haven't already.
|
