Azuarc's Leveling Guide part 01
Azuarc's leveling guide for Alliance, Act 1: Darkshore (levels 12-15)
Welcome to the guide! This opening section is going to be a little on the TLDR side as I pave the way things for later on.
| Contents [hide] |
Why Darkshore?
Feel free to skip to the next heading unless you're asking yourself this question. Unlike later in the guide, I'm going to guess that many of you are scratching your head and asking that question. Darkshore is very out of the way for many races, the art is less vivid than other areas which makes it feel a little drab, and some people find it to be an annoying zone. So either I'm braindead or I must have a reason for it, right?
I have two. The first is simply that I've played Night Elf characters enough that it's what I know best. And the other is that it actually is the best choice, in the absence of being able to use the Horde zones. The Barrens with a side of Stonetalon is rather spectacular if you know your way around, but unfortunately Alliance don't really have any business there. Instead, Alliance have the choices of Darkshore, Bloodmyst Isle, Loch Modan, or Westfall.
Let me get this through to everyone right now: Westfall sucks.
People -- especially Human players -- have an incurable fixation with Westfall, but when you arrive at level 11 or 12, you aren't well-equipped from Elwynn to start. The quests are all spread out in Westfall and you need to know where you go, which wouldn't be so bad except that the quests are also annoying. Except for one collection quest with low drop rates, most of your early quests in Westfall intentionally send you into crowded areas where you get gang-banged by murlocs, gnolls, and Defias Trappers. Once you stumble through those quests, which should have been done at 14 instead of 11 or 12, you literally don't get any others until you grind to 15. If you can get over that hump, then you get to fight Defias Pillagers in Moonbrook. Anyone who's done that can attest to how horrid a chore that is. You could group through all this to save some trouble, but you get even less experience that way and would still need to find another zone. I also personally don't feel the zone picks up much after that point.
Loch Modan is a decent zone, but it suffers from a little of the same trouble early on - all the quests on the west side of the loch are not easily soloed quests except for the Thelsamar sausage quest. Once you get past that, the zone opens up nicely. If you absolutely cannot stand Darkshore or the thought of running across the Wetlands, I would recommend Loch Modan over Westfall.
Bloodmyst Isle, on the other hand, is much easier to work in due to having a decent number of early quests. You can actually get to level 14 without breaking a sweat here, unlike Westfall or LM, and you can follow the quests nicely. If you know the quests here, it goes much more smoothly than other zones and the quest rewards are generally better. However, it's red. Very, very, red. My eyes bleed by the time I'm done there. It also requires you have Burning Crusade, which more than likely you do, but it's a fair precaution to consider.
So to be fair, I should put down the negatives for Darkshore. It's a very long, thin zone, which means lots of running if you don't plan well. The shores are lined with murlocs. Cats and bears seem to emerge from behind trees constantly if you're not careful. (Tab-targeting constantly usually resolves this.) The art is bleak and washed out, which many people find depressing. Some of the later quests can be difficult without a group. But I actually feel like if I were determined to, I could level to 18 there without going anywhere else, unlike Westfall or Loch Modan.
Beyond that, I do have other reasons. Part of the vision I have is the long run of having a character you want to play, and that includes having flight points and reputation from all over. If you don't like Darkshore, go somewhere else and catch up with the guide later. There's a reason many guides - notably Jame's - don't start until 30.
Darkshore, level 12
Darkshore runs itself almost exclusively out of the town of Auberdine, so the first thing you will want to do when you get here, other than maybe take the boat to Teldrassil for that flight point and come back, is set your hearthstone to the inn in Auberdine and get all the quests here. Don't forget to set your hearthstone!
The quests you should be able to find are:
- Buzzbox 827
- Bashal'aran
- Tools of the Highbourne
- Washed Ashore
- How Big a Threat?
- Plagued Lands
- The Family and the Fishing Pole
- The Red Crystal
- For Love Eternal
- Cave Mushrooms
- WANTED: Murkdeep!
11 total. Look around 'til you find them all. One is from a signpost, one from the top room in the inn, and one under the hippogryph platform. If you are a Night Elf, you might also still have Grove of the Ancients and the flight quest chain that will take you back to Teldrassil at some point. There's also a cooking quest and a fishing quest. This is not to say we will actually do all of these quests, but you should at least be aware that they exist in case someone is LFG for them in General, and you don't know what they're talking about.
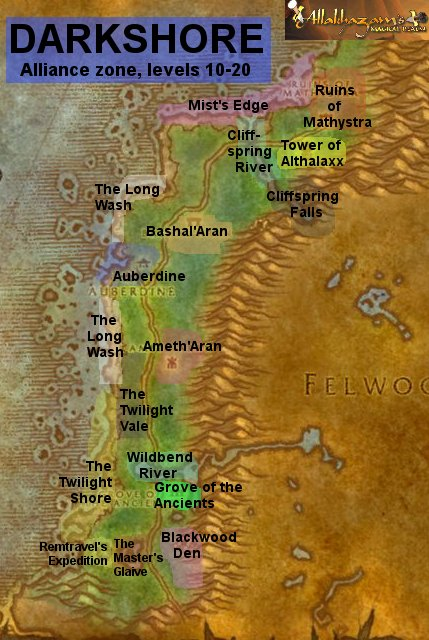
Here's a map that includes all the points of interest in the zone.
Scene 1 - The Beaches of Auberdine (level 12)
Completed quests: Buzzbox 827, How Big A Threat? 1, Washed Ashore 1-2, Plagued Lands.
Every trip out of town will be called a "scene". When you reach the end of a scene, you'll have reached a completion point of some sort, and usually you'll be back in town.
Our first trip will leave the town south along the shoreline. Our target quests are Buzzbox 827, Washed Ashore, How Big a Threat?, and Plagued Lands. The first of these to focus on is the Buzzbox, which involves killing the crabs along the beach. Just move south, from crab to crab, but keep moving south until you see the beached sea creature surrounded by murlocs. Don't worry if you don't have all six crawler legs.
When you reach the Beached Sea Creature, pull the murlocs around it until you have a clear path to your target. Use tab-targeting to check behind it as well, since they come running once you touch the whale-threshadon-thing. Be careful with murlocs, since they're known for their ability to run away and usually find three friends, but these murlocs aren't nearly as bad about bringing company. The murlocs and crabs run away quickly, but be patient. If something flees, unless you know you can hunt it down, stop and wait for it and it will usually come back to you sooner. Make a bandage while you wait or something.
Checking the body will complete Washed Ashore, and send you back to town. Don't go back yet though! Just put the bones in your "quest item bag" (along with your crawler claws and your bear trap) and keep going south, killing crabs as you go until you finish. You should be done by the time you reach the fisherman, Heldan Galesong, standing on the edge of the beach right where some land juts out into the water. Hang out and finish collecting claws if you haven't. This is our marker to turn inland. You may as well sell to the fisherman while you're here, although we won't be much longer.
Directly to the east is a furbolg camp. It's actually split into two circles. You need to, quite literally, walk into the northern of these two circles. No killing required, so you might even think about just dashing through along the edge of the camp until you get the (Complete) message rather than risking fighting adds. It's easiest to approach from the southeast where you can see everyone in front of you. They're level 11 to 13, so you can handle them if you want, but you'll also be killing them later.
There is one more thing left to do before returning to town. Find a Rabid Thistle Bear. They're all over, especially to the south of the furbolg camp. Get the attention of one, and use the trap in your bag at point-blank range. Wait a second for the trap to go off and the bear will become friendly and follow you around. It won't fight or do anything, but you've finished the quest.
Fight your way back north to town. The Buzzbox you finish at is just south of the hippogryph platform, and looks like a strange machine in some bushes. Every single quest will lead to a follow-up, but there is one in particular we are concerned with. Do all your normal quest turn-in and town stuff, but we just want to do one last thing before taking a break.
Run to the end of the dock, and jump off the southern pier where the boat to Stormwind Harbour. Dive toward the south until you see the skeletal turtle. Loot it and swim back to town. This quest needs to be done for prerequisite purposes. Now, whenever you see a beached sea creature along the shorelines, you can interact with it and get a small mini-quest.
Warriors: the class quest from the trainer in Darnassus is underwater right near here.
Scene 2 - Bashal'Aran (level 13)
Quest completed: Buzzbox 411, Bashal'aran 1 2 and 3, The Red Crystal, Beached Sea Creature #1.
This will be a long trip, so you'll need all your bag space if you're still using 6-slotters. Mail off those herbs!
Time for some more swimming. This time jump off the northern pier and head north while killing Darkshore Threshers. As soon as you have your three eyes for the Buzzbox, you can return to land, while continuing north. Eventually the shoreline will turn east for a moment before going back north. At this bend, there will be a beached sea creature. Kill your way around it and "loot" it.
We're almost finished our trip north, but not the entire journey. Just past the beached sea creature is the second buzzbox. Hand it your thresher eyes and get the next quest. Any time you see a moonstalker now, it is your business to kill it (and usually it will be its business to kill you first before you see it.) You also have a quest to kill Rabid Thistle Bears, so be prepared to hack your way to wherever you're going, although you should be doing that already. You aren't concerned with finished either of those quests now.
Head east and make your way to the road. We're actually too far north, so you'll need to trek down a bit until you reach Bashal'Aran. I recommend crossing the road and going south while keeping your eye on it so you can get some of the kill counts you need, but proceed carefully. The creatures here are tough enough you do not want to fight two at once. Once you get to Bashal'aran, that's a different matter.
Near the road is a path up the hill where most of Bashal'aran is. Take that path up and toward the blue glowy thing atop the ridge near the road. There you will find Asterion, your objective. I call him "blue man".
Blue man will ask you to kill some of the grells in the area. They're mostly level 10-12, so this shouldn't be too hard. Even if you get an add, you should be able to handle it. Grab your 8 earrings, return to blue man, and he'll tell you to kill satyrs now. There aren't nearly as many satyrs and the drop rate isn't as good, but you only need 1 drop. Bring it back to him and blue man will give you one more task that takes place somewhere else altogether.
So you're probably getting weary by now, but one more chore first to make things tidier later. Make your way to the east zone wall, and then start going south. We're actually going further south than Auberdine, just past where you will start seeing moonkin spawns. Watch up along the mountains for a large red crystal, and when you see it, try to avoid the moonkin in front of the crystal rather than killing them; even when you think you have a single pull, the mobs by the crystal are hard-linked to each other, which means you will always get two. One of those level 14 raging moonkin is doable, but two of them is usually fatal, so sneak your way to the crystal if you can. You just need to approach it.
You're not far from Auberdine, but you're well within your rights to say enough's enough and use your hearthstone. (You DID set it to Auberdine, right?)
Druids: the moonkin caves are where you need to go for your bearform quest. Since that's available at level 10, you've probably already done this, but be sure to do it by now if you haven't already.
First intermission (level 14)
Take a breather. That was a long run. Go run around Auberdine again for new quests that have become available, and make sure you fill your tube in the moonwell in town. Training at level 14 is rather dismal for most classes, but go train if you feel you need to. Seriously, though, get up and stretch at least. That last one took at least an hour.
Your quest list at this point should contain:
- Tools of the Highborne
- Bashal'Aran
- As Water Cascades (from The Red Crystal)
- Buzzbox 323 (third Buzzbox)
- How Big a Threat? 2
- The Family and the Fishing Pole (maybe)
- The Cliffspring River
- Cleansing of the Infected (from Plagued Lands)
- For Love Eternal
- Cave Mushrooms
- Deep Ocean, Vast Sea
- The Tower of Althalaxx
- WANTED: Murkdeep!
13 in all, plus possibly Grove of the Ancients for Night Elves. You are perfectly welcome to finish The Family and the Fishing Pole on your own time. I won't mention it again, because you either need to fish up some Darkshore Groupers, or get them from another player. Paying 10-15 silver will usually be enough to get you your fish, if there's anyone that's even bothering.
Scene 3 - Ameth'Aran (level 14)
Quests completed: The Fall of Ameth'Aran, Tools of the Highborne, For Love Eternal, How Big a Threat? 2, As Water Cascades
Leave Auberdine by the road this time, and head south. (We go north, then south, then north, etc.) Eventually you will see Sentinel Tysha Moonblade by the left side of the road. Take her quest, and then head into nearby Ameth'Aran. We have multiple orders of business here.
- Tools of the Highborne - just kill stuff and loot
- Bashal'Aran - find the flame in the pagoda at the center of the southern half of the ruins
- For Love Eternal - kill the wandering level 16 Night Elf ghost
- The Fall of Ameth'aran - look at two stone tablets, one in the north and one in the south of Ameth'aran
You should finish the others along the way to finding the two tablets. The southern one is straight in from the path near Tysha. Just head due east through the ruins and you should see it propped on its side. (This is south of the pagoda with the ancient flame.) The other is further north, near the other pagoda, but on its side. You might have to do a little hunting to find Anaya, but she's usually in the south fairly close to the road. She's the only non-aggressive NPC around, so follow her until you can pull her safely.
Once you've collected all your goods, return to the sentinel, and then cross the road and head a little north to get back to the furbolg camp we visited in part 1. We're cleaning house this time.
Night Elves and other Teldrassil questers: If you have Grove of the Ancients in your log, head south, past the river, turn left (east) immediately afterwards, and talk to Onu. It's a small hike, but you won't get another chance to do this quest before it turns gray. Return back up this way afterwards.
Get your kills, and then head northeast. The final goal on this expedition is to return to the red crystal. We're coming from the other direction, but the approach is the same: get to the zone wall and follow it. It's a bit more crowded from the south, so be careful. You do actually have to "use" the crystal for a moment this time to get a quest dialog, so simply running by isn't an option either.
Fight (or die) your way to the crystal, and then battle your way across the moonkin caves back to Auberdine. You should be 15 by the time you're finished.
Moving to Bloodmyst (level 14/15)
In the original version of the leveling guide, before version 2.3 increased experience gains and made a few things easier for leveling, the recommended path at this point was to take a brief trip over to Bloodmyst Isle because many of the quests are not wonderful to do at level 15 and it's an uphill climb to reach the level 20 we want to be at by the time we finish in Darkshore. This is still somewhat true, but it is less important to go to Bloodmyst. If you are by some chance level 16 already, you can simply pass over the sections of the guide that go to Bloodmyst and carry on further down in act 2.
|
