Ravennus' Horde Guide Book 14, 55-56
Buning Steppes, Azshara, Western Plaguelands: Level 55-56
Previous guide: Book 13, 53-54
Next guide: Book 15, 57-59
Generally, this series of guides will help you complete the majority of quests in each zone. In most cases, you will not have to complete every quest mentioned here in order to meet your level goal for the chapter. When you've reached the target level listed in the chapter, feel free to move on to the next zone and abandon the rest.
That suggestion is particularly true of this book. If you have so much experience that you have leveled beyond the guide, you can confidently skip the chapters in Azshara and Burning Steppes, for example, and move directly to Western Plaguelands. In this preliminary trip to WPL, we complete some important early quests that we'll need for our visit in the next book.
On the other hand, if you find yourself falling behind in leveling, this is an easy opportunity to catch up again.
Keep in mind, however, that there is an abundance of quests for levels 50 - 55, and not nearly as many quests for levels 56-59. What we're doing here is filling up our pool of experience now so that were not scraping for xp at level 58.
The other major reason for these chapters is that Azshara and Burning Steppes are unusual and distinctive zones that are worth the visit, even for a short time, just to look around.
| Contents [hide] |
Azshara 55
Preparation
Mackenzie begins this chapter at level 55 + 12 bars. The first step is to find Alchemist Cuelly in the lower Apothecarium in Undercity, and accept from him Seeping Corruption (52). Then travel to Orgrimmar and ask a guard for directions to the Warrior trainers. Outside the hall, find Belgrom Rockmaul and accept his quest Betrayed! (53). Now fly to Valormok in Azshara.
Once you arrive in the Horde camp, find Ag'tor Bloodfist on the other side of the wagons to complete the first quest and accept the next, Betrayed (53), to kill Blood Elves. Across the clearing, speak to Jediga for her quest Stealing Knowledge (52).
Thalassian Encampment
Expedition 1
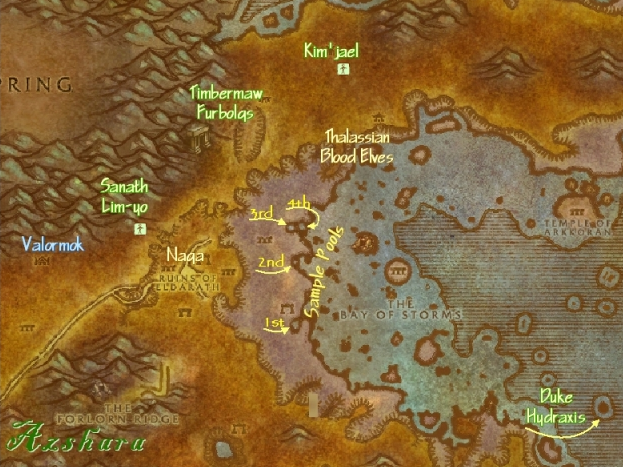
Leave camp by running north east from Valormok to find a goblin at 53, 23. You will run across some Timbermaw Furbolg and you should be careful not fight them at all. We'll have more dealings with them in the future and we don't want to damage our reptuation with them. You'll find a tall, steep-sided hill with the Legash encampment near the base. At the top, however, there is a friendly goblin with a quest against the blood elves, Kim'jael Indeed! (53).
The blood elves that have cheated Kim'jael are located just to the south east of his hill. Look for a grassy trail at 54, 27 that will lead up to a scattered Thalassian camp at 56, 29. In this area you'll find boxes that spawn on the ground at 4 or 5 set points. Open these boxes to find Kim'jael's equipment. Not every box contains a quest item; for me they dropped about 30% of the time. Often the boxes are filled with junk that just fills up your inventory. If you don't pick it up, however, the box can never respawn. The respawn rate for boxes is rapid, though, so you can just stay in this area to complete this quest.
At the same time that you're working on the boxes, you will be killing the Thalassians for Betrayed. The blood elves seem to have an unreasonably large aggro radius, particularly when you are opening boxes. You can easily have 3 or more on you if you're not careful. The other half of the Thalassian camp is at ground level, further to the east. There are two spawn locations here for the boxes, but more important is the ruined circle of stone pillars which mark Kaldorei summoning circle.
Make sure you have completed your kill list for Betrayed, then walk up to this circle to complete "Find Magus Rimtori's Camp." Right click the summoning tome to complete the first quest. The next quest has you right clicking on one of the sparkling obelisks around the circle. Choose the obelisk directly across from the book (avoid the ones on either side) and you will first summon a warrior. Pull that warrior away from the summoning circle and when she is almost dead, she will call for Magus Rimtori. Rimtori will spawn at the summoning circle and will not immediately aggro if you are well away. Finish off the warrior first, then when you've healed, engage Rimtori and loot her head.
Before leaving the area, collect all of Kim'jael's gear and then return to him to turn it in. Kim'jael's next quest is to the Naga ruins. Before heading that way, run back to Valormok and turn in Betrayed.
End of First Trip
Ruins of Eldarath
Expedition 2
Travel to the crossroads at 29, 55 and take the path that leads to the east. This will take you into the lower ruins overrun with Naga. Among these ruins, you'll find the four tablets that Jediga asked you for. They are low to the ground with glowing, colored glyphs on them. There are multiple spawn points for each of the four tablets and while you may find many spawns, you may not easily find all four different tablets. While you are searching for the tablets, kill every naga you find until they drop Some Rune for Kim'jael.
Run through the ruins and out to the beach. We need to pick up a quest from Duke Hydraxis, a water elemental found on a distant island at 79, 73. Swim out through the bay, avoiding the submerged giants walking along the bottom. Accept his quest, Poisoned Waters (55) and then return to the Beach. While you're out here by the sea, look for the Alchemist Cuelly's four pools at 47,61; 47,52; 48,49; and 46,46. According to some reports, you may have to be in the middle of the pool in order to collect your sample.
When you have four tablets, four samples, and the rune, return to Valormok and turn in the quest to Jediga. In return, Jediga will offer you four more quests, messenger quests to the three capitol cities and one local delivery. These are simple messenger quests that will give you a substantial xp reward. A little extra time spent now will be an insurance policy when we're level 59, and itching to get to Outlands.
Run back to Kim'jael and give him the rune. On your way out, pass by Sanath Lim-yo at 28, 50, who has a blue question mark. After dropping off the Rune, return to Lim-yo and he will teleport you to the top of a nearby mountain. Follow the path further up and you'll eventually come to a mage's tower. On the top floor, speak to Archmage Xylem to complete the first delivery. Accept the return quest, Xylem's Payment to Jediga (52). Find Jediga at Valormok again and turn in Xylem's delivery.
End of Second Trip
You have three more messenger quests, one to each capital city. Magatha is on Elder Rise in Thunder Bluff. Andron Gant is in the Apothecarium in Undercity, and Jes'rimon is on the upper level of the Drag, in Orgrimmar. Make a quick circuit of the Horde capitals and then return to Jediga in Azshara for the final completion.
Burning Steppes 56
Our objective is to stay here just long enough to get our feet wet. We only have 7 quests in Burning Steppes, so we will run them in order, just to get the quests we need and get out. None of these quests has any long term implications, so you're free to leave whenever you're ready.
Before the Burning Crusade expansion, this area was an important quest hub for Blackrock Depths and other early endgame content. As soloists, we won't need to put much emphasis on this area at all.
Through Blackrock Mountain
Expedition 1
Before traveling to Burning Steppes, make sure you have the Black Dragonflight Molt that we picked up in Searing Gorge. Fly into Kargath in the Badlands, where we need to pick up two quests. Find Thal'trak Proudtusk, who is usually standing in formation on the left side of the inn as you face it. If the company is not there, they are out patrolling and will return shortly. Proudtusk gives you Dreadmaul Rock (52). Beside the nearby bonfire, on the same side of the inn, speak to Heirophant Mulvadania for The Rise of the Machines (54). Now make preparations to leave Kargath.
Our next task is to reach the zone for the first time. Begin by flying to Thorium Point in Searing Gorge. Leave Thorium Point and head south, along the western edge of the cauldron. Travel to 33, 74 where you'll find wooden timbers embedded in the mountain slope, forming a ramp heading up to a door in Blackrock Mountain.
Pass through the entrance and into the hollow interior of Blackrock, into an area reminiscent of Ironforge. There are no mobs in here, and the only danger is from falling. When you get to the inner ring, turn right and pass through a doorway at 48, 66, following a stone bridge called the Molten Span, which slopes downward to another doorway on the right. You'll reach this door before you pass through the second gate in the Molten Span. This passage leads out on the south side of the mountain, into the Burning Steppes.
Follow the flagstone ramp down to ground level. You are at the far western end of Burning Steppes. The mobs around you will be level 57-58 dragonkin, so beware of stumbling in to them. You're next objective is to find the flightpath, which for the Horde is located in the center top of the zone. Follow the road to the east, avoiding unnecessary fights.
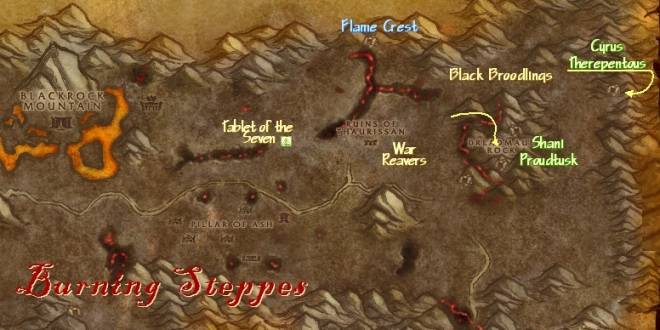
Just beyond the large white statue of a warrior, look to the north to find the Ruins of Thaurissan. Leave the road heading to this ruins at 56,40. Wandering the ruins are Thaurrisan Dwarves and War Reavers. Kill the War Reavers and collect their Fractured elemental shards, which drop about 50% of the time. Don't expect to get all 10 shards on this visit. Clear your way north east through the ruins heading for the base of a pathway at 63, 30. Follow this narrow causway up to the flight path at Flame Crest, 65, 24.
End of First Trip
Juicing the Broodlings
Expedition 2
Pick up the flight path, of course. Then talk to the two goblins under the tarp to accept Broodling Essence (52) and Tablet of the Seven (50). The other quests in this area are for instances inside Blackrock. Now leave Flame Crest and return to the Ruins of Thaurissan. Continue to hunt War Reavers for the shards as you are traveling to 54, 40. Here you'll find a statue and a tablet to complete Tablet of the Seven.
Turn to the east, now, and clear more War Reavers as you work your way out of the Ruins. Stay to the north, skirting the Ogre infested mountain, Dreadmaul Rock. Out on the plains you'll find the baby dragons, Black Broodlings. The process of collecting the Broodling Essence takes a few steps. First, you have to find a Black Broodling, and if there are others on the quest as well, these can be scarce. Tinkee Steamboil gave you a gizmo for gathering essence, the Draco Incarcinatrix 900; put that on your task bar. After you pull the broodling, activate the gizmo, then kill the Broodling normally. When it's dead, you should see a small reddish obelisk along with the corpse. Loot the obelisk and then the corpse. Now repeat this 8 times to gather all the Broodling Essence.
Hunt for the Broodlings along the northern plain. As you hunt, move to the east, heading for the north eastern corner of the zone where you'll find a Cave at 94, 30. Inside the cave, you'll find Cyrus Therepentous, who has a quest for you, A Taste of Flame (54). We'll need to go through a dialoge to complete it. After you accept the quest, click on him again and choose the dialogue "I present you with proof..." You must have the Black Dragonflight Molt in your inventory to complete this step. Click on him again, and this time click the yellow question mark to complete the quest. His next quest is for the instance, so we will not bother with it, but we basically got 7900 xp just for showing up.
Return to the plains outside and gather the rest of your broodling essence. Broodlings are found both to the south and to the west of Cyrus' cave.
End of Second Trip
Dreadmaul Rock
Expedition 3
When finished with the Broodlings, run back to the west and look for the Ogre's mound at Dreadmaul Rock. There are several entrances to the area, but the one you need is on the west side, at 75, 38. You are looking for a trail that climbs to the top of the rock. You do not need to enter any caves to get to the top; instead, look for a bridge. The ogres pose little challenge at our level. At the top, take a minute to clear out the ogres wandering there, including a few patrols. Then find the altar, surrounded by 4 pillars at the corners. On top of the altar is a skeleton. click it to examine it. All the text box says is that these are Sha'ni Proudtusk's remains. After examining the bones, however, Sha'ni's ghost appears just beside the altar, very faint.
She completes your first quest, Dreadmaul Rock, and offers you another, Krom'Grul (53). Krom'Grul is the chief of the ogres on this rock, and not a difficult kill. The trouble comes with finding him in the first place. There are two significant cave systems on the rock and Krom could be in either cave. One is to the north east, and is accessed from a path starting at 76,33. In this cave, stay to the far right and you should find him on the platform above the center area. If he isn't there, the other cave is on the ground level at 77, 47, to the south west.
After you kill Krom'Grul and loot the nose ring, you're ready to return to Kargath and talk to Proudtusk again. Climb down from Dreadmaul Rock. Make sure you have all Broodling esseces, and all the Elemental Shards from the War Reavers, then return to the flightpath at Flame Crest. Turn in your quests to Tinkee and Maxwort and fly back to Kargath.
End of Third Trip
In the Badlands, give Sha'ni's ring to Proudtusk to complete Krom'Grul. Then talk to Theodora to turn in Rise of the Machines She has a quick messenger quest Rise of the Machines (to the Gnome Lotwil Veriatus, just to the east of Kargath, where we turned in all those rock elemental shards. Run out there now and chat with Lotwil for another quick 2000 xp, but don't accept his next quest, which is for an instance.
This completes our visit to the Burning Steppes. Mackenzie earned about half of a level in this zone. We will pick up the other half of this level in Western Plaguelands. Fly to Undercity.
Western Plaguelands 56
In this chapter we will make our first visit to Western Plaguelands, at least briefly. There are two quest chains on this visit. We start one major quest series, The Scourge Cauldons, that we will continue on our next visit. If you have no need for experience, it's still a good idea to complete this main quest chain before heading to Felwood.
The Bulwark
Expedition 1
There are no flightpaths into Western Plaguelands, so fly to Undercity and take the road to the east to the border of the zone. At the border, you'll find a Horde Camp called The Bulwark. Several quests are available here, but the one you want is to the north of the road, from High Executor Derrington. Accept Scarlet Diversions (53). After accepting the quest, look beside him for a crate and pick up a Flame in a Bottle. You should also have a Scourge Banner in your pack as well.

Leave the Bulwark and travel east on the road, into Western Plaguelands. Stick to the road and you'll see Felstone Fields to the left, with groups of Scourge scattered around it. We'll be back this way soon, but for now, continue on the main road until you come to a side road that leads to the south and a signpost will point the way to Andorhal. At that juction turn north and proceed cautiously to 40, 52 where you'll find a camp of Scarlet Crusade.
There are many mobs at the camp, and they are tightly spaced so if possible you want to pull them away from the camp to fight them. You only need to clear about a third of them to reach the door of the tent. Once there, click on your Flame in a Bottle and then the Scourge Banner to complete the quest. Now return to the Bulwark and turn this quest in.
End of First Trip
Felstone Field
Expedition 2
Derrington next offers The Scourge Cauldrons (53). This quest merely sends you south of the road to Shadow Priestess Vandis. Her quest, Target: Felstone Field (53) is the real mission into the Plaguelands. Return to Felstone Field, 31, 58 which we passed before on the north side of the road, and locate the huge cauldron in the middle of the field. In front of the cauldron, on the side facing the road, you should be able to find the Cauldron Lord. Clear your way to the Cauldron Lord, defeat him and loot his key. Then click on the chains that are attached to the cauldron and accept your sample, the Filled Felstone Field Bottle. This will complete your first quest and give you the follow up, Return to the Bulwark. Do not return just yet, however.
Instead, clear your way to the large farmhouse to the north, 37, 54. Inside, on the second floor, you'll find Janice Felstone with the quest Better Late Than Never (52). She wants you to find a package and deliver it to Undercity. The package is in the next building, the barn, which is also overrun with mobs. You must click on the package twice; first to complete your quest, and again to accept the new quest to Undercity, Better Late Than Never (52). Return to the Bulwark and turn in the Cauldron quest to the Shadow Priestess. You can accept her next quest, but we will not be heading back right away.
Mackenzie was level 56 + 19 bars
End of Second Trip
Felstone Delivery
Expedition 3
Travel on to Undercity. If you picked up the package at the farm, ask an Undercity Guardian for directions to the Guild Master. Beside him you'll find the Census guy who will complete your quest. He sends you to the Cockroach Seller in Jeremiah Blues (52). The cockroach seller is located under the bridge directly in front of you as you leave the Guild Master. His quest Good Luck Charm (52) sends you back to Janice Felstone in WPL.
Next, return to Janice at the Felstone Fields. She'll ask you to find the other half of the charm, Two Halves Become One (54) which is being held by one of the Scourge. The one you want to kill is in front of the Barn, over by the group of Scarlet Crusaders. Periodically, it will spawn at 38, 56, wander for a few seconds, and then aggro on the Scarlets. Before it does, pull it to you and kill it. Loot the other half of the charm, then right click one of the halves in your inventory to combine them. Return to Janice in the house to finish the quest and the series.
End of Third Trip
That's all we need to do in Western Plaguelands right now. Our next book will take us to Felwood for a level before bringing us back. It will also be the final book set in the Old World of Azeroth.
Previous guide: Book 13, 53-54
Next guide: Book 15, 57-59
|
