Ravennus' Horde Guide Book 13, 53-54
Searing Gorge, Un'Goro Crater: Level 53 - 54
Previous guide: Book 12, 50-52
Next guide: Book 14, 55-56
This book takes us into the higher levels and at this point we are pulled in two directions. Being so close to level 60, we are beginning to hear the call of Outlands and we just want to level as fast as possible. At the same time, we are in danger of overleveling, and we begin to find ourselves many levels higher than the quests we are completing.
As usual, when you complete the target level for the chapter, feel free to move on to the next zone if you wish. Contents Searing Gorge 53 The Hinterlands 54 Un'Goro Crater 54
| Contents [hide] |
Searing Gorge 53
This chapter begins by traveling to Kargath, in The Badlands. If you're on Kalimdor, you can easily travel to Booty Bay or Grom'Gol and then fly to Kargath. From the Eastern Kingdoms, you can fly there directly.
Windblade's Camp
Expedition 1
Just south of Kargath, you'll find a mountain path that crosses the ridge between Badlands and Searing Gorge. It is marked with a large cactus tree at 6, 60. This will bring you into the zone on the eastern edge. The Searing Gorge flightpath and one of the major hubs for quests is Thorium Point, in the north western corner. Making that trip will be our first challenge.
The easiest route is to turn north onto the road and then watch for a road that splits off to the left (heading west) at 70, 36. This puts you on the north side of the Cauldron. The roads disappears among the tents of the Dark Iron Dwarves, who are hostile. You shouldn't have any trouble weaving your way through them without drawing aggro.
Your first stop is at 39, 38, with two green-named npcs. Talk to Kalaran Windblade and pick up Divine Retribution (48). All you have to do is speak to him again and read through his tale to complete this quest. Then, accept his next quest The Flawless Flame (48). Now you're ready to continue on to Thorium Point. Don't go off hunting elementals until you've gathered some more quests.
As you look west from Kalaran Windblade's camp, you'll see a strange image carved in the cliff face, flanked by two torches. That image marks the path up to Thorium Point. Talk to the flightmaster here at 34, 30; and then begin to gather quests.
End of First Trip
Cauldron's Edge
Expedition 2
Run over to the base of the Thorium Brotherhood watchtower. From the wanted poster, accept three quests: Job Opportunity: Culling the Competition (48), STOLEN: Smithing Tuyere and Lookout's Spyglass (48), and WANTED:Overseen Maltorius (50).
On the other side of the base of the tower, accept three more: Curse These Fat Fingers (49), Firey Menace! (49), and Incendosaurs? (49). Beside you, underneath the canopy, talk to Master Smith Burninate to accept, What the Flux? (50).

With these quests in your log, descend from Thorium Point and turn left to reach the open shelf above the cauldron again. First, we need to kill Heavy War Golems, which are found among the Dark Iron encampments and machinery surrounding the edge of the cauldron. While you are hunting the golems, go ahead and kill a few Dark Iron Slavers and Taskmasters, though you don't need to complete the kill list at this point. We need to kill 20 of these golems for Fat Fingers and by the time were finished, we will certainly have gathered our 4 Golem oil.
Further away from the edge of the Cauldron, look for Greater Laval Spiders and Inferno and Magma elementals. Both the flame-looking Inferno elemental, and the rock-type Magma elemental drop the Heart of Flame, so hunt them both. Continue hunting until 20 spiders are killed and you have 4 Hearts. Many of these mobs are found on the west side of the cauldron.
When your first round of hunting quests is finished, return to Windblade's camp and complete Flawless Flame and accept the next quest: Forging the Shaft (48). Run up to Thorium point to turn in Fat Fingers and Firey Menace.
End of Second Trip
Into the Cauldron
Expedition 3
Windblade's next quest, Forging the Shaft asks us to kill Taskmasters and Slavers to gather their knives. Our quest from Thorium Point, Job Opportunity has us killing the same mobs. These two mobs are found in tents around the rim of the cauldron as well as down inside.
Start with the mobs on top, and while your are hunting, also look for Blacksmiths and Lookouts to find the drops for Stolen: Now it's time to enter the Cauldron. You should already have the quests from Thorium Point: Incendosaurs?, Overseer Maltorius, and What the Flux?.
There are many ways into the cauldron, but the most direct is via the elevator at 39, 53. It's kind of slow. Ride it all the way to the bottom (the third stop). When you step off the elevator, look for an entrance into the cavern on your left. Follow the path up the right wall, killing the taskmasters and slavers as you encounter them. After you cross an uneven bridge, look for an iron door on the left, and follow the passage to the north. It is possible to avoid the taskmaster patrols, but you want to kill them now to complete the quest.
Head for the metal ramp at 43, 23, and take it to the upper level. Ignore the side ramp about halfway up and follow the main one to the top. It opens into a room full of Dark Iron Dwarves. Follow the wall on your right, fighting the dwarves in your way, and you'll come to an opening at 42, 35. This leads to the balcony where you'll find Overseer Maltorius (50) and one attendant(48).
Before facing the Overseer, stay in this room and kill any remaining Taskmasters and Slavers you need, continuing to gather Thorium Plated Daggers. Now return to the balcony. Fight them both and loot Maltorius' head. Behind them, on the edge of the balcony, you'll find the Secret Plans: Fiery Flux.
Our next quest is for the Incendosaurs. If you've already leveled to 54, however, feel free to skip this quest and return to the rim of the Cauldron.
Leaving the balcony, cross the room and head for a bridge to the south east. Cross that bridge, and you'll briefly leave the cave. Then, stay to the right to re-enter it lower down. Continue to stay to the right and you'll enter the cavern where the Incendosaurs live. Kill 20 of them to complete the quest.
Return to the place where you briefly saw daylight and jump down in the gap on the inside of the bend. From here, you can hop down to the Cauldron floor. Run to the west and you'll find a ramp leading out of the Cauldron, starting at 44, 56. Return to Windblade
Windblade accepts your Thorium Plated Daggers and sends you out again with The Flame's Casing (50). This quest is completed with the Twilight's Hammer cultists. To find them, start with the torch-flanked image at the base of the path to Thorium Point. Follow the path to the west, and you'll find them wandering around the mouth of the cave.
This can be an uneven drop, with some getting the Symbol of Ragnaros on the first or second kill, while others have to kill a dozen or more. On your way back, stop by Thorium Point and turn in the three quests you completed in the Cauldron.
End of Third Trip
Dark Iron Towers
Expedition 4
Now return with the Symbol of Ragnaros to Windblade. The next step in Kalaran's plans is a little complicated. Accept his quest, the Torch of Retribution (50). Then wait for a minute while he completes it. Speak to him again and he offers the next quest with the same name. Here, he asks you to take the Torch of Retribution. Complete that quest and he offers nothing further. At that point, the torch will be suspended in front of him. If not, click on him and a dialogue appears where you ask him to enchant the torch. When the Torch appears, Click on it to pick it up.
Windblade then offers another quest, Squire Maltrake (50). Turn and speak to his companion. Maltrake offers you the main quest Set Them Ablaze (52).
Maltrake's quest requires you to run to each of the four towers surrounding the rim of the cauldron. At each one, clear a path to the first landing. The Towers are guarded with War Golems as well as Lookouts. Kill the Lookouts to find the Spyglass.
On the first landing of each tower, on the front corner, you'll find a small brass brazier on the floor. Equip your torch as a two-hand weapon, then right click on the brazier to light the tower on fire. Don't forget to switch back to your regular weapons before fighting the next group of Dwarves. Complete this for each of the four towers. Circle the Cauldron in a counterclockwise direction. The first tower is at 33, 53; the second at 35, 59; the third at 44, 61: and the fourth at 50, 55 across a short bridge.
When you have cleared the Dark Iron Towers, continue hunting Lookouts unti you have gotten theSpyglass to drop. I had to clear the lookouts twice. (If after clearing the towers twice you don't have the Spyglass, I would consider skipping this quest, particularly if you are level 54.) Then leave the towers and head back to Kalaran Windblade. At this point, patrol the camp of Dark Iron Steamsmiths, on the northern rim of the Cauldron and continue to kill steamsmiths until the Smithing Tuyere drops. It took me 2 complete clearings of the steamworks for the Tuyere to finally appear.
Return to Kalaran and complete Set Them Ablaze. Read through the drama, then click on the chest on the ground to accept Trinkets (50). Click it a second time to receive the item, Hoard of the Black Dragonflight. Inside this chest you will find two greens and some consumables as well as the Black Dragonflight Molt. Keep this for a later quest. Kalaran Windblade's quest series is complete. Ride back to Thorium point and turn in STOLEN: and Culling the Competition.
Mackenzie was level 54 +6 bars
End of Fourth Trip
This ends the chapter in Searing Gorge. The goal was to get through level 53. Regardless of your level, we have a few quests to complete in Hinterlands to finish that zone. Fly to Revantusk in The Hinterlands for our next chapter.
The Hinterlands 54
During this brief visit to the Hinterlands, we will focus on the quests of Jintha'alor, the troll temple in the southeastern corner of the zone. The reason we're here has more to do with the loot, rather than any experience we may earn. These quests into the temple lead to an excellent bow or wand, necklace, and arguably the best non-caster trinket in the game, pre-Outlands.
We need to pick up 5 quests before we leave Revantusk: Spearation Anxiety (50) from Huntsman Markkhor, Job Opening: Guard Captain of Revantusk Village (51) and Wanted: Vile Priestess Hexx (51) from the Wanted poster next to Markhor. In the little platform on top of the inn, speak to Primal Torntusk for Dark Vessels (50), and Kidnapped Elder Torntusk! (51).
Temple of Jintha'Alor
Expedition 1
Begin by riding up the path to the top of the Overlook Cliffs, and from there, west to the road. Turn south to find the troll Temple of Jintha 'Alor.
(I'm sorry if this map makes your eyes crawl out of their sockets. Give it a minute and it will become clear.)

There's only one path through the early levels of the temple. In addition, there are no quest mobs or items on the first two levels, and it is quite possible to avoid mobs entirely and move directly to the third level. Here, at around 64, 69 you'll find Berserkers. Hunt them as you move through. You need to kill all your Berserkers now, because there are no more on the higher levels.
On the next level you'll begin to see Shadow Hunters, at around 66,75. You will easily kill 5 on your way through this area. The top of the next stairway, at 60, 71, presents you with your first choice. You want to stay to the left and begin to hunt Blood Drinkers and Soul Eaters. You will also begin to see Vessels of Tainted Blood, which are small boiling cauldrons atop a small fire on the ground. Collect 10 of these as you progress through the Temple.
Having turned to the left, pass through a stone archway and inside you'll find many Jade Sludges. In the middle is a rough fence of sharpened stakes. Pass through or over the stakes to find a pile of skulls inside. Click on this to collect Huntsman Mal'khor's Bones, the first of two pieces for Separation Anxiety. Leave the pit and continue to the south east.
Continue to hunt Blood Drinkers and gather the Vessels and climb the stairs to the top level at 65, 79. In this area, kill all your remaining Soul Eaters and gather any Tainted Blood that you need. When those two quests are completed and you're ready to move on, travel to the west through another stone archway at 62, 81, into the central temple area.
Avoid the guards on your left and carefully make you way over to the central amphitheater where you'll find Elder Torntusk tied to the altar. Kill the wolves if they wander in your way. Observe the altar, for a minute, and you'll see the entrance to a cave behind it. Regularly, the Vile Priestess Hexx (51) wanders from the cave to the altar area, then back to the cave again. You want to catch her when she is out by the altar alone.
Vile Priestess Hexx frequently turns you into a toad, and then beats on you as you hop around. The best way to defeat her is to have some way to counteract the polymorph. High DPS will take her down as well. When the Priestess has been defeated, talk to Elder Torntusk to complete the quest, and he will give you another, Recover the Key (51).
To do this, you must enter the cave system, clear out the Anan'zasi Guards and find your way to the back. There, you'll locate Hitah'ya the Keeper (51) with two attendants (50), circling the Ancient Egg. Hitah'ya has the Shackle Key and so she must be defeated to loot it. When the three of them are down, fight your way back to the front. During your time in the cave, you will easily kill the 10 Guards you need for the Hexx quest.
It's likely that Priestess Hexx has respawned, by this time. Wait until she strolls outside and then exit the cave. When she walks back inside, go talk to Elder Torntusk to complete the second part of this quest. He will give you another quest, Return to Primal Torntusk (51).
When you leave the central temple area, go to the opposite side from where you entered - find the arched exit to the north west. Follow the stone path, past the stairs on your right, and past a cave entrance on your left. You're looking for a stone alcove filled with wolves at 58, 65. Click on the pile of skulls in this area to collect Huntsman Mal'khor's Skull. This should complete all the quests you have for Jintha Alor.
Leave the alcove and curve around behind it to 57, 63. Here, you'll find a small pool leading to a series of waterfalls that will allow you to leave the temple without fighting your way back through all the levels. Jump down the waterfalls and return to Revantusk to turn in these quests.
Even if you haven't reached 54 yet, Un'goro Crater has an abundance of quests that will easily allow you to make up the difference.
End of First Trip
Un'Goro Crater 54
Preparation
Later in this chapter you will need a Mithril casing, a player-created item sometimes available on the Auction House. If you cannot find one, don't spend too much energy looking. Start in Orgrimmar and look for Jes'rimon in The Drag. He's on the upper level of one of the houses on the north side. Accept his quest, Bone-Bladed Weapons (52).
Next, fly to Ratchet. Liv, inside Marvon Rivetseeker's hut, gives you a quest to collect Un'goro ash, Volcanic Activity (55). Continue your flight south to Gadgetzan. Turn your quest into Alchemist Pestlezugg, March of the Silithid. He responds with Bungle in the Jungle (53). From Tran'rek, by the northern gate, pick up Super Sticky (54). Now leave Gadgetzan and head to the south east corner of the desert. Find the two dark obelisks marking the entrance to Un'goro Crater at 27, 57. Walk down the steep ramp into the crater.
Torwa Pathfinder
Expedition 1
At the bottom of the ramp, you'll find two earthen fingers marking the ramp as well. Just as you pass between them, turn to the right and look up on a protruding rock to find Torwa Pathfinder. Scramble up to him to accept more quests, The Apes of Un'goro (55), and The Fare of Lar'korwi (53).
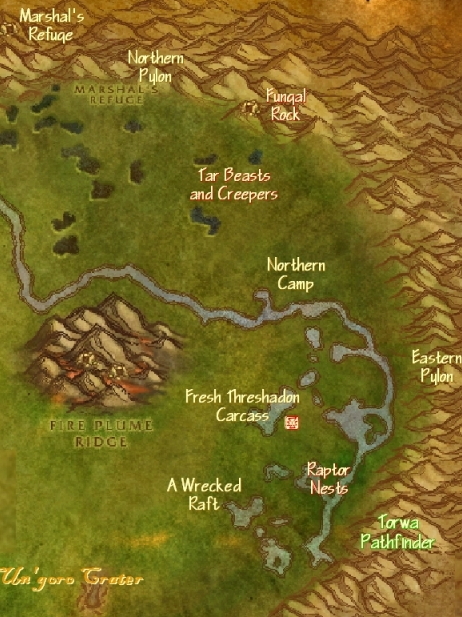
One of the first things that you will notice about the Crater is the number of collectible thing littering the ground: glowing power crystals, dark piles of Un'goro soil, bloodpetal sprouts. Each of these is part of a quest that you will eventually complete, so gather them wherever you find them. You will need seven Power crystals of each of the four colors, 10 piles of Un'goro soil, and 15 Bloodpetal sprouts.
Leaving Torwa, travel to the west - threading your way through the raptors. Head towards 63, 68 on the edge of a pond where you'll find A Wrecked Raft. Click on it to accept the quest It's a Secret to Everybody (52). Dive into the center of the pond to find A Small Pack. Click on it to complete the quest and accept the next one by the same name. This is all we can do at the raft, so head north to 68, 56 to find the Fresh Threshadon Kill, to complete Fare of Lar'korwi. Clear the raptors of the area and then click on the carcass to take your sample. As you are killing raptors, or any mob, a Mangled Journal will drop. Read this right away to accept the quest Willidan Marshal's Journal (50). This tells us to head north to Marshal's Refuge.
From the Threshadon Kill, travel north to the top of the zone. At 63, 19 you'll find Fungal Rock, the lair for the Gorillas of Un'goro. Note the location of this area on your zone map, and kill a few to begin the quest from Torwa, but don't enter the cave or spend a lot of time hunting now. Continue to travel to the west. At 56, 15 look up high on the crater wall to the north and you'll see the Northern Pylon. We don't need to go to it now, but remember it for a future quest. At this point, however, be sure that you have 7 of each color of the Power crystals, and collect 15 Bloodpetal sprouts.
Further to the west you will be diverted south around a giant boulder wedged against a tree. The Tar Pits are on the far side. Return north to hug the northern wall as you travel west. At 46, 13 you'll find a dwarf named Remtravel with the quest, Chasing A-me-01 (53). While you are stopped, look in your inventory to locate A small pack, which you picked up in the pond. Right click to open it, and pick up each of the items found inside. Then climb the steep path behind Karna to enter Marshal's Refuge.
The first quest you'll see is from a gnome named Linken. Talk to him to complete the quest. You have just completed the first few steps of a very long quest chain centered around Linken. We will not follow this series any further, but you now have the preparation to do it on your own if you wish.
End of First Trip
Marshal's Refuge
Expedition 2
Find the flightpath in the back right corner of the valley. In the back left corner, you'll find a collection of quests available. Begin by turning in Willidan's Journal and then accept Expedition Salvation (53). Beside him, speak to Hol'anyee to accept Alien Ecology (52). Over by the mouth of the cave talk to the goblin Nilminer to accept Roll the Bones (51). Dadanga, the kodo next to him, will accept groups of 15 Bloodpetal Sprouts and give you a care package in return.
Now enter the cave behind Dadanga and follow it all the way to the back to find J.D. Collie. Accept her quest, Crystals of Power (53), and immediately complete it with the crystals you've collected. At this point, Collie offers you three more quests, to discover the location of the Northern Pylon (53), the Eastern Pylon (53), and the Western Pylon (53). Accept these three and exit the cave.
As you leave, you'll find Spraggle Frock directly in front of you with Lost! (55). On the sign behind her, accept Beware of Pterrordax (55). Standing beside Spraggle, look out toward the entrance path to the valley, and you'll see Shizzle there, with a quest. Accept Shizzle's Flyer (51). Over on the far east wall of the valley you'll find Luigin in hiding. Take his quest, Larion and Muigin (52). This should be all the available quests in Marshal's Refuge.
End of second trip.
Fungal Rock
Expedition 3
Now you're ready to descend from the Refuge. At the foot of the path, you'll find the Tar Pits and the wandering Tar elementals. These drop the Super Sticky Tar for the quest from Gadgetzan. This is a very slow drop, and the best rates come from the Tar Creepers and Beasts to the south and west, not from the Lords at the entrance to Marshal's Refuge. The drop rate is low enough that you may consider skipping this quest, unless you need to load up on experience.
Next, ride to the east and look for the Northern Pylon we noted earlier at 56, 12. Click on the pylon to fill the quest objective. Behind the pylon, you may find some Pterrordax, a mob that is rarer than its Freznied relatives. Kill all of them here because they are needed for two quests. We wont get everything we need from one valley, of course, so kill what you find here and then move on.
Return to the Crater floor and continue east to Fungal Rock, the gorilla cave. This time enter the cave and begin to gather your gorilla pelts. Inside the cave, stay to the right and you'll locate A-me 01, a mechanical gorilla. Clicking on her will reveal that she needs a Mithril casing. If you brought one with you, you can use it now to begin the escort quest. With all the apes killed behind you, the passage out should be an easy one. Expect to fight a number of apes in the field outside the cave. A-Me walks back to Marshal's Refuge.
With or without having completed A-Me's quest, be sure to return to this area to gather all the pelts that Torwa wants for The Apes of Un'Goro. Now turn to the south. We're heading for the expedition's northern camp at 69, 37. Along the way, kill the wobbling Bloodpetal lashers for Luigin's quest. At the camp, gather the Crate of Foodstuffs. Before leaving this area, you should have killed all your Bloodpetal Lashers and Threshers.
Our next destination is the Eastern Pylon. From the camp, run to the eastern wall of the Crater and continue south. As soon as you see the water-filled channels of the Marshlands at 75, 48 look high on the eastern wall of the Crater to see the Eastern Pylon. Run up to inspect it and complete Collie's second quest. Make a note of this area because you will be returning here for the Lar'korwi quests.
Continue south to Torwa at the bottom of the entrance ramp. Turn in The Apes of Un'goro and accept The Mighty U'cha (55). Also complete The Fare of Lar'korwi and accept the next one, The Scent of Lar'korwi (53).
End of third trip.
Lar'korwi and U'cha
Expedition 4
Travel back to 71, 60 and you will find nests of purple eggs on the ground. Clear out the regular mobs that wander around the eggs, being careful not to touch the eggs themselves. With the mobs clear, go and stand on the eggs. In a few seconds, you will be warned that you are "in combat." The mate has aggroed on you; look around for her and take her down. Loot the Ravasaur Pheremone Gland. Now go find another nest of eggs due north at 71, 53 and do the same thing for your second gland. These ravasaur raptors drop the claws for Bone-Bladed Weapons. Continue to hunt them until you get all 8 to drop.
Return to Torwa and turn in this second quest. He gives you the final quest in the series, The Bait for Lar'korwi (56). Travel back to the Eastern Pylon, then follow the valley behind it, filled with large bones. Find the dark gray rock, low to the ground, and stand on it. Now look at your inventory and you'll find a small black pouch. Right click to open it and accept the two items. Click first on the Preserved threshadon caracass, then click on the Pheremone. Now run back up the valley toward the Pylon, where the boss raptor will spawn. Kill him and loot Lar'korwi's head.
From the Eastern Pylon, ride north and return to Fungal Rock. The objective here is not to kill the regular gorillas but to find U'cha, at the very back of the cave system. Defeat him and loot the Hide of U'cha. Leave the Fungal Cave and head to the west.
We don't have any quests to turn in yet, but if you need to clear out your bags and restock, Marshal's Refuge is nearby.
End of fourth trip.

Terror Run
Expedition 5
This time, we want to work our way south on the west side of the central volcano. On this west side, you'll find Frenzied Pterrordax, as well as Bloodpetal Flayers. Kill them as you travel south. Your immediate destination, however, is 30, 50 where you'll find Krakle with another quest, Finding the Source (55). Turn back to the west and when you reach 24, 56 look high on the east wall of the Crater to locate the Western Pylon. Inspect it to finish the third quest in this series.
Continue south, following the Crater wall until you enter Terror Run, an area in the south east corner of the zone. Here, you'll find Elite level 55 Stegadons, who are tough to kill. The best plan is to avoid them wherever possible. You'll also find Bloodpetal Trappers in this area. Kill another 5 of those to complete the quest. However we need to carefully find our way around the outside edge of the crater until we come to 31, 77 and another Threshadon Carcass. Around the Threshadon, you'll find many Dinosaur bones to complete Roll the Bones. Respawns are rapid so that you should be able to find 10 bones just in this area alone.
From the Threshadon corpse, head north to the Expedition Research Camp at 38, 66. You can find the crates of Research Equipment here to complete Expedition Salvation. Travel to the south east and you'll see the outlying evidence of the Gorishi Hive. The entrance to the hive itself is at 50, 80. Enter the hive and stay to the right. In the last room at the end of the tunnel, the same room with the Gorishi Silithid Crystal stand in the center of the room and click on the Unused Scraping Vial in your pack. You will receive a Hive Wall Sample to complete Alien Ecology. Return to the surface but remain in the area hunting insects until you find a Gorishi Scent Gland.
South of the hive, there are two valleys where you can find more Pterrordax, one at 44, 90 and the other at 56, 90. Expect to find only 3 or 4 in each valley, meaning that you'll have to hunt for the rest on the east side of the volcano. Cleaning out the two Pterrordax nests gives you an opportunity to check on another quest, Shizzle's Flyer. After killing all 25 lesser and greater Pterrordax and at least 2 dozen elder Dimetredon, Mackenzie was still missing over half of the Scales he needed for that quest. Because he doesn't need any more XP, this is a quest that Mackenzie will not pursue any further. If you have had greater success with Scale drops or are in need of a lot of experience, this quest will certainly generate that for you.
We are now ready to start turning in these quests. Begin by traveling to Torwa Pathfinder. Turn in The Bait for Lar'korwi and your hide from The Mighty U'cha. Journey north to Marshal's Refuge to turn in the rest of your quests. Willidan Marshal, Hol'anyee Marshal, and Spark Nilminer (near the cave entrance) all have quests to complete. Spraggle Frock also may have one or two quests to turn in, as well. Inside the cave, find J.D. Collie all the way at the back and turn in her three Pylon quests. She will offer a capstone quest, Making Sense of it All (53), which you will accept and turn in immediately to complete the series. You get a Pylon User's Manual that will show you how to receive buffs by presenting crystals to the Pylons.
Back outside the cave, look to the left to find Larion hiding behind his rock, to turn in your bloodpetal quest, Larion and Muigin. (He may be dead due to some recent PvP action.) Complete any other quest you have for Marshal's Refuge, as well, like Shizzle's Flyer.
End of fifth trip.
You should have three unfinished quests left in your log: Volcanic Activity, Lost!, and Finding the Source. If you are like Mackenzie, you will be well into level 55 at this point. Remember that you are free to leave Un'goro Crater at any time once you've reached your target level.
Fire Plume Ridge
Expedition 6
There is one remaining expedition to the volcanic center of the crater, Fire Plume Ridge. Travel south from Marshal's Refuge and find the path that leads up onto the volcano at 55, 49. At the top of that path, you'll find a cave entrance with Ringo inside. Before we engage Ringo in the quest Lost! we need to deal with Krakle's quest.
Outside, facing the cave entrance, look for a rough path to its right, beside a charred tree. Follow this path as it winds around to an upper level, and look to the right to find the hottest Fire Plume Ridge Hot Spot at 49, 45. Check your inventory for Krakle's Thermometer and click on it to complete the quest.
Leave the volcanic ridge and run over to Krakle at 30, 50 to complete the quest. As you are wandering on the volcano, kill the fire elementals to recover the Volcanic Ash for Liv in Ratchet. Now return to Ringo in his lower cave. Wake him up and escort him back to Spraggle Frock in Marshal's Refuge. Click the canteen to wake him, when he stops to rest.
End of sixth trip.
Wrapping Up Take the flightpath to Gadgetzan, and turn in Bungle in the Jungle to Alchemist Pestlezugg. He offers a second quest back into Un'Goro, but it's doubtful that we'll be heading back that way. Also turn in Super Sticky if you completed it. Then, fly north to Ratchet, to turn in Volcanic Activity. After talking to Liv, fly on to Orgrimmar and turn in the quest with Jes'rimon to end this chapter.
End of Book 13
Previous guide: Book 12, 50-52
Next guide: Book 14, 55-56
|
