Ravennus' Horde Guide Book 04, 24-26
Late Barrens - Ashenvale: Level 24-26
Previous guide: Book 3, 21-24
Next guide: Book 5, 27-30
In this book we have four very short chapters that still deliver a lot of experience. First, we finish up our quests in Stonetalon and The Barrens, completing several stories that we have been working on for a long time and saying goodbye to questing in the Barrens. Then we visit Ashenvale and Hillsbrad to soak up some xp and drive our characters to level 27.
Patch 2.3 This patch generally made leveling more rapid by reducing the amount of XP needed between levels, and by granting more experience for completed quests. This has two effects on leveling. First, I no longer need to do any passive grinding - killing a few extra mobs along the way to pad the xp gain. Just focus on the quest and get out. Second, you may find that you are leveling faster than the guide. In later books, many quests will be optional if you have reached your target level. For now, you will begin to notice in this chapter that things are a bit easier.
| Contents [hide] |
Stonetalon Revisited 24
Sun Rock Retreat
Expedition 1
Returning from Hillsbrad with our new toxin, the first thing to do is to fly to Thunder Bluff and visit Apothecary Zamah at the Pools of Vision underneath Spirit Rise. Zamah will accept your potion and then give you instructions to go to Stonetalon Mts with the Toxic Fogger in The Flying Machine Airport (23). We also still have a quest in our log from Seereth, Shredding Machines.
Fly into Sun Rock Retreat, and speak to Tammra Windfield, on the far side of the round house. She's the one staring at a pile of dirt apparently willing something to grow. Tammra gives us Cycle of Rebirth (23). If you completed the quest in Boulderslide Ravine last time we were here, return to the guy on the bluff overlooking the Inn and get the final quest from him, an elite quest called Earthen Arise (20+).
Before leaving the Retreat, visit the Inn and set your hearthstone there temporarily.
End of first trip.

Windshear Crag
Expedition 2
Now leave Sun Rock Retreat by the path to the main road, and take a left, following it north through a small pass that leads to Mirkfallon Lake. It will be ahead on your right. Avoid the piles of rock that house the wyverns, and circle the lake near the shore, looking for the seeds on the ground. These look like pinecones. When you have gathered 10, return to the road and head south again.
Our next destination is the clearcut area of Windshear Crag. You can jump off the cliff at Ziz Fizziks' house or run further south and enter through the spider area. You are looking for two shredding machines, which wander through the loggers and deforesters in the area. The XT:9 wanders in the southern area, while the XT:4 wanders in the northern area across the river.
Also in the northern area is the helicopter tower that you need to sabotage for the quest The Flying Machine Airport. This tower is actually marked on the map, near the Cragpool Lake. You may find a level 24 elite mob roaming nearby, so be careful. Clear your way up to the base of the structure. Then right click on the barrel of toxin in your inventory and slowly move your mouse around the grass beneath the platform until the (No!) symbol becomes a small barrel. Right click to place the toxin. After having killed both shredders, and placed the toxic fogger, you are ready to leave the area.
End of second trip.
Boulderslide Ravine
Expedition 3
Leave the clear-cut area and return to the main road. Follow the road south until you reach Boulderslide Ravine, where we've been before. This is the cave of the rat-like Groggers. Straight at the back of the cave, you will find the floating obelisk crystal. Clear your way to it, activate it to summon your boss dwarf, and then defeat the dwarf to complete Earthen Arise.
Return to the main road and run all the way south to Malaka'jin and accept Jin'zil's Forest Magic (27) from Jin'zil in the cave. Continue to the east and turn in Shredding Machines to Seereth Stonebreak at Honor Stand. Activate your hearthstone to transport you back to Sun Rock Retreat and give the gathered seeds to Tammra Windfield. Tammra has a follow up that we will accept next time we come, but watch for a minute as she plants a tree.
Also turn in Earthen Arise on the shelf overlooking the lake. Then take the flight path to Thunder Bluff and seek out Apothecary Zamah at his familiar cave to tell him about the toxic fogger. This completes our visit to Stonetalon, for now. At the end of this chapter, Mackenzie was level 25 + 5 bars.
End of third trip.
Southern Barrens 25
Cooking with Grub
Expedition 1
Our next group of Barrens' quests takes place south of Camp Taurajo. Preparation, however, begins in Crossroads, so fly there now. If you don't have the cooking skill, you will need to buy flint and tinder and simple wood from the general goods vendor on the flightpath side of the inn.
Leave Crossroads, using the road to Ratchet. On the left, you will see an orc farmhouse tower, visible from the gates of Crossroads. If you have cooking at level 20, an orc inside named Grub will give you Dig Rat Stew (23). If you don't have the cooking skill, learn it from the Cook next to Grub, as well as the recipe Spice Bread. The Baker outside will sell you mild spices and simple flour. Start your campfire and make 20 spice bread. At that point, Grub will offer you the quest.
Return to Crossroads and fly to Camp Taurajo. Pick up Betrayal from Within (25) from Mangletooth in the cage, and Weapons of Choice (24) from the blacksmith across from the Inn.
End of first trip.
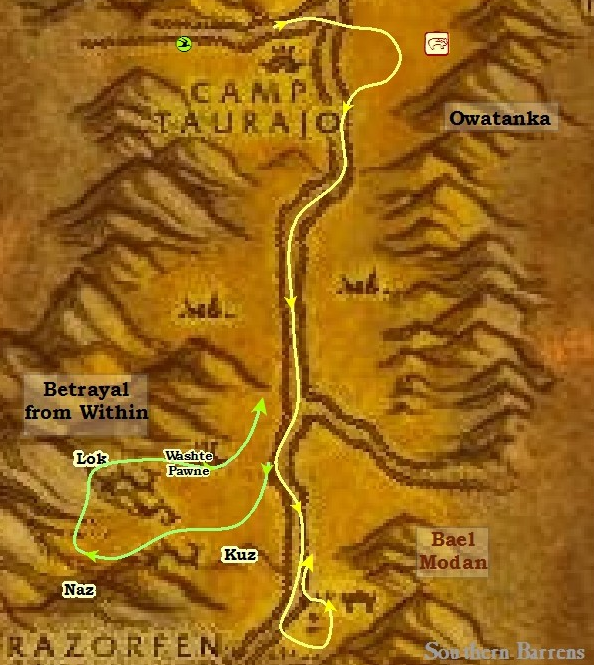
Bael Modan
Expedition 2
Leaving Camp Taurajo, stay on the path that runs out to the Gold Road. At the intersection, look straight east to find a big ugly tree. This is the most common location of Owatanka(24), a blue thunder lizard. If you don't find him there, look across the road directly south of Camp Taurajo. The challenge for Owatanka is not the fight itself but the fact that he wanders a field of tightly spaced mobs. Without careful clearing, you will have one or two adds join the fight. Kill Owatanka and take his tail for Jorn. Right click the tailspike to start the quest, .
Now turn south, and watch for a patrol of 4 mounted Night Elves that will kill you quickly. We'll pass the junction with the road to Dustwallow Marsh and in that area or further south along the Gold Road, you will find Gann Stonespire.
He has a quest called Gann's Reclamation (23) against the dwarves of Bael Modan. This is an excavation site further south and to the east of the road. You will see a dwarven fortification in the side of the hill, with a cannon sticking out. Beside it is the quarry where you can find the mobs on the kill list. Prospector Khazgorm is at the back of the dig, and will drop his journal. While in the area, you can also harvest the Dig Rats for Grub.
When the kill list is full, return to Gann to turn it in and pick up the follow up quest, Revenge of Gann (26). The target mobs for this, Riflemen and Soldiers, are up the hill by the fortification, instead of down in the pit. There is no need to go inside the fort, since the respawns are fast and most external mobs can be pulled solo.
While you are up by the Fortification, look beyond the soldiers on the eastern side and you'll find a lone tent. Inside the tent is another quest, The Tear of the Moons (30) and this one will take you deep inside the dwarven hold. There's no need to complete this quest, other that a little extra challenge.
Again, return to Gann to turn in Revenge. The final quest, Revenge of Gann II (26), wants you to sabotage the dwarves' helicopter. This is back down at the dig site, not up the hill in the keep! From the path down to the landing, mouse over the plane at the top of the tower to get the gear. Slowly approach the tower, because this can be completed from a good distance away. When the gear turns gold, right click to set things in motion, then return to Gann to complete this saga.
End of second trip.
Quillboar Cousins
Expedition 3.
Done with the dwarves, let's turn our attention to the Quillboar. Betrayal is one of the final quests against the quillboar, and asks you to kill three named targets. The Weapons of Choice are found in the same area, as a random drop off of three types of quillboars. Hunt for the named three first, collecting weapons as you go. Then continue to kill mobs for any remaining weapons. At the same time, keep an eye out for the thunderhawk (flying snake) named Washte Pawne (25). Loot its feather for Jorn.
The first named boar is Kuz, usually found wandering between the road and the ruined tauren buildings. The second, Nak, is wandering at the base of the hill to the south. The third is Lok Orcbane, found against the mountains to the west, up a steep path and inside a quillboar hut. You will kill many mobs, some of them stealthed, as you clear to these targets, so watch for the three weapons (backstabber, wand, shield) to drop along the way. I found multiples of each.
Return to Taurajo and turn in your two quillboar quests, and the feather of Washte Pawne if you found him. Reporting the kills to Mangletooth, he will send you on a messenger quest to the Crossroads, Betrayal from Within II (25). Fly there now and talk to Thork at the base of the watchtower. Next, run down to the Cook's farm and turn in your dig rats to Grub to complete his quest. Finally, head to Ratchet and pick up Further Instructions (27) from Sputtervalve, by the Flightmaster. This completes all the quests in Camp Taurajo.
Mackenzie ends the chapter at 26 + 5 bars.
End of third trip.
Middle Ashenvale 26
This chapter takes us back to Ashenvale. Fly to Splinertree Post to begin this visit.
Splintertree Post
Expedition 1
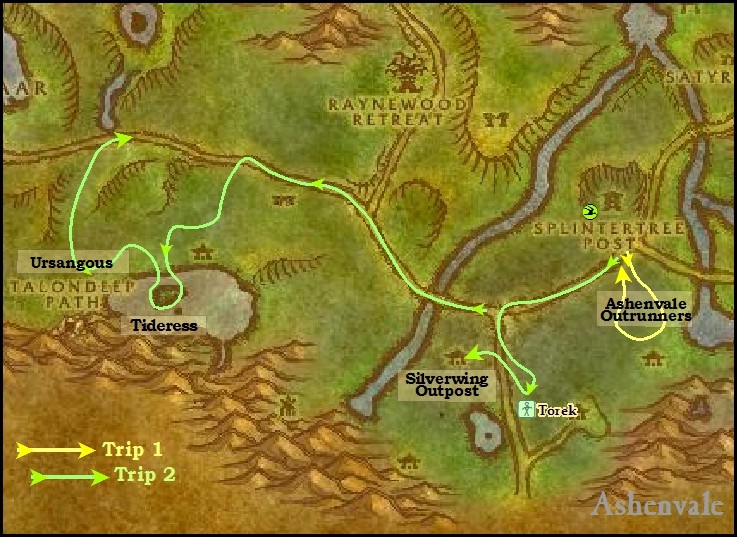
Standing at the flightpath, face the inn and look to the left side of it to find Mastok Wrilehiss and accept Stonetalon Standstill (25). Our first assignment, however, is out by the road. Speak to the troll Kuray'bin to accept Ashenvale Outrunners (24). The targets for this quest are directly south of Splintertree, in the large field littered with rotting slimes. Among the slimes are stealthed night elves, and the easiest way to detect them is to run around the edge of the field, fighting slimes where necessary, and then listening for the stealth sound that signals that one is nearby.
Sharptalon, the level 31 bird, is also in this area, and at our current level, he may be very difficult to kill. I recommend avoiding him until later.
With the outrunner quest complete, return to Splintertree to turn it in. Standing beside the troll is Locke Okarr with a quest called Warsong Supplies. Accept it now. This is a multi-part quest that we will be working on through several other quests in Ashenvale.
End of first trip
Mystral Lake
Expedition 2
Now let's begin Stonetalon Standstill, which sends us to Mystral Lake. We'll pick up another quest on the way. Run down the road to the intersection that leads to the Barrens. Run south a few feet and you'll see a night elf lodge on the right. Look to the left, past a giant tree and find Torek with a small orc raiding party, waiting for you at (68, 75). (You must find Torek and his three orcs for the raid to be successful) Accept the quest Torek's Assault (24) and join the raid against the elves.
One objective is to keep Torek alive, and the key to this quest is to wait for him to engage the enemy. Don't try to anticipate the target and engage early, but stay close and protect Torek during the encounter. The boss at the end will catch you from behind unless you stay up with Torek. When finished, return to the road, go north to the intersection and begin to travel west.
Continue past Raynewood Retreat, and ahead you will see an area with many ruined columns and small lights. Turn left here, and head south through a field of furbolgs until you see Silverwind Lodge. You're heading to a point west of the lodge at 48, 67. Mystral lake is on the south side of that Alliance outpost. Stay to the right, and begin to hunt the water elementals in the lake.
Clear a path to the center island and kill all the elementals on it. Then run over to the gazebo on the east side of the island, closest to the lodge. That will complete the first part of the quest. Wandering in this area is a green elemental named Tideress. Defeat her and she will drop a Befouled Water Globe. Right click on it and this begins a quest that is completed back in Splintertree, The Befouled Element. Now return to the water and finish up the remaining elementals to complete Stonetalon Standstill.
Back on land, the entrance to Talondeep Path is to the south west of you. Work your way over there, cautiously, looking out for a named gray bear called Ursangous. He wanders between the Lodge, the entrance to Talondeep, and up near the road. Even if he has recently been killed, his respawn is rapid, so look in that area, hunting a few regular bears for xp, until you find and defeat him. When you kill the gray bear, loot his paw and right click on it to begin the quest Ursangous's Paw (24). Bring this to Senani Thunderheart at Splintertree Post to complete the first phase of the Ashenvale Hunt.
Return to Splintertree now. Turn in Stonetalon Standstill and The Befouled Element to Wrilehiss behind the Inn. Accept the follow-up quest from Wrilehiss, Je'neu of the Earthen Ring(27).
End of second trip.
Thistlefur Hold
Expedition 3
Our next quests begin at Zoram'gar. Fly there now. Find Je'neu in the hut closest to the sea to complete his quest, but don't accept any further. Speak to Karang Amakkar to accept Between a Rock and a Thistlefur (24). Up in a hut beyond him, talk to Mitsuwa for Troll Charm (24).
With these last two, run to the main road and then travel east across Ashenvale. Just before you reach Astranaar, the Alliance town, look for some Thistlefur Furbolgs on the left, north of the road. These Avengers and Shaman are the target for the first quest. During this trip among the furbolgs we need to keep an eye out for the Logging Rope which is a component for Warsong Supplies. It will drop off of one of these mobs.
Work your way north, following the road to the left. You will first pass though a wooden gate, and then under a giant stone lintel, to find the entrance to the Thistlefur Hold. At this point, you don't have to kill all the Avengers and Shamans that you need, because you'll be back this way when you've finished inside the hold. Mackenzie had also found the Logging Rope as a drop from one of these Thistlefurs by this time.
Inside you will find small boxes on the ground that contain the Troll charms. It can be a little crowded in the hold so pull carefully but steadily, because respawns are somewhat quick. Stay to the right, collecting boxes as you go. Cross a bridge and stay right again; you will end up on a platform overlooking a white bear in a cage, with a quest, Freedom to Ruul (24). At this point, you need to have gathered all your troll charms, so finish gathering them now, if you have not.
The white bear is a difficult escort, and I don't recommend it for the solo player, but if you enjoy a challenge this will offer you one. (I was able to complete this as a druid, healing the escort.) Instead, follow the passage that leads up, and take a right where it joins the larger hallway and it will lead you to the exit. Once clear, return to Zoram Strand and turn in the two quests. Then fly to Splintertree Post.
My druid had leveled to 27 while inside Thistlefur Hold, and after the turn-ins, was 27 + 3 bars.
End of third trip.
Before we leave, we need to think about the quest called Warsong Supplies. There are 4 items to gather, and one of them (Logging Rope) has been collected from the thistlefur quest on this visit. The Crate of Axes simply requires a trip to Booty Bay from Ratchet to pick it up off the dock. The Deadly Blunderbuss must be bought from an engineer off of the Auction House. We must work on these two items before our next visit to Splintertree Post, when we'll find the last one.
For now, our chapter in Ashenvale is finished. Our next mission is in Tarren Mill, so fly to Orgrimmar, complete any housekeeping that is necessary, and take the Zeppelin to Undercity.
Middle Hillsbrad 27
Beginning this chapter, we should be near to level 27.
Ambermill Assault
Expedition 1
Our ultimate objective is to travel to Hillsbrad again, but we have a stop to make on the way. From Undercity, fly to Sepulcher and talk to Shadow Priest Allister to pick up a quest we left last time, The Weaver (22). (If you haven't done the low level quests from Allister, this quest won't be available. Just fly on to Tarren Mill and continue with Expedition 2.)
At our current level, 22 seems a little low for a quest. This one is particularly difficult, however (we probably would not have been able to solo it on our last visit) but more importantly, this is a near duplicate of a quest that we have to complete later, so we have the opportunity to give this a trial run.
The Weaver is Archmage Ataeric, a mage found at Ambermill, in a town hall building inside a walled enclosure. There are three phases to this assault. First, the mobs in the fields outside the walls are all very low, ignore them except for the two that wander up and down the main road. Eliminate these two. Position yourself just outside the gates of the walled enclosure. Ahead of you, you will see a stationary mob that you should clear, but you must also notice that at least 5 other mobs circle the main building. You must take each of these singly as they patrol past. You can ignore all other stationary mobs outside.
Next, move up to the entrance to the town hall. This has two small rooms and a large main room. Clear the small rooms of their single mobs. In the main room are 4 mobs and the boss. Wandering the middle of the room are two warlocks with their pets. These you must fight together. From the side chamber, pull one of the warlocks (both will come) and then run into the entranceway to break line of sight. This will cause both warlocks to run through the door. You must fight them there, concentrating on the warlocks first, then the pets. Check to see if any exterior patrols have respawned and take care of them if they have.
Third, move to the entrance of the main room and pull the Protector from the back of the room. He's a standard melee fighter who will meet you in the side chamber where you can kill him. The next protector is up by the boss, but he will come alone if you pull him to the back of the room. Finally, do not pull the boss, but run up to him. He casts frostbolt and will freeze you but goes down quickly as a caster. Loot his staff. Check again for patrols outside the building before running out the door. Then return to Sepulcher and turn in the quest to Allister. Then fly to Tarren Mill.
End of First Trip.

Farmers' End
Expedition 2
One of the great things about Tarren Mill is that it has a lot of xp compacted into a relatively small area. The quests aren't complicated, nor do they require extensive directions but they do involve a lot of killing. This leads to highly efficient xp gain.
Flying into Tarren Mill, first pick up Elixir of Pain (24) from the Apothecary in the first house on the left, to hunt mountain lions. On the outside wall of the Inn, pick up Dangerous!(28) for a list of citizens to kill. Then, talk to High Executor Darthalia in the center of the square to accept the first Battle of Hillsbrad (24) to kill farmers and farmhands.
As you travel to the area, harvest the mountain lions in the open fields that you pass through. You have two trips across these fields to gather all the blood you need. The human town of Hillsbrad is located far to the west, north of the road. Farmers are found on the north side of the town. Move first to the northern farmhouse where you will find Farmer Ray. He can be just inside the door, or on the second floor, or among the vines on the south side. Then look for Farmer Getz, who may be in the blue-roofed barn, or in the field across from it, or even in the small house to the east. Then complete your list of farm victims in the field. Also in this area, look for Citizen Wilkes to come walking by, the first of your kills for Dangerous!.
Now, return to Tarren Mill, but be sure to collect all the Mountain lion blood that you need for the Elixir quest. Cross over to the south side of the main road for many more Starving Mountain Lions. Just don't go too near Southshore.
After the first Battle of Hillsbrad is turned in to Darthalia, take the next in the series Battle of Hillsbrad II (25) looking for peasants. After speaking to Darthalia, talk to Samsa (behind you, next to the inn) for the Souvenirs of Death (25) quest. Turn in Elixir of Pain, and accept the next quest by the same name, Elixir of Pain (24). With these three, we are ready to return to the human town.
Level 27 + 10 bars.
End of second trip.
Peasants of Hillsbrad
Expedition 3
Approach the town from the road. You will first come to an orchard where you will find the Peasants, in the south east corner of town. In this area you will also find another citizen, Farmer Kalaba. Look around for her and add her to your kill list. You are also gathering skulls, though you won't get all 30 on this visit. There are two more Hillsbrad quests later, so save the skulls and we'll complete the Souvenirs quest then, particularly inside the mine. There aren't enough peasants in the orchard to complete your list of 15. Clear the orchard first, then find Stanley.
The second Elixir of Pain quest sends us to feed a sample of our poison to Stanley. The dog Stanley is found outside the farm house where you found Farmer Ray, and he enrages and becomes hostile when you give him the elixir. Now return to the orchard up by the road to look for Peasant respawns. When I completed killing peasants, I had 15 skulls as well. Return to Tarren Mill to turn in your Battle of Hillsbrad quest with Darthalia. The first half of the Battle of Hillsbrad is complete. Hearth away to Crossroads, and we'll finish the Battle in the future.
At the end of this chapter, Mackenzie was level 27 + 17 bars.
End of third trip.
Book 5 - Stonetalon, Thousand Needles 27-30
|
