Older version (diff) | current version (diff) | Newer version (diff)
Ravennus' Horde Guide Book 02, 17-20
Sepulcher, Stonetalon: Level 17 - 21
Previous guide: Book 1, 14-16
Next guide: Book 3, 21-24
While the first book concentrated on a single area, The Barrens, this second book has a lot more traveling. We'll be visiting the Undead areas on the continent of the Eastern Kingdoms in the first chapter, Sepulcher 17-18. Then we'll return to the Barrens in chapter 2, Northern Barrens 18-20, and finish out the northern area, basically as a preparation for our trip to Stonetalon. Finally, we'll make the trip itself in the third chapter, Stonetalon Mountains 20-21.
If you're like Mackenzie, you have been working almost entirely on purple xp and you have been staying just barely ahead of the level requirements for expeditions. In order to change that situation we are going to travel to Silverpine Forest in the Undead lands, and complete similar leveled quests there. Since they start a little lower than our current level, these quests will be quick, but still offer us a substantial amount of xp.
However, if you have been able to accumulate a significant amount of rested xp between sessions, then you are likely to be far ahead of the suggested levels for each trip and this side trip may not be necessary. As another alternative, now would be a good time to complete an instance run of Ragefire Chasm, which will give you a nice chunk of experience if you complete all the quests there. For people who chose the latter options, simply skip down to where we return to the Barrens, and continue from there.
| Contents [hide] |
Sepulcher 17-18
We begin at the Crossroads, and should have our quest from Tonga Runetotem, Mura Runetotem(15). With this one and the one from Clarice in Thunder Bluff, Until Death Do Us Part (15), we are ready to begin our travels. We should be about level 17, at this point. At the start of this book, Mackenzie was level 17 + 12 bars, with no rested experience.
Travel to Undercity
Expedition 1
Begin by flying to Orgrimmar. Run out the front gates and turn to the left, heading east towards the sea. You will run past a farm on your right and will see a tower ahead of you, where the Zeppelin's dock. Run to the top and wait at the landing facing south. This zeppelin will take you to Undercity.
When you leave the zeppelin tower at Tirisfal Glades, you will discover the Ruins of Lorderon. Undercity, as the name implies, is physically underneath these ruins, and getting down to them is a bit of a maze. Enter through the front gates by turning right and then left again, and you will find yourself in a courtyard. Cross a bridge and there is another gate, navigated the same way – right and then left.
Down the hall, and you are in the Throne room, with the seal on the floor. Again two passages lead off on either side of the throne. Take the one on the right, and look for the opening on the left. This leads to the Tomb room. Again you will see two passages, each with Abominations guarding a doorway. The Abominations are city guards, whom you can ask for directions, and they guard elevators that lead down into the Undercity. Wait for the door to open and walk inside; but be ready to run off at the bottom, because they don't stay long.
At the bottom, follow the passage into the inner circle of the Trade Quarter. You will be on the upper level. At the south end of this ring, you will find the bat handler, who is the flight master for Undercity. Go there now and pick up that flightpath. At the north end of the ring, you find the Inn and the mailbox. This is a major city with all amenities so complete whatever business you may have here and then return to the surface and outside the gates of Lorderon.
The main road here heads east to the Plaguelands, but we want to follow it in the other direction, south west through Tirisfal Glades, a level 6-12 area. Our destination is The Sepulcher. Continue south on the road, and just after a wooden bridge, look for the road to the Sepulcher on the right. The flightmaster is near the Bat tree on the left as you enter the area.
End of First Trip
Within the Cemetary
Expedition 2
Let's begin by completing the quests that we brought with us. Walk through the metal gate of the cemetery and look to the left for a full length, raised tomb that will give you a gear when you mouse over it. Right click on it to continue and complete the quest Until Death Do Us Part. Looking up from the grave, you will see a crypt at the back of the area, which is actually the Inn. Standing to the left of the crypt is Mura Runetotem, waiting to complete the quest by that name. These two quests give us 1600 xp, just for showing up.
Looking around the cemetery, you may see many quests being offered. Most of these are too low for us, around 11, or 12. Instead, look for Shadow Priest Allister in front of a large gravestone with candles on it, near the Inn. From him, accept Border Crossings (14) and we'll be on our way.
Return to the main road and turn south. Just before the road to Ambermill, you will find one working green lamp post. At the lamp, turn right and look for a large fallen log, and some tents. This is where we find the crates. Work your way behind the camp, and approach from the hill side. These mobs are all casters, and they slow your movement and run away when their health is low. Try to draw them away from the tents one at a time. You shouldn't have to clear very many before you can reach the crate. Opening the crates gives you a second quest: Maps and Runes (14). Return with it to the Sepulcher.
Talk to Shadow Priest Allister to complete this quest, and he sends you to Dalar Dawnweaver, a purple guy a few steps away by the cottage, with the quest Dalar's Analysis (14). Dalar immediately sends you back to Allister with Dalaran's Intentions (14). Allistar's next quest is Ambermill Investigation(16) and this sends you again to the Dalaran mages, but don't leave just yet. End of Second Trip
Dead and Decrepit
Expedition 3
Our next quests are to the north. Go over to the crypt, which is also the inn, and run inside to the very bottom. There you will find High Executor Hadrec. Accept his quest, The Dead Fields(14). Back outside, return to the main road, and head north. Just across the bridge, you will see a barn and farm on your right. Past that, look for a faint road on the left that heads west into a field of bears and worgs. This road leads to the gnolls for The Dead Fields. While working in this area, look out for a level 23 elite Son of Arugal, and completely avoid him, running away if he engages.
The procedure for Dead Fields is to begin killing the gnolls. When enough have died, and Mackenzie only killed 4 or 5, the ghost lady Nightlash (14) will be summoned in the center of the field, and you must kill her as well. Loot her Essence and return to Sepulcher. Back in the Crypt, Hadrec completes the quest and gives you The Decrepit Ferry (16).
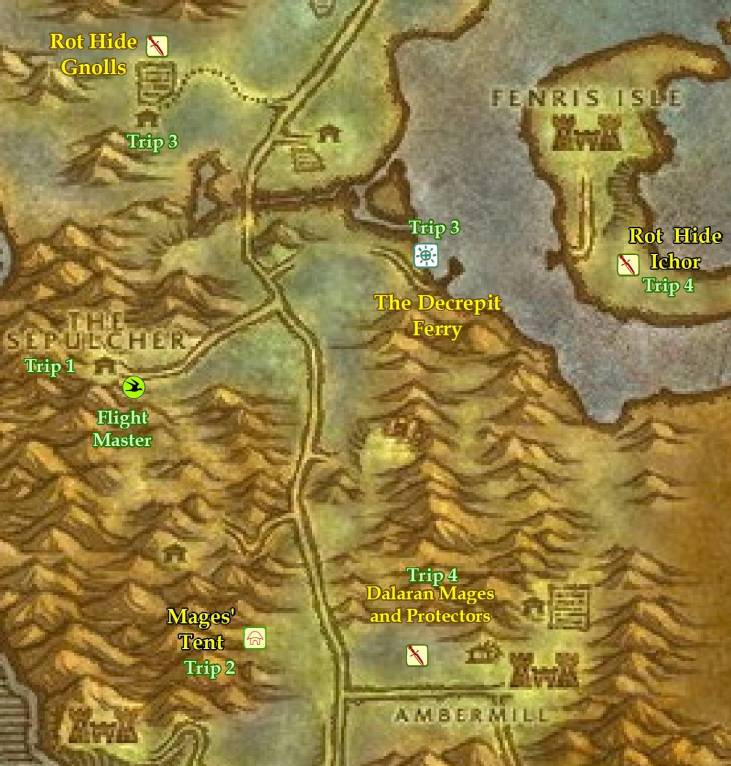
This will be a slightly more dangerous mission. From the Sepulcher, return to the road but instead of following, cross over it and continue on the other side until you come to the lake. You will need to clear several mobs as you make your way to the shore. As you approach the lake, look around for a dock. This is the Decrepit Ferry. Just to the north of the dock, on the grass you will find a Corpse Laden Boat. Clicking on the boat will give you the quest Rot Hide Clues (16). Return to the Sepulcher and speak to Hadrec about it. He gives you the next quest, Rot Hide Ichor (17). This has us go out to Fenris Isle itself.
High Executor Hadrec also has a second quest for us The Engraved Ring (16), a messenger quest to Brill and eventually Undercity. Be sure to accept that quest now, and we'll finish it when we head back to Undercity. End of Third Trip.
Ambermill
Expedition 4
First, we head back to find bottles of rot hide ichor over on Fenris Isle. Run back to the road again, and make your way to the Decrepit Ferry as before. This time, swim over to the dock you see on the far shore. When I first arrived, I was alarmed to see some level 18 gnolls among the rest, but I never found them to be very challenging. They are well spaced outside the keep and drop the ichor bottles regularly off both the brutes and the mages. They have two 4-min curses that they give you, but the debuff isn't worth worrying about. Don't bother going inside the keep as things are more densely packed and adds are more of a danger. Gather your 8 bottles of Ichor, leave the island, and return to the main road.
Our next quest is back to the south, where we need to complete Ambermill Investigation. Here, at last, a signpost clearly marks our destination. Travel south on the road and turn left at the sign to Ambermill and walk up the road toward the town. We don't need to get very close to town, however, to find Dalaran Mages, and Dalaran Protectors on either side of the road. Stay at this distance and hunt them to gather your Pendants. Mine dropped about every third kill. When you have all 8, return to Sepulcher and hand them over to Shadow Priest Allister. He has a follow up quest, but since it is level 22, we'll wait till later to accept it.
We also want to turn in our Rot Hide Ichor. The guy we give this to is outside the crypt on the right side (as you face it), Apothecary Renferrel. He checks out your ichor and gives you a quest to carry it to the Undercity, Rot Hide Origins (17). You also have a messenger quest to Brill, The Engraved Ring. With these two, we'll take the flight path back to Undercity. End of Fourth Trip
A Day in Undercity
Expedition 5
Our first stop is to the magic quarter. Cross the channel of green slime and find the skull building in the center of the magic quarter. Take the outside set of steps that lead up on top and find Bethor Iceshard directly behind the Skull. He will give us the next quest, Thule Ravenclaw (16), and ask us to return to Sepulcher. Before flying back, however, we need to go to Brill, a town in Tirisfal Glades. Find the elevators and exit the Undercity, and run to the Zeppelin Tower. Continue running directly north and you will enter the town of Brill. Look for the town hall with the clock tower, and inside you will find your man for The Engraved Ring.
The Magistrate sends you back to the capitol with Raleigh and the Undercity (16). Ask a guard for the Cooking trainer, and you will find him there. He has a further request, in the form of the quest, A Husband's Revenge (20). You don't need to accept this quest now, though we will come back this way later. For now, fly back to Sepulcher and turn in Thule to Apothecary Renferrel under his canopy outside the Crypt. He takes your message and then sends you inside the Crypt to talk to Hadrec with, Report to Hadrec(16). High Executor Hadrec responds with the quest, Assault on Fenris Isle (24+) which is both elite and level 24 so don't accept it now. End of Fifth Trip.
For now, our quests in the Sepulcher are finished. By the end of the last expedition, Mackenzie had turned level 19, so we earned a full level + 6 bars of purple xp during this chapter. We are now ready to return to our quests in the Barrens, a little better prepared for the tasks ahead. Fly to Undercity and take the Zeppelin back to Orgrimmar. The next chapter leaves from the Crossroads, so complete any business that you might have in the capitol and then fly to the Crossroads.
Northern Barrens 19-20
In this next chapter, we will return to the Barrens, to finish our work with the Goblins and the Harpies. Both of these quest lines have continuing quests that lead to Stonetalon. The objective is to reach level 20 before we leave for Stonetalon.
Mackenzie was level 19 + 4 bars, after our trip to Sepulcher.
The Sludge Fen
Expedition 1
Leaving from the Crossroads, run north along the Gold Road until you get to the very top of the zone. To the right of the road you will find a small house with Wenikee Boltbucket standing outside. Speak with her to complete the quest, and then accept the follow up, Nugget Slugs (15). These quest items are found in the Sludge Fen, which is located on the east side of the samophlange smokestack. A big structure is built in the center of a small lake, with Venture Co. workers positioned around it. Our task will be to find our way through these Venture Co mobs and look for small tool buckets near machinery to loot them for nugget slugs.
Approach the Fen from the north side, and you will see a Shredder down on a little clearing next to the water. Right click on the shredder to speak to the goblin inside, and he will ask you to get the key to the machine, Ignition (18). Work your way around the lake, or swim across looking for the rare sludge monster in the water. Kill your way onto the structure and on the main floor, or the one above it, you will find Supervisor Lugwizzle, who drops the key. Watch out for a rare spawn of the Engineer inside the shack on the second floor. He is a warlock and a tough fight. All along this area, you will find the tool buckets that will drop the nugget slugs you need for Wenikee's quest. Continue to search the structure until all your nuggets are collected.
With the key in hand, return to the shredder and complete the quest. The next in the series, The Escape(18) is an escort quest to follow the shredder around for a while, until it collapses. With you and the shredder both fighting, this is an easy quest, despite the level. At the end, the operator will direct you back to Ratchet for your reward.
Return to Wenikee with your nugget slugs and watch as she destroys the samophlange again. She will send you to Orgrimmar to speak with Rilli Greasygob (18). End of First Trip.
Harpies' Corner
Expedition 2
Before we leave this northern area, however, we need to visit the Harpies again. Across from Wenikee's house is a mountain range that follows the edge of the zone all the way to the Stonetalon Road. The second ridge leads to the top of the mountains, and there you will find the High Plateau, a highway of sorts that is free from any mobs or obstacles.
Several ridgelines run down at regular intervals, allowing you to get down to the Harpies without having to wade through a bunch of prowlers and striders. To find Harpy Lieutenant Rings, we'll need to fight Witchwing Slayers, which are back along the cliffs. The drop rate can be rather low, so expect to hunt for a while.
When your rings are complete, take the back way out, running the high plateau all the way south to near the western road without being troubled by any mobs. Return to Crossroads to complete this quest with Darsok at the top of the watchtower. Mackenzie: level 19 + 17 bars End of Second Trip.
Harpies Defeated
Expedition 3
Darsok has a follow up for the Harpy leader, Serena Bloodfeather (20). Because she is level 20, we should be at least level 19 to defeat this target. Although it is a long run, it's probably best to return now and finish this last assignment before we leave this area. Run back, taking the High Plateau if you wish. Serena's area is marked by two wicker cages and a large tree near the hills, both of which are visible from the plateau if you take that route. Clear her entourage and then Serena herself.
There is a wandering elite Harpy in this area called Sister Rathtalon, level 19. Also, a stealthed harpy ambusher makes a long patrol through Serena's area. It's possible to defeat either of these, if you pull them by themselves, although Rathtalon is tough as an elite. However, if they add while you're engaged with other harpies, or Serena herself, they could make things very difficult.
At the end of this fight you should be very near to level 20. If you are more that 2 bars away, this is a good place to stay and earn some xp. Leveling now will make a big difference when we hit the next chapter. When finished with the harpies, return to the Crossroads. Consider using the hearthstone to avoid the long run to town. Run to the top of the watchtower again to complete this final step in the series. Darsok now gives you a messenger quest to travel to Stonetalon Mountain, Letter to Jin'Zil (20) and that will be our next zone for adventuring. There are other quests left in the Barrens, though, so we will be back before long. During this trip, Mackenzie leveled to 20. End of Third Trip.
Expedition 4 We must now do a little travelling to tie up some loose ends. Start by flying to Ratchet, to turn in your Escape quest with Sputtervalve. In return, he will give you a quest to find Ziz Fizziks (20) in Stonetalon. If you have all the items for Chen's empty keg, turn that in now as well. The Brewmaster will offer a follow up, but this quest gives no experience as a reward. You gain nothing but reputation with Orgrimmar for its completion. I recommend that you ignore this one and move on.
Now fly to Orgrimmar, complete any available training, and do a couple of quest things while you're there. In the front room of Thrall's big meeting hall, speak to Zor Lonetree and pick up a quest to find Seereth Stonebreak called Spirits of Stonetalon (17). Also, complete your quest to visit Rilli Greasygob at the same time. He's in the Valley of Honor, which is reached through the gate to the north, about halfway through The Drag. Because we're now level 20, we definitely want to check the class trainer to pick up important skills available at that level.
Now fly to the Crossroads and prepare for your trip to Stonetalon. In your log, you should have four quests for Stonetalon: Spirits of Stonetalon, Deepmoss Spider Eggs, Ziz Fizziks, and Letter to Jin'Zil. With these four, we are ready to leave. Mackenzie is level 20 + 2 bars. End of Fourth Trip.
Stonetalon Mountains 20 - 21
With this trip, we say a temporary good bye to the Barrens and move on to a more advanced zone. This will be all new territory for us, so enjoy the feeling of discovery as you travel to Sunrock Retreat. Expedition 1 Leaving the Crossroads, run down the western road and you will come to Honor Stand, a Horde outpost. There are no quests at the watchtowers, but just down the hill, as you cross into Stonetalon, you will find two quest givers standing in a stone ruin. The orc is Seereth Stonebreak, and she will complete your quest Spirits of Stonetalon, and give you the next one: Goblin Invaders (19). Beside her, is the tauren Makaba Flathoof, with a quest of his own, Avenge My Village (18). Makaba's quest is in the hills just behind him, and we will complete that one first.
Run across the broad valley behind the pair, down a dirt path to the right, and into the ravine beyond. You may see a few evil tauren beside the trail, but when you come to a large totem pole beside a tent, leave the road to the right and harvest your needed ruffians and mercenaries for the quest. Then return to Makaba. He has a follow up quest, Kill Grundig Darkcloud(19) for the same area.
Run down the same path that you travelled before, down into the deserted village of Camp Aparaje, and up the other side of the valley. You will see a fallen log on your right, beside the path. At this log, turn right into a narrow valley and run to the totem pole at the end, clearing the mobs along the way. This path leads to Grundig's tent. Clear the area in front of the tent, and then pull Grundig himself.
After defeating him, check inside his tent to find Kaya and accept her escort quest, Rescue Kaya (19). Kaya walks down the same pathway that you just cleared, so the escort should be uneventful until the very end. She walks back to Camp Aparaje, and triggers an event when she gets to its center. As she is getting close, run ahead and fight the mob that is hiding behind the totem pole, because he will aggro during the final fight. This last event summons three mobs (one a caster) that will attack Kaya and quickly bring her down unless you can pull aggro onto y